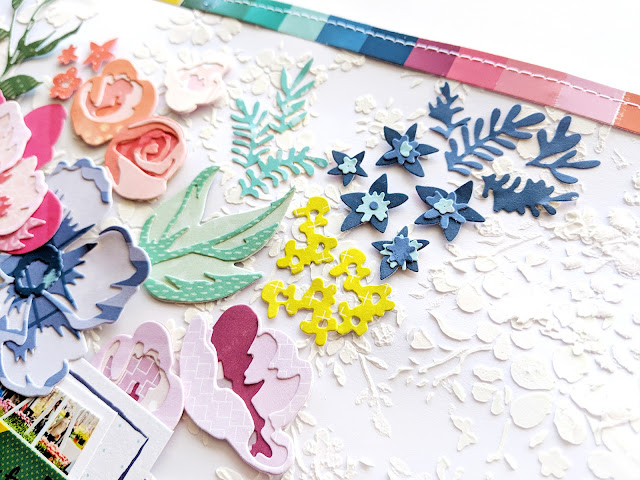
I created a layout for scrapbook.com's YouTube channel! This layout features lots of my favorite things: flowers, bright colors, and texture.
Here is the start-to-finish process video:
I started with a few Altenew metal dies: Spring Shower Cover Die, Fantasy Floral Die, Rose Flurries 3D, and Peony Dream 3D. They are Beautiful with a capital "B"! (I know some of these are out of stock but they will be back in a few days - click "notify me" to receive an email from scrapbook.com as soon as they've arrived!) Once I made one flower, I had to make many more. That's just what I do :) But first I needed patterned papers. I sorted through all 108 of my double-sided patterned papers (24 in PICK-ME-UP, 24 in TURN THE PAGE, 24 in OH MY HEART, 24 in TAKE ME AWAY, and 12 in FANCY FREE) and picked out alllll of the solid colors. I'm going to keep these in a separate pile and use them often whenever I need a rainbow of colors!
I started with a few Altenew metal dies: Spring Shower Cover Die, Fantasy Floral Die, Rose Flurries 3D, and Peony Dream 3D. They are Beautiful with a capital "B"! (I know some of these are out of stock but they will be back in a few days - click "notify me" to receive an email from scrapbook.com as soon as they've arrived!) Once I made one flower, I had to make many more. That's just what I do :) But first I needed patterned papers. I sorted through all 108 of my double-sided patterned papers (24 in PICK-ME-UP, 24 in TURN THE PAGE, 24 in OH MY HEART, 24 in TAKE ME AWAY, and 12 in FANCY FREE) and picked out alllll of the solid colors. I'm going to keep these in a separate pile and use them often whenever I need a rainbow of colors!
Each metal die flower uses 3-6 patterned papers, 1 for each layer. I used a Cricut Cuttlebug (alternatively, check out the WeRMemory Keepers Evolution or Sizzix Big Shot) to manually cut out each layer of each flower. I couldn't stop! But eventually I made about 12 layered flowers and a handful of single ones, along with leaves. For each flower I used monochromatic papers for a more realistic look.
Time to work on the background! I grabbed a piece of 12x12 smooth white cardstock and used the Floral Drape Stencil to scrape modeling paste over it on the top left corner. Then I came in with the 6x6 Bloom Stencil to add smaller flowers going from the bottom left to the top right corner. Later I added just a few more flowers in the gaps with the Mini Bloom Stencil. I LOVE the white-on-white textured look modeling paste with stencils adds!
Once the modeling paste dried I placed all of the patterned paper flowers and leaves on top and took a picture with my phone if I needed to refer back to it. I chose a photo of myself at the Keukenhof Tulip Festival in Holland and tucked it under the flowers. I added half of a floral Journaling Spot under the right edge of the photo and placed a "time for fun" Chipboard Sticker on top for the title. I added a purple frame sentiment from the Ephemera Die Cuts for a final layer. Underneath the photo I wrote journaling on another Journaling Spot with a .03 black precision pen and tore off the bottom edge.

At this point I felt like the layout was missing a little somethin' somethin'. I auditioned Pick-Me-Up patterned paper strips along the bottom edge, but none of them were looking quite right. Then I noticed the bright rainbow striped paper that comes inside the Mini Thickers packaging - it was perfect! I trimmed two thin strips, added them to the left and top edges, then stitched them in place with my sewing machine and white thread. All done!
I hope you are inspired to play with solid colored patterned papers and the beautiful Altenew metal dies to create gorgeous flowers!
SUPPLIES: B-side patterned papers: PICK-ME-UP, TURN THE PAGE, OH MY HEART, TAKE ME AWAY, FANCY FREE; PICK-ME-UP: Mini Thickers, Journaling Spots, Chipboard Stickers; ALTENEW: Floral Drape Stencil, Spring Shower Cover Die, Fantasy Floral Die, Rose Flurries 3D, Peony Dream 3D; KAISERCRAFT: 6x6 Bloom Stencil, Mini Bloom Stencil; Spray adhesive; precision pen; Manual die cut machine; modeling paste


Wowwwwwwwwwww! This is gorgeous! LOVING that subtle background with the bright flowers layered on top and loving that photo of you!!!!!!!!!
ReplyDeleteI love the texture that the modeling paste adds. I definitely want to scrap lift this layout. Thank you!!
ReplyDelete