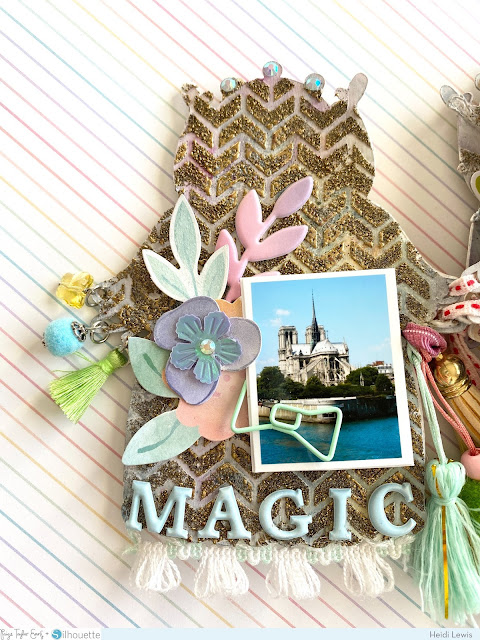
Hey there scrappy friends, Heidi K. Lewis here today sharing a heavenly little angel album made with Paige’s Bloom Street collection. The Angel cut file itself from Paige's 25 Days of Christmas Cut Files 2020 inspired me to document my photos of the Notre-Dame cathedral taken during a trip to Paris 10 years ago. The design of my mini album was influenced by this Mixed Media Album Tutorial by Paige. I followed a similar process, but created my own stencils with the following cut files: Angel, Chevron Background, Tiles Background, Petals Background, Rainbow Circles Background, Mandala Doily, Tile Stencil, Heart Confetti Background, and Sunburst Rays Background. A few of these are already actual Stencils by Paige which you can grab here.
To make the base pages, I resized the Angel to five inches and used the “contour” function in Cricut Design Space to turn the image into a basic outline, leaving three holes in each wing to use for my binding. I cut 10 angel outlines out of white cardstock to make a front and a back for each page. I could have made just five pages and applied mixed media to both sides of each page, but I was worried that the holes in the angel wings would rip over time without the reinforcement of a second piece of cardstock.
Once the angels were cut, one side of each angel got a quick coat of clear gesso to prep it for mixed media. Originally I was going to make my pages in rainbow colors, but my pictures of the detailed stonework on Notre-Dame inspired me to make the angels look as if they were made of aged stone. I accomplished a gritty stone look by using a combination of texture paste, chunky bronze embossing powder, and neutral-colored watercolors.
To begin the mixed media process, I applied modeling paste to each page through my custom stencils, which were each sized to 5.5 inches. Next, I dumped chunky gold embossing powder over the paste while it was still wet and set it with my embossing tool. Some pages have more texture paste and embossing powder than others making each page unique.
To finish the mixed media background, I applied Lindy’s Gang Magical Powder with a fan brush to each page and activated it with a water spray bottle. Since I wanted the pages to look like aged stone, I used mostly beige and gray powders including Martina’s Marigold, Steam Punk Sepia, Silent Night Silver, and Sea Grass Green. Even though I utilized neutral colors, each jar of Lindy’s Magical Powders has surprise colors and the little pops of pink, green, purple, and blue coordinate with the colors in the Bloom Street collection.
With the mixed media phase complete, I began placing my photos and embellishing the pages. All my photos were sized to 1.5 x 2 inches with my Canon photo printer app and printed at home with my Canon iX6820. Since all the base pages were made with similar colors, I chose my photo placement based on shapes. For example, a picture of a stained-glass window with circular and triangular shapes paired nicely with Petals Background, while a picture of a detailed arch paired cohesively with the Rainbow Circles Background. I used specialty paper clips throughout the album to hold extra pictures. The bow paper clips from the Embellishment Mix are my favorite item from Paige’s new Memory Explosion Box endcap at Michaels. The little bow ties went so perfectly with the church theme!
Once the photos were paired with pages, I began the embellishing process using the Floral Die Cuts, Puffy Vinyl Stickers, Enamel Dots, and Mixed Embellishments from the Bloom Street collection. Each page is embellished with intricate little details to reflect the elaborate style of the cathedral. I toned down the bright colors of the Floral Die Cuts with a coat of clear gesso and white acrylic paint applied with my finger. The Puffy Word Stickers and Puffy Vinyl Stickers were perfect for adding titles to each of the inner pages, while Floral Foam Thickers and Mini Foam Thickers finished off the title page. Like Paris, the style of the album is a mix of old (bronze background) and new (pastel florals).
The last phase of my mini album was assembling all the pages. I chose the order of my pages and then hot glued the backsides of two pages together. Pieces of pastel trim sandwiched between the pages add a sweet, feminine, French touch and provide another layer of detail and texture.
To finish the assembly, two pieces of thin pink ribbon were threaded through the top and middle loops of the angel wings on the left-hand side. Three charms (a butterfly, a pom pom, and a Tassel) were attached to each of the three loops on the right-hand side. A Bloom Street Tassel was tied to the front page of the album for a beautiful finishing touch. The fully assembled album is quite chunky!
Overall, I think this project shows how you can make something more muted with a really bright collection. It also demonstrates how a Christmas Cut File can be repurposed with a Bloom Street makeover. I hope this angel mini album inspires you to create something equally divine today!
SUPPLIES: Patterned papers, stickers; modeling paste; gesso; watercolors; white acrylic paint; white cardstock; Cut files: Angel, Chevron Background, Tiles Background, Petals Background, Rainbow Circles Background, Mandala Doily, Tile Stencil, Heart Confetti Background, and Sunburst Rays Background by Paige Evans


Post a Comment