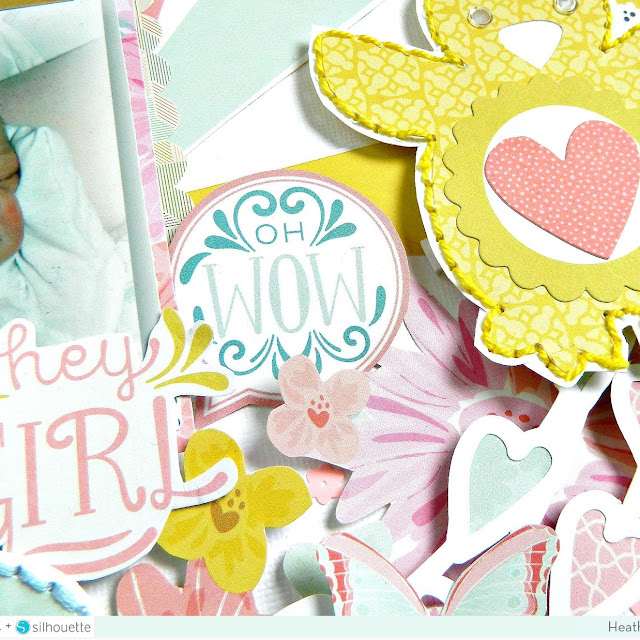
Hey Girl Layout by Heather Shank


Wednesday, January 31, 2018

Heather Shank is here today sharing her first official layout as part of my Silhouette Design Team!
I'm so excited to share my first layout for the Paige Evans + Silhouette Design Team! I used the Turn the Page collection and pulled out the gorgeous pinks, yellows, and mints for this pretty layout of my new granddaughter. 
 I used the Hearts Wreath cut file along with the Baby Animals cut file that I stitched and added foam to the back to add dimension.
  I hope you enjoy this layout and I will be back soon with another layout using the beautiful Pick-Me-Up collection!
Instagram: @crafts_by_heathers | Facebook: Heather Wilson Shank
There are so many details on this layout!! I could stare at it for hours!

Be Extraordinary Layout by Flóra Farkas


Tuesday, January 30, 2018

Today Flóra Farkas is here sharing a layout featuring lots of my favorite things: cut files, fussy cutting, and bright colors!
Hi friends, it’s Flóra back with a new layout! This time I documented a photo about myself and I used two of my favorite things: hearts and butterflies. First, I cut out the Jewel Heart cut file by Paige from white cardstock using my Silhouette Cameo then I placed it on the Pick-Me-Up Paper 16. Love this ombre paper with the tiny hearts, perfect for a background.
I added my photo with foam tape and started to embellish the page. Next to the photo I adhered the title using Chipboard ThickersEphemera Die Cuts, and Stickers. Under the "extraordinary" die cut I placed a flower sticker, as well as around my photo.

Once my title was done I gathered all the butterflies and moths from the Chipboard Stickers and Stickers sheets. These have gold foil which gives extra shine to my layout. Then I fussy cut more from the gorgeous Paper 14. This took quite some time, but the cutting was relaxing and the result was lovely. I scattered the moths around the heart. I added dimension to some with foam tape.

That's it for today! I hope you like my new page and I could inspire you to use the amazing Pick-Me-Up collection!

Blog: pinkandpapergift.blogspot.com Instagram: @floramfarkas Pinterest: @floramfarkas
Facebook: pinkandpapergift YouTube: Flora Monika Farkas

Gosh Flóra's pages are always so simply stunning!! I love her style :)

Frame Banner Hearts Layout by Bea Valint


Monday, January 29, 2018

I love every version of project I've seen using my frames cut files!! You just add a few photos and embellies and it's good to go! I even have one coming up in Paige's Pages 15 at Big Picture Classes next week! And of course I'm LOVING this layout by Bea Valint!
Hi everyone! I’m back with a new layout using Paige’s lovely Polaroid Frame Banner Hearts cut file. My idea was to create a big frame to my layout to mimic a real banner.
 To do this I created a frame using Paige’s Scalloped Border Background cut file, I just had to rotate and merge four lines. I cut the frame using my Silhouette Cameo 3 from Turn the Page patterned paper and backed it with light pink paper from the Oh My Heart.
 I used different patterned papers for adding colorful frames then I decorated the frames with puffy stickers and ephemera pieces.
I hope you love this layout as much as I do and check out the Polaroid Frame Banner Hearts cut file! I will be back soon to share projects made with Paige's new collection called Pick-Me-Up!
Blog: myshinystudio.blogspot.com / Instagram: @beavalint / Pinterest: @valint7 /
Facebook: myshinystudio / YouTube: Bea Valint

GGGGORGEOUS!! And perfectly fitting for upcoming Valentine's Day!

Free Spirit Layout by Missy Whidden


Friday, January 26, 2018

I am SO HAPPY that Missy Whidden took the time to back this Folk Art Flower cut file - it's exactly what I had envisioned when designing it!
Hey, friends! Missy here and I’m having a blast creating with Paige’s new Pick-Me-Up collection! It really is beautiful and pairing it with her cut files is even better. I used her Folk Art Flower cut file available in the Silhouette store. I knew right away I wanted it to flow across the page with my photo in the lower right corner. I cut the flower design on white cardstock using my Silhouette Cameo and then used various patterned papers from the collection to back the flowers, stems, and leaves. I wanted to add some watercolor behind the photo, so I smudged on some white gesso first. I also smudged some over parts of the flowers and leaves to add some variation and texture. I added a bit of matching ink sprays behind the photo using the packaging and splatter techniques. I also splattered across the page to add some subtle interest on the white space.
Here you can see where I added the gesso.  At first I wanted to make the flowers all one color, but there were just too many gorgeous colors in the papers to choose from.  I decided to use them all and I love how it turned out. I machine stitched around the three larger flowers with different colored thread and then I used white thread to stitch the flight paths of the butterflies. I used some of the Pick-Me-Up Mini Thickers for my title. I love the white tone-on-tone look with the smaller letters.

I used bits of Pick-Me-Up Paper 04 and Paper 07 as layers behind my photo. I layered in some of the floral Pick-Me-Up Chipboard Stickers and Stickers on and around the photo to enhance the flower theme. I did pop the photo up with some adhesive foam to create some depth and that made it easy to tuck in some pink thread for an extra pop of color.

This cut file is so pretty. Here you can see how detailed it is. This collection is perfect for backing it because the colors just really bring it to life. I didn’t want to take away from the design by adding a big title, so I went small. I also added in a Pick-Me-Up Sticker that says “born to fly” because she was flying high in her swing. I did a bit of messy machine stitching along some of the stems for added interest and texture.

I hope this gives you some more fun ideas to try on your next layout. You simply must pick up the Pick-Me-Up collection! It’s my favorite collection so far! Thank you for stopping by!

Blog: littlenuggetcreations.blogspot.com  Instagram: @missywhidden  Pinterest: @missywhidden
Facebook: missy.whidden  YouTube: Missy Whidden
GGGGGOOOOOORRRRRGGGGGGEEEEEEOOOOOOOUUUUUUUSSSSSSSS!!!

Creativation 2018


Thursday, January 25, 2018

Last weekend I flew to Creativation in Phoenix, Arizona to (wo)man the Pink Paislee booth and it was a total blast! YIPPEE!!
Bye bye rainy Seattle, hello warm and sunny Phoenix!
We flew right over the Grand Canyon - it was sooooo cool! I haven't been there since I was like 3 so I don't remember it at all.
I dropped my bags off at the hotel then ubered straight to the convention center. The booth was already set up! I just added a few layouts and projects here and there.
EEPS!! There she is!! The entire Pick-Me-Up collection! It was my first time seeing some of the products in person like the 2x2 Paper Pads12x12 Paper Pad6x6 Paper PadFloral Transparency Paper, and Cut Apart Vellum Paper. Love it all!
I brought along a couple of my coptic books and newer mini albums.
In the other corner of the booth the Wild Child and brand new Confetti Wishes collections adorned the walls.
Across the way was Amy Tangerine's cute table!
Heidi Swapp describing her collections and products to the sales team before opening day.
Maggie Holmes getting her gorgeous booth ready.
These girls!! Enza from the Pink Paislee Design Team also came down from Seattle, Lorilei Murphy from my Silhouette Design Team came all the way from Calgary Canada, and Missy Whidden from my Paige Evans Design Team flew across the country from Florida to attend their very first Creativation and help me out in the booth! Meeting Lor and Missy in real life was so surreal!! (I've met Enza twice before this and of course she's the sweetest thing in real life too - so lucky we live close to each other!). Love love love these girls.
On the first day the booth was filled with visitors from opening until close. We took selfies and then I printed pics right then and there from my instax. These people are the reason behind my love of this hobby - the friendships and connections and shared interests are so real and bonding!

Here are the custom paperclips I made as SWAG for anyone who dropped by for a visit!
I also finally got to meet Cassie, my sales rep! We have exchanged soooo many emails - I'm sure I've been quite a pain in the butt trying to get product for my classes in time over the last few years! She's a peach and so gorgeous! And of course Vicki Boutin - she is the happiest, sweetest, nicest, FUNNIEST thing in the world. I want to be like her when I grow up :)
Vicki, Heidi, Kimberly from Hip Kit Club, and me!
For dinner we went with a bunch of friends all the way out to Scottsdale but after running around in the cold and rain trying to find a nice restaurant that would seat all 11 of us, I suggested Shake Shack and it turned out to be even more than perfect! Left to right: Meghann Andrew, Shimelle, Missy Whidden, Lorilei Murphy, Vicki Boutin, Catherine Tachdjian, Nicole Nowosad, me, Aly Dosdall, Jennifer Gallacher. Seriously, such great friends and oh so talented!
Squeezing in with Amy Tangerine, Dear Lizzy, Jen Hadfield, and the gals from Kimidori Shop in Spain!
I didn't even get a chance to walk around the floor since I went home a day early and I hardly took any more pictures than what you see here! But I can say that it was an amazing 48 hours being surrounded by all things scrappy!
Already counting down the days until next year!

Butterfly Layout by Lorilei Murphy


Wednesday, January 24, 2018

Lorilei Murphy is here today sharing her first page made with Pick-Me-Up!
I’m so excited to share my very first layout with Pick-Me-Up! The colors are so rich and plentiful! I started by cutting the Butterfly cut file from white cardstock using my Silhouette Cameo and then going to town backing it with papers! 
I decided to go with the rich blues on top and plums and pinks on the bottom. I added some mixed media to my white background and added foam to the back of the butterfly to add dimension.
I wanted just a few embellishments and used the strip going down the edge of the page and the happy tab from Paper 01. The butterflies and moths are fussy cut from Paper 14. Love this collection!!
SUPPLIES: PICK-ME-UPPaper 01Paper 02Paper 03Paper 14Paper 15Paper 16Paper 17; Cut file: Butterfly by Paige Evans; Die cut machine: Silhouette Cameowhite cardstock
Blog: roseyposeystudio.com / Instagram: @roseyposey_studio / Pinterest: @roseyposeygirl /
Facebook: 
Rosey Posey Studio / YouTube: Lorilei Murphy

Beautiful beautiful beautiful! What more can I say?!

Hearts Layout by Stefanie Ried


Tuesday, January 23, 2018

Stefanie Ried has a new jaw-dropping layout to share with you today! Of course it's amazing and lovely and divine! 
I am very excited - my first layout with the enchanting new collection Pick-Me-Up! It is sooo beautiful and I would have liked to use all papers and stickers on my page! I started with a layout full of hearts. The new cut files from Paige have inspired me to do that. And Valentine's Da is not so far away either!
I used the Hearts Heart cut file for the many hearts. First, I removed the grouping and then selected individual hearts in different shapes. Then came the papers. I wanted to use many different colors and patterns.
I sewed the hearts individually using my sewing machine then bent up the edges to make a nice three dimensional effect. For the title I added a Chipboard Sticker.
Since I liked the many hearts and I had so much fun creating the layout, I will definitely make a mini with it. Many thanks for stopping by and see you next time :)   

Blog: steffiried.blogspot.com / Instagram: @steffiried / Pinterest: @steffiried / Facebook: stefanie.ried.96 YouTube: Steffi Ried
All you need is some hearts and a photo and you've got a layout made in no time!!

Love-Themed Cards by Zsoka Marko


Monday, January 22, 2018

Gasp! Swoon! Love these cards by Design Team member Zsoka Marko!

Hi there friends! Today I'm back with a couple of cards I've made for Paige Evans + Silhouette!
Since it's Valentine's Day soon, I thought I'd make something love-themed. Not specifically for Valentine's Day, but any occasion really where love is involved! I went with the beautiful Oh My Heart collection because I haven't used it in awhile! For the first card I've used the Hearts Wreath cut file. I scaled it down to fit on an A2 card and cut it twice in slightly different sizes from white cardstock using my Silhouette Cameo. One of them I backed with different patterned papers, the other one I just kept all white without any backing.
I made an A2 top folding card base from white cardstock and glued the B-side of Paper 22 on it. Then I adhered the larger wreath to a piece of the mint part of Paper 17 and fussy cut around it to have a solid panel that I then popped up with foam adhesive. I glued the smaller wreath on top of this too.
I picked out a sentiment from the Ephemera Die Cuts and adhered it to my wreath panel with foam adhesive. I had a couple of fussy cut flowers from Paper 06 left from a previous project - I tucked these behind the die cut and glued them down. To finish off my card I added a rose gold ampersand Chipboard Sticker.
I also made a coordinating envelope from patterned paper - I used the envelope from the Envelope Gift Mini Album cut file for this, I just sized it to a little larger than my A2 card and die cut it from Paper 02

For my second card I chose the Pie Chart Heart cut file. I backed the openings with several different pink patterned papers then I cut off the right side of the heart. Again, I made an A2 top folding card base and adhered the same size of patterned paper panel on it. I love Paper 17 and I haven't used it on any layout yet if you can believe it!
I used some foam adhesive to adhere the heart to my card base then I tucked some Ephemera Die Cut flowers as well as some fussy cut flowers from Paper 06 under the heart. I found the Hey Sugar heart donut piece in the Ephemera Die Cuts and I thought it would be perfect for a sentiment.
I wanted to add a little something to finish off my card and decided that the super adorable heart Charms would do the trick! I've been obsessed with eyelets again lately, so I added one to the die cut and hung the little charms from that hole. 
I created a coordinating envelope using the above mentioned cut file and Paper 24. This time I had to scale up quite a bit because the Hey Sugar piece hangs off the card base. That's it for today, I hope I could inspire you in some little way!

Blog: apocketfullofscrap.blogspot.com / Instagram: @zsokamarko / Facebook: Zsoka Marko / YouTube: Zsoka Marko
I love the dimension and all the details Zsoka included on her pair of cards - perfect to give to your honey!
Paige Taylor Evans © // Quinn Creatives DESIGN