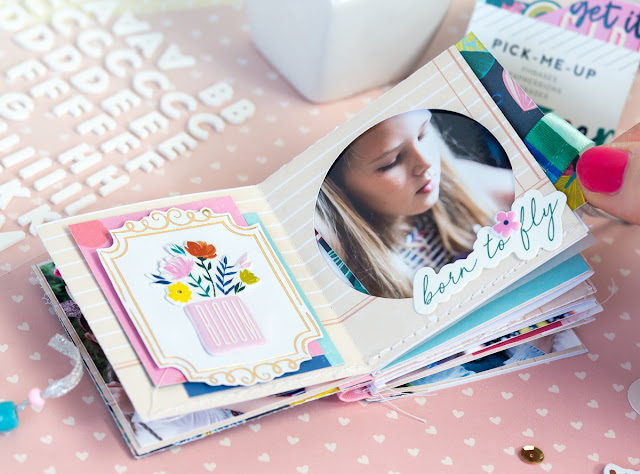
Mini albums are my jam and this new one by design team member Bea Valint gives me all the feels!
I think one-page mini albums are really fun and easy to put together. When I saw Paige new "1 piece of paper mini album cut file" it wasn’t a question that I had to create a mini album with it!

I started by choosing a light pink background paper from the Pick-Me-Up 12x12 Paper Pad, inserted 2 circles into the cut file ,and cut out the album from the paper. Then I folded the pages on the scored lines to finish the base of the album. To create pockets and interactive pages, I stitched together some pages.

Usually I create the cover at the end of the process, but this time I didn’t keep the regular order. I trimmed a blue patterned paper, spread sequins, and machine stitched tulle on top. The lovely day Sticker was the perfect title for my mini album. I adhered patterned paper to the back too and placed a piece of pink material between them as the spine. This was a super easy way to create a mini album base and then I could fill it with photos and pretty bits and pieces.

I wanted to keep my album airy and fresh, so I used light colors, a lot of vellum, rub-ons, and a few chipboard stickers and stickers from the Pick-Me-Up collection. I used them repetitively on my pages to create a cohesive look.

I love Paige’s beautiful heart cut files, I adhered the Heart Love cut file and the Geometric Heart cut file onto vellum to create transparent pages.

And here are some more photos of the mini album for you!
This mini album was so much fun to create! I hope I could inspire you to use Paige's "1 piece of paper mini album cut file" for your next mini album!
SUPPLIES: PICK-ME-UP: 12x12 Paper Pad, Ephemera Die Cuts, Chipboard Thickers, Chipboard Stickers, Rub-Ons, Haberdashery Multi-Pack, Mini Thickers; Cut files: 1 piece of paper mini album, Heart Love, and Geometric Heart by Paige Evans; Silhouette Cameo 3; white cardstock

Blog: myshinystudio.blogspot.com / Instagram: @beavalint / Pinterest: @valint7 /
Facebook: myshinystudio / YouTube: Bea Valint
I have the base for this mini album already cut and assembled, now I just need to add some photos and embellishments and hope it turns out half as pretty as Bea's! :)

I started by choosing a light pink background paper from the Pick-Me-Up 12x12 Paper Pad, inserted 2 circles into the cut file ,and cut out the album from the paper. Then I folded the pages on the scored lines to finish the base of the album. To create pockets and interactive pages, I stitched together some pages.

Usually I create the cover at the end of the process, but this time I didn’t keep the regular order. I trimmed a blue patterned paper, spread sequins, and machine stitched tulle on top. The lovely day Sticker was the perfect title for my mini album. I adhered patterned paper to the back too and placed a piece of pink material between them as the spine. This was a super easy way to create a mini album base and then I could fill it with photos and pretty bits and pieces.

I wanted to keep my album airy and fresh, so I used light colors, a lot of vellum, rub-ons, and a few chipboard stickers and stickers from the Pick-Me-Up collection. I used them repetitively on my pages to create a cohesive look.

I love Paige’s beautiful heart cut files, I adhered the Heart Love cut file and the Geometric Heart cut file onto vellum to create transparent pages.

And here are some more photos of the mini album for you!
This mini album was so much fun to create! I hope I could inspire you to use Paige's "1 piece of paper mini album cut file" for your next mini album!
SUPPLIES: PICK-ME-UP: 12x12 Paper Pad, Ephemera Die Cuts, Chipboard Thickers, Chipboard Stickers, Rub-Ons, Haberdashery Multi-Pack, Mini Thickers; Cut files: 1 piece of paper mini album, Heart Love, and Geometric Heart by Paige Evans; Silhouette Cameo 3; white cardstock

Blog: myshinystudio.blogspot.com / Instagram: @beavalint / Pinterest: @valint7 /
Facebook: myshinystudio / YouTube: Bea Valint
I have the base for this mini album already cut and assembled, now I just need to add some photos and embellishments and hope it turns out half as pretty as Bea's! :)


So beautiful! I love the Sequins Page.
ReplyDeleteThis is ABSOLUTELY gorgeous! LOVING the size!!!!
ReplyDelete