Today I'm delighted to share another gasp out loud layout by design team member Bea Valint!
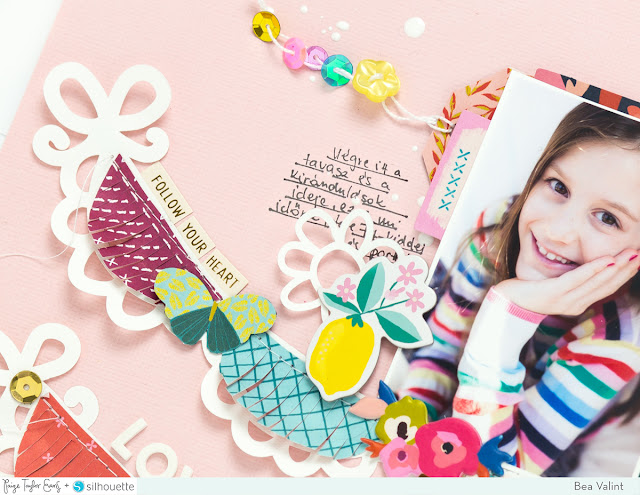
Hello ladies! I’m so excited to be back with a new layout using the awesome Pick-Me-Up collection! I always love playful fringe on my layouts and when I saw Paige's new Scalloped Banner cut file, I thought that it would be a fun idea to incorporate fringe.
I chose a pink cardstock for my background. I cut out the Scalloped Banner from white cardstock using my Silhouette Cameo 3, bent up the edges for dimension, and adhered the cut file the background.
I punched colorful half circles from Paper 10, cut fringes using fringe scissors, and arranged them on the scallops. Then I machine stitched through the tops of the banner lines. I placed my daughter's photo at the top of the cut file and layered a tag and Ephemera Die Cut frame behind. I also used Roller Stamp from the Take Me Away collection for more detail.

I placed my three title words at the top of the banner lines and used both the white Mini Thickers and the Chipboard Thickers as well as a word from the Chipboard Stickers. There are many beautiful butterflies and flowers in this collection and I placed some of them on the banner along with sequins from the Haberdashery Multi-Pack and Stickers.

This page was so much fun to create! I hope I could inspire you to add some pretty banners to your next layout!
SUPPLIES: PICK-ME-UP: Paper 10, Paper 14, Ephemera Die Cuts, Chipboard Thickers, Chipboard Stickers, Haberdashery Multi-Pack, Mini Thickers, Puffy Stickers, Stickers; TAKE ME AWAY: Roller Stamp; Cut file: Scalloped Banner by Paige Evans; Silhouette Cameo 3; white cardstock

Blog: myshinystudio.blogspot.com / Instagram: @beavalint / Pinterest: @valint7 /
Facebook: myshinystudio / YouTube: Bea Valint
I chose a pink cardstock for my background. I cut out the Scalloped Banner from white cardstock using my Silhouette Cameo 3, bent up the edges for dimension, and adhered the cut file the background.
I punched colorful half circles from Paper 10, cut fringes using fringe scissors, and arranged them on the scallops. Then I machine stitched through the tops of the banner lines. I placed my daughter's photo at the top of the cut file and layered a tag and Ephemera Die Cut frame behind. I also used Roller Stamp from the Take Me Away collection for more detail.

I placed my three title words at the top of the banner lines and used both the white Mini Thickers and the Chipboard Thickers as well as a word from the Chipboard Stickers. There are many beautiful butterflies and flowers in this collection and I placed some of them on the banner along with sequins from the Haberdashery Multi-Pack and Stickers.

This page was so much fun to create! I hope I could inspire you to add some pretty banners to your next layout!
SUPPLIES: PICK-ME-UP: Paper 10, Paper 14, Ephemera Die Cuts, Chipboard Thickers, Chipboard Stickers, Haberdashery Multi-Pack, Mini Thickers, Puffy Stickers, Stickers; TAKE ME AWAY: Roller Stamp; Cut file: Scalloped Banner by Paige Evans; Silhouette Cameo 3; white cardstock

Blog: myshinystudio.blogspot.com / Instagram: @beavalint / Pinterest: @valint7 /
Facebook: myshinystudio / YouTube: Bea Valint


Post a Comment