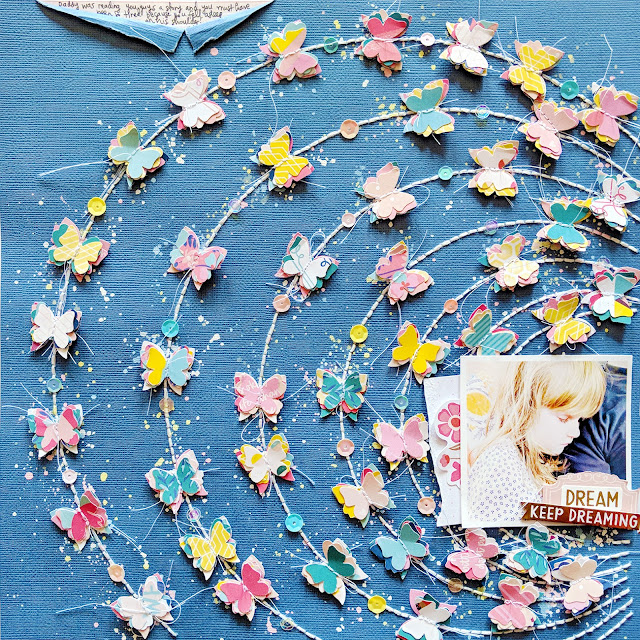
I picked out lots of the blues and aquas along with pops of pink and yellow from the moodboard - and birds have wings and fly so I used butterflies which also have wings and fly :)
First, check out how this layout was made from start-to-finish and all the mistakes between!
I began by making layered butterflies with a punch - it's by EK Success and has four different and small butterflies on it. I punched butterflies from all of the pink, blue, aqua, and yellow papers in my Pick-Me-Up collection. Then I layered the butterflies together, four per stack, and mixed all the colors and patterns together. Next I machine stitched through them, leaving the thread ends long. You know the drill: then I bent up the wings for lots of dimension!

I thought I would do some mixed media for the background, but it turned out to be too much. Instead I started fresh with a new piece of blue textured cardstock and used my Silhouette Cameo to draw concentric circles. I pierced holes about 1/4" apart through the circles and then hand stitched through using white embroidery floss. I came in with white acrylic paint and watercolors to jazz up the background and then glued the butterflies on top. Between the butterflies I attached sequins in coordinating colors.
To finish I tore the top left corner, backed it with the B-side of Paper 20, and journaled with a .03 black precision pen. Simple and sweet caption for this simple and sweet moment. Finished! Best of all, I still have some butterflies leftover to use on a future project.

Eri Wunderlich
Christina Buresch-Leyrer
Anke Kramer
Julia Schueler
Michelle Lagler
Ulli Dold
Birgit Krasenbrink
Steffi Ried
Ashley Horton
Zsoka Marko


You are always so inspiring!! LOVE the amazing stitching and details on this layout!
ReplyDeleteThis layout is stunning! Thanks for sharing the process video.
ReplyDeleteLove love love love this! LOVING those layered butterflies and the stitching!!! Just GORGEOUS!!!!!!!!!!!!!
ReplyDeleteLove love love love this! LOVING those layered butterflies and the stitching! Just GORGEOUS!!!!!
ReplyDelete