I was sent the Cobalt blue Cricut® Explore Air™2 found exclusively in JOANN stores!

What's new and awesome about this machine? Let me tell ya!
• It can cut and write up at the same time, up to 2X faster than previous Cricut Explore® models with this DIY speed machine!
• The Cricut Explore Air™2 cuts over 100 materials - everything from cardstock, vinyl, and iron-on to specialty materials like glitter paper, cork, and bonded fabric.
• From cards to custom T-shirts to home decor, Cricut® makes it easy to realize your creative vision.
• Design on the go on your laptop, iPad, or iPhone. Browse and play with thousands of images, fonts, and ready-to-make projects. Or create your own design from scratch.
• Upload and cut out your own artwork absolutely free. Upload files, and turn your masterpieces into home décor, cards, gifts, fashion, and more!
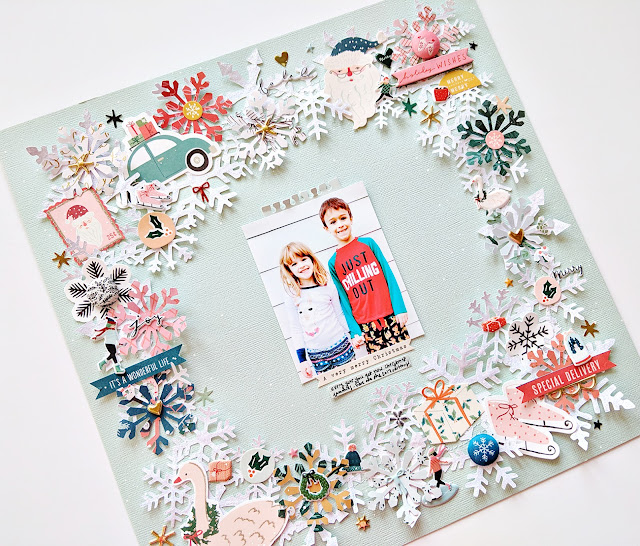
I've been designing cut files for just over a year now and I'm so excited to be able to create them for Cricut users too! I used my Snowflake Frame cut file (which you can find for free in my Happy Scrappy Place Facebook Group!) to create this layout and cut it out from white cardstock using my new Cobalt blue Cricut® Explore Air™2! I was sooo amazed at how quiet the Cricut was when cutting - it was actually quite a soothing sound lol!
Once the snowflake frame was finished cutting I carefully peeled it off the sticky mat. I found a mint green textured cardstock for the background and lightly adhered the snowflake frame on top. Then I used my sewing machine and stitched twice around the edges to attach the frame in place permanently. I bent and lifted up the snowflakes to give them lots of depth and dimension.
Then I used a snowflake punch to make a bunch of small snowflakes from Christmas themed papers which I then layered around the frame. Then I added all kinds of Christmas embellishments like chipboard stickers, puffy stickers, paper stickers, gold epoxy stickers, and die cuts to the snowflake frame.
In the center of the page I added a photo of Fox & Jane in their new Christmas jammies, placed a sentiment sticker below, and then journaled on a tiny piece of die cut. For an extra dash of sparkle I added glitter glue to all of the exposed spots of the snowflake frame.
Thanks to the help of my new Cricut® Explore Air™2 this layout came together so quickly! I'm so excited to learn about everything it can do!

Be sure to pick up the Cricut® Explore Air™2 in Cobalt exclusively at your JOANN store or online!
In the center of the page I added a photo of Fox & Jane in their new Christmas jammies, placed a sentiment sticker below, and then journaled on a tiny piece of die cut. For an extra dash of sparkle I added glitter glue to all of the exposed spots of the snowflake frame.
Thanks to the help of my new Cricut® Explore Air™2 this layout came together so quickly! I'm so excited to learn about everything it can do!

Be sure to pick up the Cricut® Explore Air™2 in Cobalt exclusively at your JOANN store or online!
This is a sponsored conversation written by me on behalf of JOANN & Cricut. The opinions and text are all mine.


That machine sounds wonderful!! I loveeeeeee that lo! LOVING that adorable photo and all the snowflakes!! GORGEOUS!!!!!!!
ReplyDelete