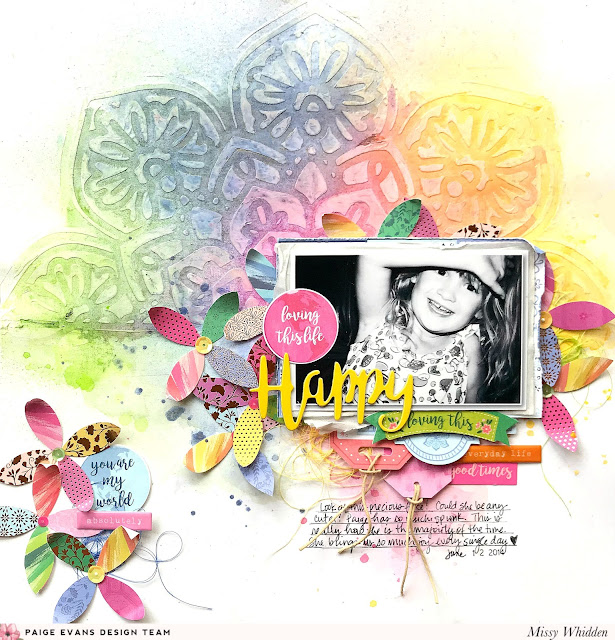
Hey, friends! Missy Whidden here with a new layout featuring the Horizon collection. One thing I love about Paige’s cut files is how they can also be used as stencils. I wanted to create a fun textured background, so I cut the Mandala Half cut file from white cardstock using my Silhouette Cameo 3. I used thick smooth white cardstock as my background and scraped white modeling paste over the stencil. I wanted the design to cover half the background. Once it dried I used lots of ink sprays to add a colorful watercolor effect. I love how the colors spread and blended in between all the hills and valleys of the paste. The paste itself absorbed some of the color and I just love the end result.
I cut some fun flower shapes from one of the foiled papers in the 6x8 Paper Pad and scattered them around the bottom of the page around the photo. They have so many colors and I thought they made a great embellishment. I used a few tags from the Ephemera Die Cuts under my photo and added a little bit of cord through the ends. I also tucked a few other die cuts under there as well. I went simple with the title and used one of the Chipboard Stickers which I placed on top of the photo. I also had a leftover circle from my last layout that I punched from Paper 11 and adhered to the photo. I love all of the dimension here. Creating layers makes instant dimension!

Here you can see how cool the background texture is. This really was easy to do even though it looks complicated. I decided to use a black & white photo to really let all the colors shine. I used a bit of Paper 21 as a layer behind my photo.

I created a matching cluster over to the left of the page using the same fussy cut flowers. I added some sequins from my stash to the centers. I finished this area off with another fussy cut circle, an Epoxy Sticker, and tangled thread.

I hope this inspires you to create your own stencil from one of Paige’s cut files. It’s so much fun to make your own backgrounds like this and stencils give you the opportunity to create some awesome textures! Be sure to check out my process video for even more details!
Thanks so much for stopping by, and have a great day!
I cut some fun flower shapes from one of the foiled papers in the 6x8 Paper Pad and scattered them around the bottom of the page around the photo. They have so many colors and I thought they made a great embellishment. I used a few tags from the Ephemera Die Cuts under my photo and added a little bit of cord through the ends. I also tucked a few other die cuts under there as well. I went simple with the title and used one of the Chipboard Stickers which I placed on top of the photo. I also had a leftover circle from my last layout that I punched from Paper 11 and adhered to the photo. I love all of the dimension here. Creating layers makes instant dimension!

Here you can see how cool the background texture is. This really was easy to do even though it looks complicated. I decided to use a black & white photo to really let all the colors shine. I used a bit of Paper 21 as a layer behind my photo.

I created a matching cluster over to the left of the page using the same fussy cut flowers. I added some sequins from my stash to the centers. I finished this area off with another fussy cut circle, an Epoxy Sticker, and tangled thread.

I hope this inspires you to create your own stencil from one of Paige’s cut files. It’s so much fun to make your own backgrounds like this and stencils give you the opportunity to create some awesome textures! Be sure to check out my process video for even more details!
Thanks so much for stopping by, and have a great day!
SUPPLIES: HORIZON: 6x8 Paper Pad, Ephemera Die Cuts, Chipboard Stickers, Epoxy Stickers, Stickers, Paper 11, Paper 21; white cardstock; gesso; modeling paste; inks; Die cut machine: Silhouette Cameo 3; Cut file: Mandala Half by Paige Evans
Blog: littlenuggetcreations.blogspot.com Instagram: @missywhidden Pinterest: @missywhidden
Facebook: missy.whidden YouTube: Missy Whidden
Facebook: missy.whidden YouTube: Missy Whidden


This is stunning!! LOVING those colors!!! So bright and happy!!!!
ReplyDelete