Good morning, everyone. My name is Nicole Martel and I live in Maryland. You can find me on my blog at www.nicolemartel.blogspot.com or on Instagram as @nicolemartel1978. I am beyond thrilled to be guest designing for Paige this month using her cut files! I feel guilty that my Silhouette Portrait has been sitting on my desk for awhile now, untouched... This year, I am working on changing that!
For my first layout, I used Paige's Horizon collection along with the Heart Confetti Background cut file. I set the Silhouette Portrait up so it would print the hearts on half of the white cardstock. I did not want a full page. Less work for me to pluck those tiny hearts out. :)
Once I was satisfied with the placement of embellishments, I mounted them down and then I added a few puffy hearts from the Epoxy Stickers within the hearts to make them stand out more.
For my next project, I created a mini album using photos from my sister's baby shower in June. She's having a baby boy and I couldn't be more excited!! I used pieces from the Heart Confetti Background cut file and the Layered Butterfly cut file to create this adorable mini album.
I used mostly Tags for the album pages, but ran out so I had to get creative... I used the tags to trace around the patterned papers to create a template then punched a hole at the top using my hole punch.
I used a few of the butterflies throughout the mini. I LOVE butterflies so I had to use them. To decorate the mini album, I used lots of Stickers, Epoxy Stickers, and Ephemera Die Cuts. I used several foam squares to pop them off the pages.
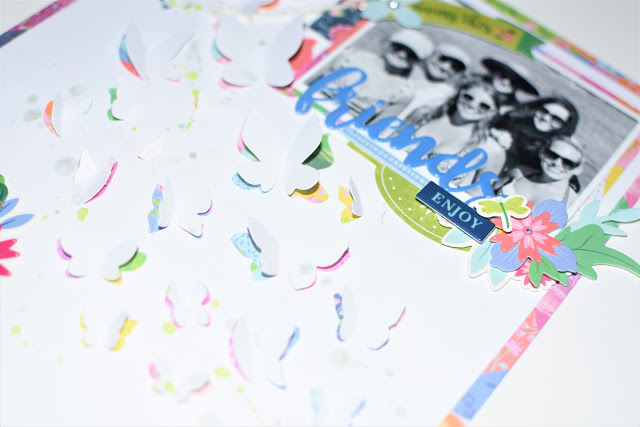
I used the Cut and Fold Butterfly cut file to create a fun, whimsical layout! I love butterflies and I love how this looks. I splattered watercolor paint all over the butterflies across the page to add a bit of color. To complete the layout, I layered several embellishments from the Horizon collection. Love how bright and pretty this collection is! It's perfect for scrapbooking those special times with your friends and love ones.
Initially, I was worried that the butterflies wouldn't leave me with enough space for the photo and embellishments, but it actually helped me create this fun design! I decided to work around the butterflies to make it work for me.
I used the circle stamp from the Acrylic Stamps to create a border of half circles across the bottom of the page. I'm not sure why I felt the need to add some black, but I like it!
I used a few hearts from the first layout to create a card. To begin, I used the floral circle stamp from the Horizon Acrylic Stamps and stamped it on the hearts then layered them together using a foam square. I put those aside then stamped several circles on a 3x4" card (white cardstock) to create a fun background. Then I covered the bottom corner using a variety of Floral Die Cuts, trimming the edges so the flowers did not hang over the edges of the card. To complete the card, I mounted the layered heart to the center of the card.
I cut the "hello" sentiment from the Horizon Tags to pull the card together. I think it adds a nice touch.
Thank you for visiting today! I hope I inspired you to use your digital cutting machine if you haven't done so in awhile. You just might surprise yourself! It's definitely a great way to kick your mojo up a notch!


Wowwwwwwwww! These are all AMAZING! LOVING the colors!! So bright and happy!!!!!
ReplyDeleteOmgosh Nicole ! You are a crafting ninja ! Layout, Mini-album and cards ?! Loved it all, Bravo !!
ReplyDelete