Pregnancy Banner by Nidia Rubio


Saturday, November 30, 2019

Hi friends! It's Nidia Rubio from Scrapamundi and I'm here today sharing you a very special project: my pregnancy garland made with the Truly Grateful collection! It is a project to decorate my daughter's bedroom. Before I was pregnant I had seen many pregnancy garlands, but not a scrapbook pregnancy garland so I had to try it!
First of all, I collected my favorite pregnancy photographs and I started to combine them with the beautiful papers from Truly Grateful. I printed some black & white and some color photos to mix them in the garland.


I used the same method for every pennant: two pieces from different papers in two sizes, a photograph, and some embellishments.

The numbers are from the Paige Font cut file and I cut four of each number and layered them together to create chipboard-thick numbers.

Other cut files I used to decorate this garland were the Pie Chart Heart and Love Heart.

And, of course, I used some embellishments from Truly Grateful like sequins and wood veneer from the Mixed EmbellishmentsCardstock Stickers, and Ephemera Die Cuts. I set an eyelet through the top corner of each pennant and strung them onto twine to complete the banner.

I hope you like my idea. Also, it's perfect for a gift :)

Thank you for stopping by, see you next time!

SUPPLIES: Patterned papers, embellishments, stickers, sequins, wood veneer, die cuts: TRULY GRATEFUL; Die cut machine: Silhouette Cameo 3; Cut files: Paige FontPie Chart Heart, and Love Heart by Paige Evans
Location: Spain/ Blog: Scrapamundi / Instagram: @scrapamundi Facebook: Scrapamundi
YouTube: Scrapamundi / Pinterest: Scrapamundi

Layered Mini Album by Stefanie Ried


Friday, November 29, 2019

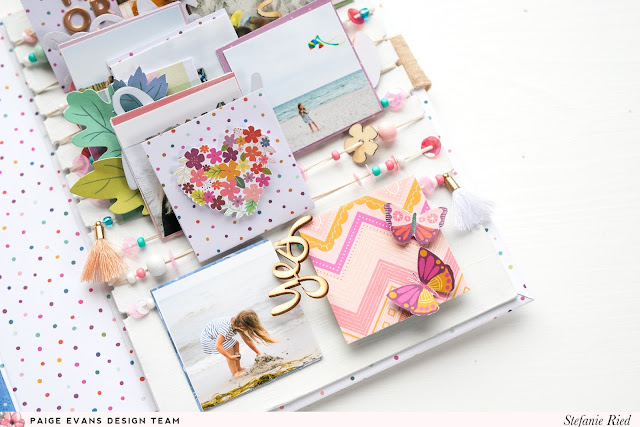
Hello everyone! Stefanie Ried here and welcome to a new project! In the last weeks I had hardly any time to scrapbook because we are currently building a house. But soon we will be finished so that we can slowly unpack the boxes. I was very HAPPY when I sat at my table again and could finally be creative again. Yay!
In the summer I had an idea to make a mini album with yarn and little square pages. When I have an idea, I often write it down so I don't forget it. The ideas then go into a box and wait for the right photos and collections. I gathered my supplies and got to work.

The 2x2 Paper Pads from the Truly Grateful collection were perfect for this mini album. A yarn is wrapped around a stable cardboard. The yarn is decorated with sequins, wood veneer, and beads. I cut 2 x 4 long paper strips and fold them in the middle. These are hung on the yarn. Always rotating and offset so it looks even more interesting. Finally it is decorated with photos, words, stickers, etc. It is a lot of fun.

Here are lots more photos from the album:
The album is suitable for many occasions and memories. I will create a few albums for Christmas. Thank you very much for stopping by!

SUPPLIES: Patterned papers, stickers, sequins, die cuts, wood veneer, Thickers, embellishments, buttons: TRULY GRATEFUL
Blog: steffiried.blogspot.com / Instagram: @steffiried / Pinterest: @steffiried / Facebook: stefanie.ried.96 YouTube: Steffi Ried

Wonder Layout


Thursday, November 28, 2019

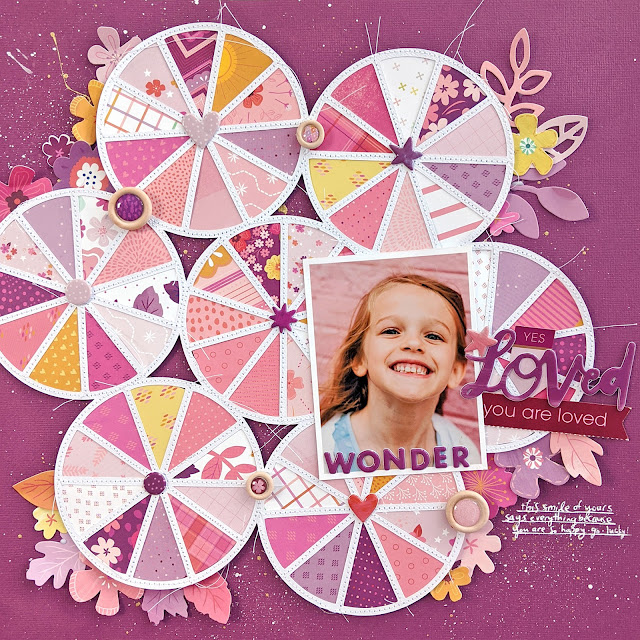
I'm back with another just-for-fun layout using my Pie Circles Background cut file and Truly Grateful collection!
Here is a process video so you can see how this layout came together:

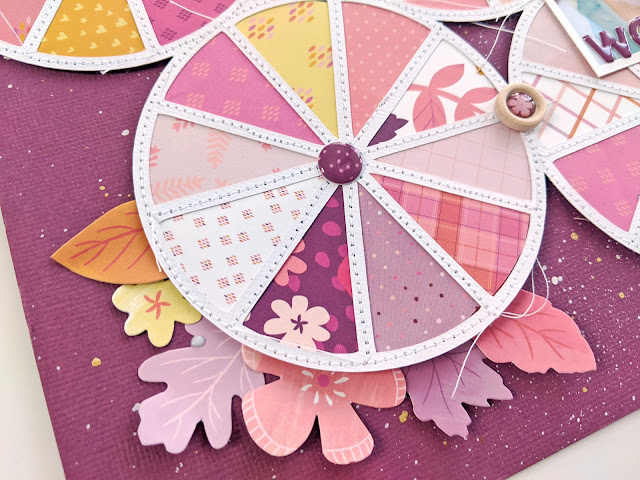
I started by cutting my Pie Circles Background cut file from white cardstock using a Silhouette Cameo 3. Then I went through Truly Grateful and pulled out all of the papers with pink, purple, and a few yellow/oranges for a little pop of brightness. I traced one of the inner wedges of one of the pie circles and used it as a template to hand cut 70 slices.

I quickly placed all of the wedges on top of the cut file to see how I wanted to arrange them then carefully took them all off in the same order. I used spray adhesive across the back of the cut file and then placed the backing pieces in the same arrangement. Turning the complete cut file over is such a fun WOW moment!

Next, I spent some time machine stitching through the cut file for lots of interest and texture. I used a Brother sewing machine and white Coats & Clark thread with a basic running stitch. It took about 2.5 minutes to stitch each pie circle, so about 20 minutes to stitch the entire design. Totally worth it! Slow and steady wins the race :)

I had a heated debate with myself about which color of cardstock to use for the background and ultimately I turned to instagram stories for input. My gut wanted to use a light purple background, but the majority of votes were for this darker purple background so I decided to please the people and give 'em what they want lol. I actually really like how it turned out so I'm glad I pushed myself to use this darker color of purple to help the backed cut file colors POP.

To jazz up the background a bit I splashed liquid gold paint across it along with Pastel Dreams & Tropicals watercolors in colors matching Truly Grateful, topped with a smattering of watered down white acrylic paint splashed with a paint brush as well as a toothbrush for a fine mist.

Once the background dried I adhered the cut file on top with dimensional adhesive and added the photo. I adhered the cut file slightly off-center and trimmed off the little piece of excess on the left edge. Time for embellishing! I placed "WONDER" purple Puffy Phrase Stickers across the bottom of the photo and a "Loved" Epoxy Sticker on the right side with a "you are loved" tag from a Journaling Spot below. I tucked a "YES" tab also from the Journaling Spots into the title arrangement.
On the center of each circle I added an Epoxy Sticker, keeping with the monochromatic pink/purple color scheme. Between a few of the circles I added a Wooden Button. I opened up a fresh pack of Floral Die Cuts, grabbed all the pink, purple, yellow, and orange flowers and leaves then tucked them underneath the cut file in a few clusters. I glued them in place and then bent up the petals and leaves for dimension. To finish I wrote journaling with a white pen under the title.

I hope this layout inspires you to use my Pie Circles Background cut file with Truly Grateful! See you again soon!

SUPPLIES: Patterned papers, stickers, wooden buttons, die cuts, embellishments: TRULY GRATEFUL; Sewing machine: Brother; Thread: Coats & Clark; Printer: Canon Pro-100white acrylic paintliquid gold paint; Watercolors: Pastel Dreams & Tropicals by Prima; white cardstock; Die cut machine: Silhouette Cameo 3; Cut file: Pie Circles Background by Paige Evans

December Planner Dashboard by Mik Godinho


Wednesday, November 27, 2019

Hi friends! It’s Mik here from Papermiks here with a new blog entry. Today I’m here to show you a new planner dashboard which I made using the cut files from Paige's cut files and Horizon collection.
Some of you know that I live in Bolivia and here we are almost entering the summer, whereas in the northern hemisphere winter is approaching. That's why I wanted to mix these two seasons on this dashboard. Here you’ll find two Paige’s cut files: December and Poinsettia Nordic Background. I started by die cutting the Poinsettia Nordic Background from white cardstock and trimmed it to 8 1/4 x 6 1/8" size to make the background. Then I cut the December from white cardstock, watercolored over it, and backed it with vellum.

I added hand stitching to the Poinsettia Nordic Background. To bring summer to my dashboard I used the Ephemera Die Cuts, Floral Die Cuts, and Epoxy Stickers from Horizon. To finish, I used a paper from 6x8 Paper Pad and glued it behind the white cardstock to create a continued page with an "adventure" sticker at the bottom.

That’s it! Hope you liked it! Thanks for stopping by and have a creative day!

SUPPLIES: Patterned papers, stickers, die cuts: HORIZONwhite cardstockwatercolors; Die cut machine: Silhouette Cameo 3; Cut files: December and Poinsettia Nordic Background by Paige Evans
Location: Bolivia / Instagram: @papermiks / Facebook: mik.godinho.papermiks 

Happy Birthday Layout by Maija Männistö


Tuesday, November 26, 2019

Hi everyone, Maija Männistö here with a never before seen topic on my layout made with Truly Grateful! Today, November 26th, is the 40th birthday of my husband so I thought this would be the perfect chance to make a layout with a photo of just him! Luckily Paige has plenty of cut files to fit the birthday theme, so I chose the Banner cut file and the Happy Birthday cut file.
For the background I took one of the papers from the 12x12 Paper Pad and added a little bit of mixed media onto it for extra texture. I used white gesso first to make the paint like texture and then used Paige’s Star stencil to create white stars to match the ones on the paper with white modeling paste. To finish off the background I splashed white acrylic paint. For the banners I wanted to add several different patterned papers so I used different papers again from the 12x12 Paper Pad. For some texture and a finishing touch I stitched around the banners with white embroidery floss. It really makes the banners pop, even literally as the thread makes the paper thicker.

For the title of the page I used the Happy Birthday cut file and backed it with a paper from the 12x12 Paper Pad. I used one color for each letter and I love how this turned out! For embellishments I took pieces here and there from the Truly Grateful collection. The Ephemera Die Cuts are my favorites of the embellishments and for this layout I chose some birds, a leaf wreath, and a phrase die cut. From the Cardstock Stickers I chose leaves and stars and from the Epoxy Stickers some hearts and another bird. I couldn’t resist adding a 40 on to the layout and luckily the Thickers had the numbers in perfect colors!

Thank you so much for stopping by today!

SUPPLIES: Patterned paper, embellishments, die cuts, stickers: TRULY GRATEFULwhite cardstockgessowhite acrylic paint; Star stencil: Paige Evans; Die cut machine: Silhouette Cameo 3; Cut files: Banner and Happy Birthday by Paige Evans
Location: Finland / Blog: Mai Makings / Instagram: @maimakings / YouTube: Mai Makings / Pinterest: Mai Loves

Three Cut File Cards by Lilly Sanchez


Monday, November 25, 2019

Hey guys, Lilly Sanchez here, welcome back to the blog. Hope everyone is doing great and is ready to bring in the holidays with lots of fun and joy! Today I have some fun cards to share with you that I made using the Truly Grateful collection and Paige's cut files.
You already know I love making cards so today I am sharing three special ones with you. With a little stitching, some fun cut files, and a cute collection, you can make super cute cards. To create mine I used three of Paige's cut filesTriangle Christmas TreeScalloped Circles Background, a Layered Butterfly, and Circles Wreath.

My first card, which is my favorite in this trio, is the one with the Triangle Christmas Tree cut file which I turned in to a shaker with gold sequins and pink stitching. I layered it on top of three different papers from the collection, each popped up with foam tape and a white cardstock base for the card itself. The papers I used for the background are the 12x12 Specialty PaperPaper 03, and Paper 09. For added texture I used some of the Epoxy Stickers.

For this second card I used a white cardstock base and matted it with Paper 23. I did stitching around the card for fun texture then started to add my layers. My first layer was one ring from the Scalloped Circles Background, which I also turned into a shaker with a pretty mix I found in my stash and stitched all the way around to close it up. I then used a fun leaf wreath from the Ephemera Die Cuts to add on top. I finished with a couple Layered Butterflies. For final decorations I used Puffy Stickers and sentiments from the Cardstock Stickers.

The third card is simple but still oh so cute. I also used a white cardstock base and matted it with Paper 18. I did stitching on the border and for decoration on this card I used the Circles Wreath and Layered Butterfly cut files and Ephemera Die Cuts. And that's it! I hope you enjoyed the post and make some cards of your own. See you next time! Stay crafty friends!

SUPPLIES: Patterned papers, die cuts, stickers, embellishments: TRULY GRATEFUL; Die cut machine: Silhouette Cameo 3; Cut files: Triangle Christmas TreeScalloped Circles BackgroundLayered Butterfly, and Circles Wreath by Paige Evans
Location: New Jersey, USA / Instagram: @craftingwithliller / Facebook: Crafting with Liller
YouTube: Crafting with Liller / Pinterest: Crafting with Liller

Mini Envelopes Layout


Sunday, November 24, 2019

I've been making a lot of mini albums lately and am now itching to get back to traditional 12x12 layouts! I made this layout just for fun using Truly Grateful and my Mini Envelope cut file.
Here is a process video so you can see how this layout came together from start-to-finish:

I started by die cutting a mini envelope from all 24 patterned papers in Truly Grateful using my Silhouette Cameo 3. To add interest, texture, and detail, I machine stitched around the envelope edges (before assembling them) using a Brother sewing machine, white thread by Coats & Clark, and a basic running stitch. To complete the envelopes I added super sticky 1/8" double-sided tape to the edges of the bottom flap and folded each envelope up.

For the background I chose the salmony-pink polka dot B-side of Paper 01 and did a little mixed media: I splashed watered down white acrylic paint across the background and created a few larger drops by pinching the paintbrush bristles. Then I came in with Pastel Dreams & Tropicals watercolors and splashed coordinating colors on top.

While the background was drying I searched my computer for photos to use and found a trio of pictures of cute Janey girl. I used one of the photos twice to make (4) 1.5" square photos and trimmed them out leaving a white border for contrast. Here is my tutorial for creating small photos. With four photos and four letters in her name, I added Thickers to spell JANE.

I stuck all of the envelopes in place in somewhat rainbow order and tucked the photos into four of them cascading down the page. Time for embellishing! I used all kinds of bits from Truly Grateful and decorated each envelope with things Jane loves from birds and butterflies to flowers and hearts. I used a smattering of Cardstock StickersPuffy StickersEpoxy StickersEphemera Die Cuts, and Wooden Buttons.

For the journaling I found two little Journaling Spots, wrote on them with a black pen, and tucked them into the envelopes. I love this interactive element! It won't be legible inside a page protector but can easily be pulled out to read.

All-in-all this layout came together in just a couple hours! I hope it inspires you to pick up my Truly Grateful collection and Mini Envelope cut file!

Thanks for stopping by and I'll see you again soon!

SUPPLIES: Patterned papers, stickers, buttons, die cuts, Thickers, embellishments: TRULY GRATEFUL; Cut file: Mini Envelope by Paige Evans; Die cut machine: Silhouette Cameo 3white acrylic paint; Watercolors: Pastel Dreams & Tropicals by Prima; Sewing machine: Brother; Thread:  Coats & Clark
Paige Taylor Evans © // Quinn Creatives DESIGN