Spring Bloom Layout by Anita Bownds


Saturday, February 29, 2020

Hi there crafty friends, Anita Bownds here sharing my first layout using the beautiful Bloom Street collection! I’m so in love with all the patterns and beautiful colors. I really love all the flowers in our garden full of color in spring. So for my layout today I decided to use the color tones to match my photo.
I started off by cutting the Butterfly Heart cut file out on white cardstock using my Silhouette Cameo and then backing it with a paper from the 12x12 Paper Pad. Then I machine stitched around the edges of the white cardstock to add texture. Next I matted my photo on papers from the 6x8 Paper Pad and added it in the middle of the butterfly heart.
Then using two more papers from the 12x12 Paper Pad I used my Silhouette Cameo to cut out Layered Flowers and Leaves in two colors and layered them together. I added a rhinestone from the Mixed Embellishments in the centers. One one of the flowers I added a tiny bow made with a paper from the 6x8 Paper Pad.
Next, using three green papers from the 6x8 Paper Pad, I cut out all the leaves using the Layered Flower and Leaves cut files and then started tucking them in around the flowers. I then add my title using Puffy Vinyl Stickers on the side and underneath my photo then added a few stickers to the top of my photo using the 4-Page Sticker Book. I finished it off with the beautiful Layered Butterfly Stickers and a small touch of glitter around the edges of the flowers.
I hope you enjoyed my spring inspiration!

SUPPLIES: Patterned papers, stickers, die cuts, embellishments, jewels: BLOOM STREET; Cut files: Butterfly Heart and Layered Flowers and Leaves by Paige Evans

Location: Australia / Blog: Neat-N-Crafty / Instagram: @anitabownds / Facebook: Anita Bownds
YouTube: Anita B / Pinterest: Anita Bownds

Hello Happiness Layout by Missy Whidden


Friday, February 28, 2020

Hello again friends! Missy Whidden here with a new layout featuring Paige’s Bloom Street collection. I’ve been eyeing the beautiful diamond shapes from Paper 10 so I decided to cut some out and create a design with them. I arranged them in a horizontal fashion in rainbow order and added matching watercolors behind them. For the most part I went tone-on-tone with the embellishments and I love how it turned out!
I used smooth White Foundations Media Paper as my background and I first coated it with clear gesso. I used coordinating colors of Distress Oxides to add the color. I just scraped the ink pads onto the paper and then spritzed it with water. I used a brush to help the colors blend and spread. I used Shimmerz sprays to add ink splatters. I sorted through the Bloom Street products and used some of the shapes from the Puffy Vinyl Stickers, floral stickers from the 4-Page Sticker Book, and some Cardstock Stickers. I used black & white photos so all the rainbow colors would really pop off the page. I added a bit of white tissue paper behind my photos for a subtle border.

I machine stitched through all the diamonds for added texture and I popped them all up using adhesive foam. I love this big sunshine sticker from the Cardstock Stickers. It was perfect for the yellow section of the layout. To add even more color and texture, I tucked in matching colors of tangled thread around the page. I used more flowers from the 4-Page Sticker Book and a few hearts from the Puffy Vinyl Stickers and Cardstock Stickers. I also added a few words from one of the Washi Tape rolls.

I love these soft blue colors. I added more the same elements here including leaves from the Floral Die Cuts and then added my title down below. I used two word stickers from the Cardstock Stickers. Lastly, I wrote my journaling using a black fine-tip Sharpie.

I can’t wait to see what you all make with the new Bloom Street collection! It’s so beautiful. I hope this layout gives you some ideas to try with it. The rainbow color scheme is something you can easily do with this line because it has ALL the gorgeous colors! Thanks for stopping by!

SUPPLIES: Patterned papers, stickers, die cuts, washi tape, embellishments: BLOOM STREETgessoWhite Foundations Media PaperDistress Oxides
Blog: littlenuggetcreations.blogspot.com // Instagram: @missywhidden // Pinterest: @missywhidden
Facebook: missy.whidden // YouTube: Missy Whidden

Familia Mini Album by Nidia Rubio


Thursday, February 27, 2020

Hi friends! It's Nidia Rubio from Scrapamundi and I just wanted to share with you my newest mini album. This is a gift for friends. They don't have an album to keep their family photographs in so they need it but they don't know it! I created the whole album, the structure, pages, and decoration, and everything is full of Paige's touches. Also, I used her beautiful Truly Grateful collection because I wanted to create a very fun project, full of color. On the cover I used the Flower Borders cut file with colorful Thickers for the title between.
This mini album has a very simple ring-binding. I chose this method to mix different types and sizes of pages, even an envelope like this. I used the Envelope cut file and added two hidden magnets to close it.

I mixed different collections to decorate the pages: Truly GratefulHorizon, and Oh My Heart. It is amazing how they mix so well.

For this page I used the Clouds Background cut file. I think it looks so beautiful over the next page with all of those stars.

I leave you here with some more photographs of more pages! This page features the Banner with Leaves cut file.

Here I used the Flower Wreath cut file.

And this page uses the Balloons cut file.

I'm showing you the whole mini album on my YouTube channel:

Thank you for stopping by. See you next time!

SUPPLIES: Patterned paper: TRULY GRATEFULFloral Die CutsHORIZON; Die cuts: Oh My Heartwhite cardstock; Die cut machine: Silhouette Cameo 3; Cut files: Flower BordersEnvelopeClouds BackgroundBanner with LeavesFlower Wreath, and Balloons by Paige Evans
Location: Spain/ Blog: Scrapamundi / Instagram: @scrapamundi Facebook: Scrapamundi
YouTube: Scrapamundi / Pinterest: Scrapamundi

Bloom Street MemoryDex Cards


Wednesday, February 26, 2020

Continuing with this progressive project - I've created the next set of three cards for my Pink Paislee MemoryDex using Bloom Street!


This rolled flower ampersand card is one of my most favorite things ever :) It's a miniature version of the rolled flower ampersand I created for my Spring Decor class at Big Picture Classes from many years ago. I die cut my Rolled Flower Cut Files from Paper 07 - 36 flowers, each sized to under 2" to fit in the 36 squares of patterns so they're itty bitty! I also cut about a dozen more mini flowers from other Bloom Street papers. This little card is just over 4" tall. Very fiddly to make but soooo worth it! For the base I folded a piece of Paper 14 in half then used the official MemoryDex punch to add the notches at the bottom to fit inside the box.

For this second card I folded a piece of the Specialty Floral Transparency Paper in half, tried to use the punch but it was too thick so I just used scissors, and then machine stitched around three of the sides. I poured in the sequins from the Mixed Embellishments and then finished sewing it closed to create a fun shaker pocket! I attached an eyelet to the top right corner then tied on a Tassel along with one of the Flower Charms. The layered paperclip is the one piece of SWAG that I kept from the 68 I made to give away at Creativation 2020 so I thought this was a fun place to keep it displayed. I printed the Bloom Street logo and tucked it under the clip along with a photo of me. I layered Floral Die Cuts under the photo and added a heart border sticker from the 4-Page Sticker Book. To finish this card I added a few jewels from the Mixed Embellishments for sparkle and shine!

The last card is an envelope cut file that I cut from Paper 23 and then machine stitched around all the flaps. I layered Ephemera Die Cuts, stickers from the 4-Page Sticker Book, a colorful "bloom street" title made with the Puffy Word Stickers, a heart from the Puffy Vinyl StickersLayered Butterfly Sticker, and a couple Floral Die Cuts. The more layers the better!

In the envelope I tucked journaling cards from the Ephemera Die Cuts on which I added photos, the stamped date Bloom Street was released, and the blurb explaining what this collection is all about!

Here is a photo of all of my MemoryDex cards with all 9 of my Pink Paislee collections, three cards for each collection:
They all fit nicely in this box and sit atop my cabinet as a fun memento to my collections! Let me know if you have any questions, thanks for stopping by!


SUPPLIES: Patterned paper, floral transparency, stickers, die cuts, sequins, jewels: BLOOM STREET; Cut files: Rolled Flowers by Paige Evans, envelope by Lori WhitlockMemoryDex punch

Planner Spread by Mik Godinho


Tuesday, February 25, 2020

Hi friends! It’s Mik here from Papermiks here with a new blog entry! Today I’m here to show you how I decorated my week using Paige’s cut files, and 30-page Paige Evans #StickerBook.
Every Sunday take a moment to decorate my week. This is my moment to have fun and to de-stress before starting the week. I believe it is so important to take some time to do it. It doesn't have to be a chore, but chill time. Do you have a designated time to plan?

On these pages, I started by cutting the Love Heart cut file from Horizon Paper 09 and the Heart Scissors cut file from white cardstock on my Silhouette Cameo.

Then I started sticking the cut files in the center of the page. After this I had fun with the 30-page Paige Evans #StickerBook. I love how the mix of cut files and stickers look!

I hope you got some inspiration from this idea and enjoyed it! Thanks for stopping by and have a creative day!

SUPPLIES: Patterned paper: HORIZON; white cardstock; Stickers: 30-page Paige Evans #StickerBook; Die cut machine: Silhouette Cameo; Cut files: Love Heart and Heart Scissors by Paige Evans
Location: Bolivia / Instagram: @papermiks / Facebook: mik.godinho.papermiks 

Love Layout by Maija Männistö


Monday, February 24, 2020

Hi there! Maija Männistö here to share some love with the Truly Grateful collection! I wanted to create a unique stitched embellishment for my layout so I used Paige's Sketch & Stitch Love Heart cut file.
I used pink and white ombre thread for the stitching to make it really pop! After stitching I fussy cut the shape to make an embellishment. Before mounting it onto the paper I created a watercolor background with Pastel Dreams. I made the background two-toned similar to the stitching. I used foam tape to adhere the shape onto the page, giving it dimension and allowing me to place the flowers slightly under the big shape.

I used the Layered Flower and Leaves cut file to create the gorgeous dimensional flowers. I chose a different patterned paper for each layer of the flower so that I could get lots of colors onto the page. I bent the edges of each piece just a little bit to get more dimension into the flowers.

For finishing touches I backed the photo with patterned papers and of course added my favorite detail: banners! I also used one of the Journaling Spots for the backing as it had the perfect word for my layout. Next to each flower I put two tiny enamel hearts from the Mixed Embellishments, a small but meaningful detail.

Thank you so much for stopping by today, have a great and crafty day!

SUPPLIES: Patterned papers, stickers, embellishments, die cuts: TRULY GRATEFULwhite cardstockPastel Dreams watercolors; Die cut machine: Silhouette Cameo; Cut files: Sketch & Stitch Love Heart and Layered Flower and Leaves by Paige Evans
Location: Finland / Blog: Mai Makings / Instagram: @maimakings / YouTube: Mai Makings / Pinterest: Mai Loves

One Little Word Bible Page by Paula Fiihr


Saturday, February 22, 2020

Hello friends! Paula Fiihr here and I am so excited to be sharing my first blog post with you! My one little word this year is GROW, and what better way to document it than in my Bible?!
After choosing the verse and gathering supplies from Paige’s Horizon line, I chose the Flower Trio and the Daisy Border Background cut files as the focal point of my page. I cut them using Paper 10 and backed them with Paper 03 and Paper 09. On my page I added watercolors for a bit of color before I highlighted the verse.
I decided the flowers needed some texture so I added French knots onto each. I used Floral Die Cuts with a foam dot to fill in the bottom of the page a bit. The word "always" finished it up and came from the Cardstock Stickers in Truly Grateful. Across the top I sewed the daisy chain onto a strip from Paper 09 and attached some shapes with scrap paper as well as a few leaves from the Floral Die Cuts. The words are a combo of handwriting and sticker letters.
I love making pockets and tags, so I thought I would do both with this page! I sewed the Envelope Rounded made with Paper 02 before gluing it onto a tag made with Paper 09. I added a couple journaling cards from the Ephemera Die Cuts to jot a few thoughts down and tucked them into the envelope. A bit of floss and ribbon finishes off the tag - it looks so cute sticking out of my Bible!
Thanks for stopping by and I hope this inspired you to journal your one little word!

SUPPLIES: Patterned papers, die cuts: HORIZON; Die cut machine: Cricut; Cut files: Flower TrioDaisy Border Background, and Envelope Rounded by Paige Evans
Location: Texas, USA / Instagram: @psplannergirl / Pinterest: pfiihr / Facebook: Paula Fiihr

Sunshine Moments Layout by Stefanie Ried


Friday, February 21, 2020

Hello everyone! Stefanie Ried here with a new layout. My daughter's birthday is in February so we're both busy planning the decorations for her party. It's going to be a rainbow and unicorn party. Just a typical girl, hahaha :) I've seen some pretty colorful wall decorations. These inspired me to create the colored curtain layout for today.
First I chose all colored papers and two cardstocks. I wanted to make a similar color combination as her invitations. I cut the papers in different lengths and widths so the curtain gets more dimension. I really like that. The photo should be rather bright in colour and should go along the whole length of the curtain.

I cut the fringes with my paper trimmer. It was the best and quickest way. First I wanted to cut it with scissors, but with the long fringes it went better with the trimmer.

Thanks for looking! I hope you are inspired!

SUPPLIES: Patterned papers, stickers, embellishments: TRULY GRATEFULwhite cardstock; Printer: Canon Pro-100; Photo paper: Canon
Blog: steffiried.blogspot.com / Instagram: @steffiried / Pinterest: @steffiried / Facebook: stefanie.ried.96 YouTube: Steffi Ried

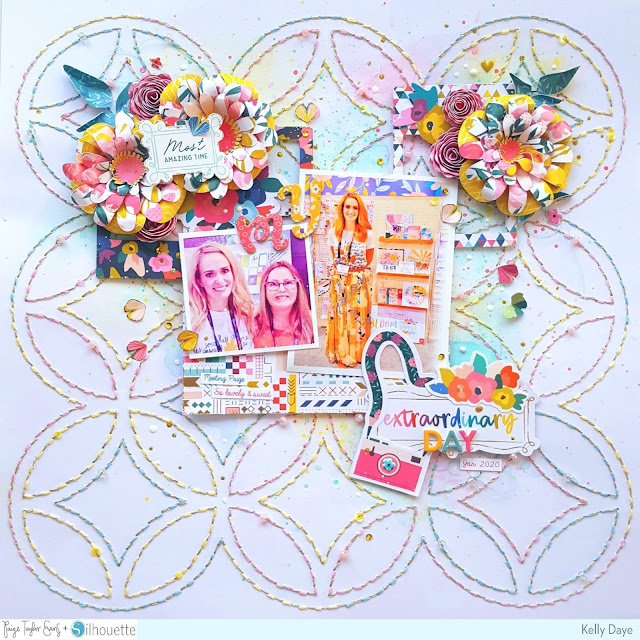
My Extraordinary Day Layout by Kelly Daye


Thursday, February 20, 2020

Hello friends, it’s Kelly Daye here, fresh from Creativation 2020 and meeting Paige! So of course that’s what I’m scrapping about today. It’s a new layout using Paige’s colourful Pick-Me-Up collection. It’s from a bit ago but I still love working with it. I actually won the Puffy Stickers at Paige’s Happy Scrappy Place Facebook Group and was keen to use them on this layout.
I started my design with the Sketch & Stitch Geometric Background cut file. If you haven’t already, do watch this tutorial video where Paige shows you how to set up your Cameo to use these fabulous files. Once my Silhouette Cameo 3 was done, I added Pastel Dreams watercolors. I adore how you can layer watercolours to make many shades of the same colour.
Once dry, I used all six strands of DMC embroidery floss and a simple running stitch in three pastel colours - pink, blue, and yellow to hand stitch the entire background. I alternated colours in each section and around the outside too. For a little extra pretty, I added seed beads to the stitching here and there as I went along. Then, because I’m slightly mad, I stitched the entire layout again, using a running stitch in the alternate spaces with gold metallic thread. Wow, it’s really pretty with that bit of glam added in. So totally worth it.

Finally, embellishments and photos. Sticking with my triangular design, I added three frames from the Pick-Me-Up Ephemera Pack to the background. The largest one holds my photos while the others support a couple of floral vignettes. I used three of Paige’s cut files to make the flowers from Paper 07 and Paper 23. The larger flowers are a combo of Layered Flower and Leaves with the Layered Flower cut files. Using the McGill Paper Blossoms tool kit to bend and shape the petals in place adds a lot of dimension. If you love making flowers, you’ll really find the set handy. The smaller pink roses are made with the wordy pink side of Paper 17 and Paige’s Rolled Flower cut file. It’s super easy when using a quilling tool to roll them. I also added flowers from the Ephemera Pack to fill in the vignettes.

Below the photos I made a third vignette with a cute camera and banner from the Ephemera Pack. ‘DAY' is spelled with the Foam Mini Thickers from the Whimsical collection. It’s awesome when you can mix collections together so perfectly, don’t you think? Finally, I finished it off with the usual dabs of gold Prima paint, gold Stickles, and a few very tiny moths that I fussy cut from a page in the 6x6 Paper Pad. So, I thought was was finished, but decided to use Missy Whidden’s (she so awesome) messy thread technique in a couple of spots and splatter with white paint. There, now I was happy!

Hope you found a couple of things to try on your own gorgeous designs!

SUPPLIES: Patterned paper, Ephemera and Puffy Stickers; PICK-ME-UP; Mini Foam Thickers; WHIMSICALPastel Dreams watercolors; McGill Paper Blossoms tool kit; white cardstock; Die cut machine: Silhouette Cameo 3; Cut files: Sketch & Stitch Geometric BackgroundLayered Flower and LeavesLayered Flower, and Rolled Flower Paige Evans
 Location: Edmonton, Canada / Blog: Kelly Made It / Instagram: @kellymadeit / Facebook: Petals Daye / Pinterest: Kelly Made It

Sunshine & Happiness Layout


Wednesday, February 19, 2020

I have a new layout to share with you today using my new Bloom Street collection! Do you recognize that lovely lady next to me? That's the one and only Vicki Boutin!
Check out the process video to see how this layout came together from start-to-finish (I didn't show doing the PixScan part, but I do have a separate tutorial for that HERE).

I started by having my Silhouette Cameo 3 cut out all of the flowers from Paper 23 using the PixScan mat. SUCH A TIME SAVER! Can you imagine cutting out all of these teeny tiny flowers by hand? It can totally be done, but technology makes it so much quicker and easier :)

I did just a little mixed media on the background by splashing watered down white acrylic paint with a toothbrush where I knew the photo would go, on the top left side. I also machine stitched wonky circles using white thread all around where the photo would go, but pretty much all of it got covered up with flowers, and that's okay!


I used Photoshop to print a round photo, cut it out, then adhered it over the paint and stitching. I quickly placed all of the flowers around the photo to make sure I was liking the direction this was going, decided I did, and started gluing the flowers in place, starting with the inner most layer and working my way out. Once the glue dried, I bent up the flower petals and leaves to create texture and dimension.


For the title, I used "Sunshine" and "Happiness" words from the Cardstock Stickers with an ampersand Puffy Vinyl Sticker between. Underneath I layered a white flower border sticker from the 4-Page Sticker Book, a scalloped border punched from the barcode strip of the same Paper 02, and machine stitched through those two pieces. I wrote journaling with a blue pen below the scalloped border.


To finish, I added a smattering of Butterfly Stickers emerging from the floral wreath and placed two leaf Puffy Vinyl Stickers above and below the ampersand.


I hope this layout inspires you to pick up my new Bloom Street collection and scrap your precious memories! Thanks for stopping by, see you again soon!


SUPPLIES: Patterned papers, stickers, die cuts: BLOOM STREETwhite acrylic paintsewing machinewhite thread; Silhouette Cameo 3
Paige Taylor Evans © // Quinn Creatives DESIGN