
I have a new layout made with Bloom Street created for the Pink Paislee blog showing how to create a custom patterned background using a single stamp and the scrapbook.com complete ink bundle.


Check out the process video to see how this page came together from start-to-finish:
I started with one of the butterflies in the Acrylic Stamps and used a rainbow of colors from the scrapbook.com complete ink bundle to stamp dozens of butterflies starting from the bottom left corner and going up to the top right corner on a sheet of smooth white cardstock.

I added a photo of Jane to the bottom right side using foam squares to pop it off the page and create dimension since the background is super flat. Then I added a smattering of different kinds of butterflies, tone-on-tone, over the stamped butterflies. I used a combination of Puffy Vinyl Stickers, Cardstock Stickers, butterflies from the 4-Page Sticker Book, Ephemera Die Cuts, and the Layered Butterfly Stickers.
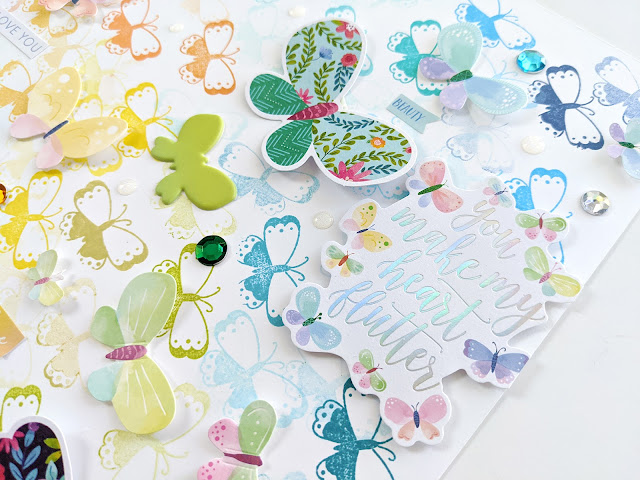 I grabbed a few of the colored jewels from the Mixed Embellishments and white Enamel Dots and sprinkled them into the background. The title is a Cardstock Sticker surrounded by butterflies that says "you make my heart flutter" which I added it to the top right side. There was a little bit hanging off the edge so I trimmed it off with a pair of scissors.

I wrote journaling on a ticket from the Ephemera Die Cuts, added it overlapping the right side of the photo, and tucked a floral butterfly sticker strip from the 4-Page Sticker Book underneath. I placed a few sentiment stickers tone-on-tone in the empty spaces which I grabbed from the Cardstock Stickers and 4-Page Sticker Book.

This layout came together quickly by focusing on one element: butterflies!

I hope this page inspires you to pick up my new Bloom Street collection and try creating a colorful custom background using stamps and a rainbow of inks. Thanks so much for stopping by and I'll see you again soon!

SUPPLIES: Stamp, stickers, die cuts, jewels, enamel dots, embellishments: BLOOM STREET; Inks: scrapbook.com complete ink bundle; Printer: Canon Pro-100; Canon photo paper
I started with one of the butterflies in the Acrylic Stamps and used a rainbow of colors from the scrapbook.com complete ink bundle to stamp dozens of butterflies starting from the bottom left corner and going up to the top right corner on a sheet of smooth white cardstock.

I added a photo of Jane to the bottom right side using foam squares to pop it off the page and create dimension since the background is super flat. Then I added a smattering of different kinds of butterflies, tone-on-tone, over the stamped butterflies. I used a combination of Puffy Vinyl Stickers, Cardstock Stickers, butterflies from the 4-Page Sticker Book, Ephemera Die Cuts, and the Layered Butterfly Stickers.


I wrote journaling on a ticket from the Ephemera Die Cuts, added it overlapping the right side of the photo, and tucked a floral butterfly sticker strip from the 4-Page Sticker Book underneath. I placed a few sentiment stickers tone-on-tone in the empty spaces which I grabbed from the Cardstock Stickers and 4-Page Sticker Book.

This layout came together quickly by focusing on one element: butterflies!

I hope this page inspires you to pick up my new Bloom Street collection and try creating a colorful custom background using stamps and a rainbow of inks. Thanks so much for stopping by and I'll see you again soon!

SUPPLIES: Stamp, stickers, die cuts, jewels, enamel dots, embellishments: BLOOM STREET; Inks: scrapbook.com complete ink bundle; Printer: Canon Pro-100; Canon photo paper


SO GORGEOUS!!!!! Loving how you mixed the stamping butterflies with the paper butterflies!! And LOVING the rainbowed colors!! And of course, that ADORABLE photo of Miss Jane!! :)
ReplyDeleteA half hour layout is epic and look how gorgeous !! I've eyeballed that ink set by Scrapbook.com too. While I have two drawers of ink pads, It's so tempting when they're all co-ordinated and rainbowlicious. I'm so glad there are stamps with Bloom Street. I love the images and they stamp really nicely. xK
ReplyDelete