Back to School Art Spread by Paula Fiihr


Monday, August 31, 2020

Hello friends! Paula Fiihr here today to share my back to school layout in my art journal. Paige has so many cute cut files to choose from and I decided to use this Back to School cut file for my spread.
I absolutely love the colors from her Truly Grateful line and it fits with fall so I used Paper 12 for the file. Because I wanted to make it span across two pages, I cut it in between the words "to" and "school". It fit so nicely that way. The books and letters were all backed with scraps from Truly Grateful as well. That’s why I keep every piece for projects just like this that need tiny pieces! The apple card was perfect for my date stamp.

I wanted to make two pockets so I fit Journaling Cards into the books and backed those spaces with vellum paper. Makes it easier to pull the cards in and out. I carefully glued down the sections that weren’t pockets and then had fun decorating with Puffy Stickers, Cardstock Stickers, and Wooden Buttons. I pulled out some cute chipboard stickers from the Whimsical collection to go with my school theme. On the journaling cards I added pics and both handwritten and typed journaling. I tucked a tag into the pocket as well. A few hexi shapes cut from Paper 21 and sewed are on the right side of my layout. The washi is from Paige’s Horizon line. Then I painted some acrylic paint globs as a finishing touch.

I will always have such amazing memories from our homeschool years and this layout which includes pics from throughout those years makes me so happy!

SUPPLIES: Patterned papers, stickers, die cuts: TRULY GRATEFUL; Die cut machine: Cricut; Cut file: Back to School by Paige Evans
Location: Texas, USA / Instagram: @psplannergirl / Pinterest: pfiihr / Facebook: Paula Fiihr

Right Now Layout by Shimelle


Sunday, August 30, 2020

Hi friends! Shimelle here to share one more Bloom Street page before I get my hands on Paige's new collection called Go the Scenic Route! I've been saving this Bloom Street Paper 22 for awhile because I didn't want to lose the variety of colors. Vellum to the rescue! With vellum backed butterflies, there's still plenty of beautifully colored pattern on show.
I started by cutting the Butterflies cut file from smooth white cardstock using my Silhouette. Then, in Silhouette Studio, I released the compound path from the butterflies and deleted all the interior butterfly cut lines, and cut it again but with white vellum. Then I just had to attach the vellum to the back of the white cardstock frame. I cut foam squares into tiny pieces to get that lifted look that lets the vellum add even more beauty to the background.

I set the background aside to work on the photo embellishment, layering Ephemera Die Cuts and stickers from Bloom Street to frame the picture. Once it was ready to attach to the page, I added the Enamel Dots and a few more stickers to frame its spot on the layout.

My title came from the Epoxy Phrase Stickers in Truly Grateful - and I love how this rich color makes the title more obvious. But the journaling is exactly the opposite! There are sentences of journaling scattered all over the background, but I wrote them all with a white gel pen. They are legible if you're paying attention but not overwhelming if you're looking quickly. I love that style for writing about personal journeys in life, as it's enough to remind me and sometimes that is all that matters!

To finish my page, I scattered all my remaining Layered Butterfly Stickers across the page! They may have been my favorite embellishment in the entire collection. What was yours?

SUPPLIES: Patterned papers, stickers, die cuts, enamel dots: BLOOM STREETwhite cardstockvellum; Die cut machine: Silhouette Cameo; Cut file: Butterflies by Paige Evans
Location: London / Blog: Shimelle / Instagram: @shimelle / Facebook: Shimelle / YouTube: Shimelle Laine / Pinterest: glittershim

Back to School Layout by Maija Männistö


Saturday, August 29, 2020

Hi friends, Maija Männistö here to share a layout made with Bloom Street. Hard to believe it, but it’s already time for back to school photos! My daughter just started 4th grade! I created this layout with the Back to School cut file. With a cut file this big and pretty you really don’t need many things added to the layout!
I backed the Back to School cut file using various papers from the 12x12 Paper Pad. I mainly used the softer toned papers and for that little “oomph” I added bolder colors here and there on the smaller pieces. I added a little “oomph” on the background too with the Wonky Hearts Stencil by Paige. White modeling paste on white cardstock is absolutely my favorite kind of mixed media. Subtle yet stunning!

For embellishments I went with a load of flowers! I used the Floral Die Cuts as well as a fussy cut floral piece from the 2x2 Paper Pads, just to get one smaller flower there too. The sun is from the Ephemera Die Cuts and the little banners from the 4-Page Sticker Book. I also added two of the Layered Butterfly Stickers as well as a few of the rhinestones from the Mixed Embellishments. Together they form a pretty cluster next to the photo that I backed with a paper from the 12x12 Paper Pad.

Thank you so much for stopping by today, have a lovely and crafty day!

SUPPLIES: Patterned papers, stickers, jewels, die cuts: BLOOM STREETwhite cardstockWonky Hearts Stencil by Paige Evans; modeling paste; Die cut machine: Silhouette Cameo; Cut file: Back to School by Paige Evans
Location: Finland / Blog: Mai Makings / Instagram: @maimakings / YouTube: Mai Makings / Pinterest: Mai Loves

Pop-Up Cards by Kelly Daye


Friday, August 28, 2020

Hello, hello! Kelly Daye here to share a trio of cards, all made with Paige’s brand new, bright and sunny Go the Scenic Route collection. What a fun way to amp up these summer days. It was a blast to design with and you won’t want to miss it!
All three cards feature a shaker on the front that was filled with a custom mix of sequins from my stash. First up, Hooray! Paige’s Hooray cut file was backed with pretty blues and pinks. That sweet butterfly was fussy cut from the beautiful Paper 20. The background is Paper 13 and the shaker frame is Paper 24.

The real surprise for each card is the pop-up inside! This one is Paige’s cutie Cupcake cut file. I had so much fun designing this poppyseed delight, topped with lemon curd, strawberry whip, and a cherry on top. If you want to learn how to use the pop-up feature on your Silhouette, watch the video at the end of this post!

The front of my second card features part of a cut file - I cut the word SUMMER off the Summer Movie Nights cut file in Silhouette Studio using the Knife Tool. Another fussy-cut butterfly from Paper 20 and a couple of tiny fussy cut flowers from Paper 12 also adorn the card front. The background is Paper 8 and the frame is Paper 16.

Inside is Paige’s adorable Glamper cut file. Wouldn’t it be awesome to have one in these colors?! There’s a bluebird peaking in. She was fussy cut from one of the stamps on Paper 3 and flowers in the windows were fussy cut from one of the borders of Paper 23.

The last card is a bit of a happy surprise to me since I don't usually use orange. But, for those of you who like things hot and spicy, this card was made for you, ha! Instead of a cut file on the front, I chose a couple of items from the Ephemera Die Cuts. They go perfectly with the background, Paper 7 and frame, Paper 2.

Inside, Paige’s Butterfly from her 19 Days of Spring Cut Files, pops up to greet you. Paige has so many Butterfly cut files you could also use, available in the Silhouette Design Store or in Etsy.

All the inside greetings were written with sketch fonts, using the Foil Quill by WeR Memory Keepers. Of course there are dabs of paint and Stickles to add that glamor I just have to have! Hope you’re inspired to try something new! Cheers dears!

https://youtu.be/1qOoWnggXqg

SUPPLIES: Patterned papers, die cuts, embellishments: GO THE SCENIC ROUTEwhite cardstock; Die cut machine: Silhouette Cameo; Cut files: HoorayCupcakeSummer Movie NightsGlamper, and Butterfly from the 19 Days of Spring Cut Files by Paige Evans
Location: Edmonton, Canada / Blog: Kelly Made It / Instagram: @kellymadeit / Facebook: Petals Daye / Pinterest: Kelly Made It

Endless Summer Layout by Zsoka Marko


Thursday, August 27, 2020

Hello there crafters, Zsoka Marko stopping by today to share a new layout with you that I've created for the Paige Evans Design Team! As you know, Paige's new collection, Go the Scenic Route, was released recently, so I'll be using this wonderful new collection! It's perfect because we just got back from holiday, so I have a million new travel-themed (and other) photos!
When I saw this orange/pink paper B-side of Paper 24, I immediately thought of the sunsets at the beach that we often just had to go see because they were too beautiful. Unfortunately, my Selphy doesn't print vivid colors (like not even close to the real colors) but I think this photo still fits that background paper just fine. I generally stay away from scrapping photos like this because normally I don't find collections/papers that go well with them. I'm glad it worked out this time!

I cut the Endless Summer cut file from white cardstock then backed the waves with the different blue tones of the B-side of Paper 15, plus I added the dark blue B-side of Paper 4 at the bottom, behind the letters. I backed the sun with a piece of orange Paper 6 but didn't back the rays because I wanted the background to shine through. I then fussy cut out all the letters from a variety of pink/red patterned papers, glued them on the white fall out pieces from the original cut file to make them hold up better, and added them back into place using foam adhesive.

I chose a few embellies to decorate my page: Chipboard Stickers and Ephemera Die Cuts. Aaaaaaand something super cool! My friend Sandra posted a few buttons on Instagram that she made with the new WeR Memory Keepers Button Press that I'm dying to have - and one of them was using Paige's paper from this collection. So, I asked her if I could have some of those buttons and in two days they were in my mailbox wooohooo!! At that point I had several layouts ready, so I checked which one I could use the button for. I thought the middle of this large chipboard flower was the perfect spot for it :) I wrote my journaling using a white gel pen then I splattered some white acrylic paint all over my page.

It's a very simple page but I think the stunning background paper adds so much to it! What do you guys think? Thank you so much for stopping by today! Have an awesome day!

SUPPLIES: Patterned papers, die cuts, stickers, embellishments: GO THE SCENIC ROUTEwhite cardstock; Die cut machine: Silhouette Cameo; Cut file: Endless Summer by Paige Evans
Blog: apocketfullofscrap.blogspot.com // Instagram: @zsoka_marko // Facebook: Zsoka Marko // YouTube: Zsoka Marko

Chipboard Frames Layout by Paige Evans


Wednesday, August 26, 2020

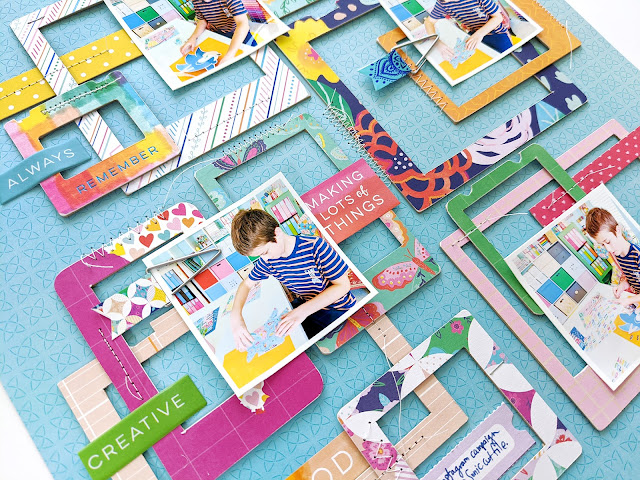
In a creative rut? Lost for inspiration? Turn back to your old scrapbook pages and give them a new spin with current product! Here is a layout I made for fun, scraplifting the design of a page I made back in 2014, only this time I made the chipboard frames from scratch using my new Go the Scenic Route collection. 
Check out the process video to see how this page came together from start-to-finish:
Here is my original page I scraplifted:
I began by making the paper frames. First I measured the frame sizes on my original page and trimmed Go the Scenic Route patterned papers to the same size.
 Then I got out my mixed media/spray adhesive box, placed all the frames upside down inside, and sprayed the backs of them with the spray adhesive. I quickly and carefully pieced the paper frames onto a piece of chipboard.
 Then I cut out the frames from the chipboard. I rounded most of the corners with scissors and then used a piece of fine sandpaper to wear down the edges and corners, making the frames look legit, as if they came in a package like that!
 Following the placement of the frames on my original layout, I placed my handmade chipboard frames across the blue geometric B-side of Paper 13. I attached them in place lightly with adhesive and then secured them with a Tiny Attacher as well as machine stitching, varying the type of stitch for interest and texture.
 After trimming the threads (only partially, I kept them quite long again for texture and whimsy), I added four 2" square photos on top and embellished minimally with pertinent sentiments from the Cardstock Stickers and Puffy Phrase Thickers. I tacked two Flag Paperclips onto the photos. To finish, I wrote journaling on one of the perforated tags found in the Ephemera Die Cuts using a blue pen.
I hope you are inspired to try making your own chipboard frames with my new Go the Scenic Route collection and turn to your older pages to scraplift yourself when you're looking for inspiration! Thanks for stopping by, see you again soon! 
SUPPLIES: Patterned papers, stickers, die cuts, paperclips: GO THE SCENIC ROUTE; Journaling pen: American Crafts; Tiny AttacherSewing machine: Brother; Thread: Coats & ClarkPrinter: Canon Pro-100Canon photo paper

Fresh Start Layout by Brianna Lepper


Tuesday, August 25, 2020

Hey friends! Brianna Lepper here today sharing a new layout that I created with Paige's Flowers cut file and her Bloom Street collection!
To start, I cut the Flowers cut file out on the heart paper from the Whimsical 12x12 Paper Pad. For this particular layout, I wanted the cut file to be white but I also wanted extra interest to it so this heart paper was perfect for what I was going for. After I cut it, I backed three of the flowers using Paper 10 and made sure to color block each section since I wanted to embellish and add mixed media using the tone-on-tone method. I backed the other three flowers using vellum.

I love backing cut files with vellum, especially if I have a mixed media background because you can still see a bit of the paint underneath it. For the centers of the flowers I used the gems from the Mixed Embellishments and the larger glitter enamel dots.

Next, I started working on my background. I prepped a piece of thick white cardstock with white gesso and pulled out Paige's Flower Garden Background Stencil. I applied white modeling paste through the stencil and allowed that to dry overnight. The next day, I pulled out some of my Shimmerz Paints and applied the colors in rainbow order around the page. I absolutely love the texture and colors on the page!

Once my background was completely dry, I got to work on the rest of my layout. I popped up the entire cut file on foam adhesive and started embellishing using the tone-on-tone technique. On the pink section, I added pink embellishments and the yellow with yellow embellishments and so on. I love this technique, it's so fun!

Here's a look at the yellow section. I even added in one of the Flower Charms and take a look at the fun texture! I mainly used the Ephemera Die Cuts and Floral Die Cuts as well as the Enamel Dots to embellish each section.

For my title, I used the Fresh Start saying from the Puffy Vinyl Stickers. It fit nicely right in that space and was so perfect.

I absolutely love how this layout came out. It definitely got to the point where I had to stop myself from adding more things to it! ;) Thank you so much for stopping by today! I hope I've inspired you in some way and I'll see you in my next post!

SUPPLIES: Patterned papers, stickers, die cuts, charm, jewels, enamel dots, embellishments: BLOOM STREETwhite cardstockgessomodeling pasteFlower Garden Background Stencil by Paige Evans; Die cut machine: Silhouette Cameo; Cut file: Flowers by Paige Evans
Location: Louisiana, USA / Blog: I Love Paper Blog / Instagram: @briannalepper / Facebook: Brianna Nichole
YouTube: Brianna Lepper / Pinterest: Brianna Lepper

Summer Daze Layout by Elsie Robinson


Monday, August 24, 2020

Hey everyone, it’s Elsie Robinson here again with another scrapbook layout using one of Paige's cut files! This time I’ve used the Branch cut file with a mix of the Bloom StreetTruly Grateful, and Whimsical collections. Let me talk you through how I created this layout. I firstly started by cutting the Branch cut file twice from white cardstock. I knew I wanted to create a really leafy and whimsical design, so I used my knife tool (in Silhouette Studio) to cut up one of the cut files into smaller pieces, which I could use to frame the layout.
Next in Silhouette Studio, I used one of the inside leaf pieces and offset it to get a leaf slightly bigger than the opening. I then multiplied this several times and cut them from 6 different green patterned papers from the Bloom Street and Truly Grateful collections. This was a massive time-saver and meant that I could easily back the cut file in no time at all! To back the branches I used some kraft cardstock from my stash. To jazz it up a little, I used a Tim Holtz woodgrain stencil and brown ink to give it some cool texture.

Yet again, I used Bloom Street Paper 02 as my background! I love this paper because the colors and texture are so beautiful. I also added punched clouds from white cardstock as an extra background element. I then adhered the Branch cut files down with foam dots and I nestled in my 3x4” photo between the branches.

To embellish, I used some of the hummingbird Ephemera Die Cuts and Cardstock Stickers from Bloom Street, as well as some of the florals from the Whimsical sticker book, since these collections work really nicely together. Finally I added my title ‘Summer Daze’ with the light pink mini foam Thickers from Whimsical.

Thanks for stopping by and make sure you check out Paige's cut files and scrapbook collections!

SUPPLIES: Patterned papers, stickers, die cuts, embellishments: BLOOM STREETTRULY GRATEFULWhimsicalwhite cardstock; Die cut machine: Silhouette Cameo; Cut file: Branch by Paige Evans
Location: England / Blog: Hey Elsie Instagram: @heyelsie_ / Facebook: Elsie Robinson / YouTube: Elsieeee / Pinterest: heyelsie

Envelope MemoryDex by Amber Mitchell


Sunday, August 23, 2020

Hello crafty friends! Amber Mitchell here on Paige's blog today to share this fun handmade MemoryDex mini album I created using Bloom Street and several of Paige's envelope cut files.
When it comes to making a MemoryDex mini album, envelopes are a great starting point. Not only do they come with built in storage for photos and memories, they also have plenty of room on the outside for embellishing!

I used the following envelope cut files by Paige to create six individual envelopes for my mini album: Envelope 1, Envelope 2, Envelope 3, Envelope 4, Envelope 5, and Envelope 6. I love the look and texture that the different styled envelopes bring to the project.

Before cutting the envelopes, I first resized them all individually so that they would measure 4 inches in width when assembled. Once cut, I stitched along the outer edges of each envelope using my sewing machine. Next, I used my Cricut to create and cut MemoryDex card slots that I then adhered to the back of each envelope. If you don't have a cutting machine, another option would be to use a MemoryDex punch or a simple hole punch to create the openings.

These envelopes measure 4 inches in width which is just under the standard size of a MemoryDex card. As such, they'll fit perfectly in any storage box you have. I opted to make my own using Paper 22 from Bloom Street and some striped paper straws.

Once my envelope cards and box were assembled, it was time to embellish this cute mini! I used a mix of embellishments from both the physical and Bloom Street Digital Collection. I used the Print and Cut feature on my Cricut to create lots of floral and butterfly die cuts. I also used some stickers from the Cardstock Stickers and 4-Page Sticker Book to layer amidst the flowers.

With the outside of the envelopes embellished, I then took some larger journaling pieces from the Ephemera Die Cuts to use for documenting. I lightly embellished these and added one or two to each envelope.


To add a bit of flair to the storage box itself, I used three of Paige's Rolled Flower cut files to create a couple dozen small flowers. I then glued these to the edge of the box to tie everything together!

After adding the envelope cards to the box, my mini album is complete and ready for memories! Thanks so much for stopping by the blog today! If you'd like to see more of this project, you can find a project share video here:

I'll see you next time with another fun project!

SUPPLIES: Patterned papers, stickers, die cuts, embellishments: BLOOM STREET; Die cut machine: Cricut; Cut files: Envelope 1Envelope 2Envelope 3Envelope 4Envelope 5Envelope 6, and Rolled Flowers by Paige Evans
Location: California, USA / Blog: Happy Crafty Studio / Instagram: @bambismail / YouTube: bambidearr / Pinterest: bambidearr
Paige Taylor Evans © // Quinn Creatives DESIGN