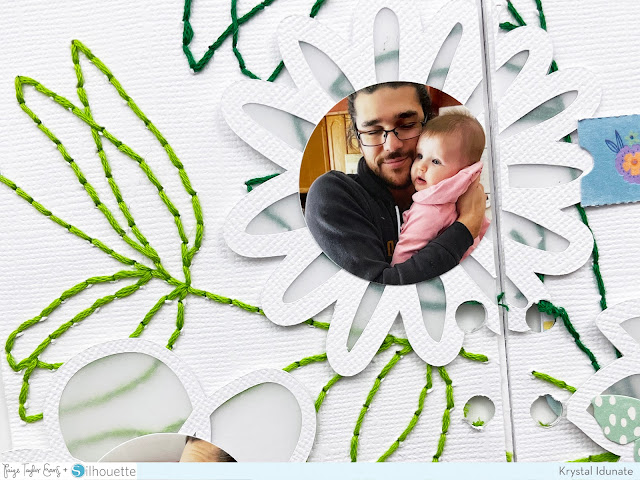
Hello friends! Krystal Idunate here today sharing a spread I created using Paige’s Leaf Background cut file along with the Hand Drawn Flowers cut file. I loved the idea of pairing these all together to document a story for my niece's 3x8 Story Album about her relationship with my husband.
As soon as I saw the Leaf Background cut file, I knew I wanted to stitch it onto textured white cardstock. So, I adjusted the size of the cut file in my Silhouette software to fit over a two page spread in a 3x8 album (roughly 8.25x8.25”). Then, instead of having my Silhouette cut the file from my cardstock, I switched out my blade for the pen holder tool and put a sharpened pencil inside. I placed my cardstock upside down on my sticky cutting mat so my machine would actually trace the file on the back of my paper and sent it through.
Next, I opened up the Hand Drawn Flowers cut file and arranged them on my Leaf Background file in Silhouette so I could scale them to the size I wanted. I then took the newly resized files and cut them from the same textured white cardstock with my Silhouette.
With everything cut out and ready to go, it was time to work on hand stitching the Leaf Background. I cut down my traced file into two panels, each sized at 3.875x8.25”. This would allow me to hole punch the pages and add them into my 3x8 album, outside of the page protectors. I made the mistake of not immediately hole punching BEFORE starting to stitch… so, if you decide to do a spread like this, I definitely recommend hole punching first and then stitching.
Using an awl (or poking tool), I punched holes into my cardstock right inside the traced lines, about every millimeter. If you don’t have an awl, you can also use a thumb tack - how’s that for a crafty hack! While watching a few (okay… MANY) episodes of a new show, I backstitched the lines using all six strands of green embroidery floss. I chose two different tones of green to give the pattern even more added interest.
With the background piece finished, I then turned my attention to those Hand Drawn Flowers cut files. Originally I was going to back them with some patterned papers from the Memory Explosion Box Paper Pads, but ultimately felt like that would detract from my background. After all that time stitching, I wasn’t about to cover it all up. So instead, I backed each of the flower cut files with vellum. I LOVE the softness the vellum brings to this spread so, so much.
For my photos, I printed 5 small photos of my husband with my niece. Then, I punched them into 1.5” circles. I knew I wanted the photos to become the centers of the flowers for this spread… and LOVE how it turned out! I finished off the layout by lightly embellishing using a few butterflies and a small ticket title piece from the Memory Explosion Box Travel Die Cuts and the Birthday Die Cuts.
It is impossible for me to create a scrapbook layout and not include some longer journaling. So for this spread, I took a large white tag I had in my stash and added a scalloped die cut from the Travel Die Cuts to the bottom of the tag, along with a ticket shaped label that I could stamp the date on. I decided that since this was a story about my husband and my niece, my husband should be the one to do the writing. I gave him the tag and instructions to write about our niece and his feelings for her. He did a great job!
To store the tag, I created a pocket that would go in-between the backside of this spread and the backside of the next spread. I first added an extra layer of white cardstock on the back of both panels for this layout. That will make storing it much easier and cleaner in the album. Then, I cut a green floral paper from the Memory Explosion Box 12x12" Paper Pad to the same size as one panel (3.875x8.25”). I added super strong ⅛” scor tape to the two sides and the bottom of the paper. Then, I adhered the patterned paper to the backside of the layout - that created a pocket between the layers for my tag to slip into.
I am obsessed with this spread and I’m SUPER glad I took the time to stitch that background. I think it makes this whole layout really special and gives it all the beautiful texture you could want. I hope this spread inspires you to use Paige's cut files in creative ways to help you tell your stories. Thank you so much for stopping by and I hope you have an awesome day!
SUPPLIES: Patterned papers, die cuts, embellishments: MICHAELS MEMORY EXPLOSION BOX; vellum; white cardstock; Die cut machine: Silhouette Cameo; Cut files: Leaf Background and Hand Drawn Flowers by Paige Evans
Location: Michigan, USA / Instagram: @krystal.idunate / YouTube: Krystal Idunate / Pinterest: Krystal Idunate


Krystal, love this layout, I shall be trying this technique myself very soon, Annette, Derbyshire, Uk
ReplyDelete