Doily Cards by Marinette M'Boussi


Friday, April 30, 2021

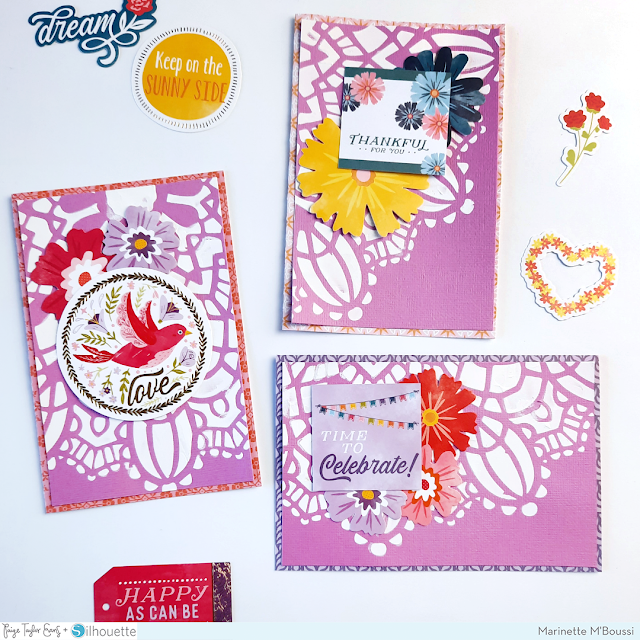
Hello everyone! Marinette M'Boussi here! Today I’m sharing my new creation for Paige’s Cut File Design Team. This time I have 3 cards to share with you. I made them with the beautiful Wonders collection and a Doily cut tile that I used as a stencil.

I started by cutting the Doily cut tile on white cardstock with my Silhouette Cameo. Then I chose purple cardstock for my background and used the cut page as a stencil to apply modeling paste.

After that I took 3 pages from the 6x8 Paper Pad and folded them in half. I cut the purple cardstock in 3 pieces and glued them on the cover of each card. And as a final touch I embellished with elements from the 2x2 Paper Pads and Floral Die Cuts.

These cards are really easy and fun to make, I hope you’ll want to try this technique for yourself! Thank you for stopping by today!


SUPPLIES: Patterned papers, stickers, die cuts, embellishments: WONDERSwhite cardstockmodeling paste; Die cut machine: Silhouette Cameo; Cut file: Doily by Paige Evans

Location: France / Instagram: @marinettemb / YouTube: Marinette MB / Facebook: marinette.mboussi

Good Days Ahead Layout by Zsoka Marko


Thursday, April 29, 2021

 Hey there lovelies, Zsoka Marko back with a new layout today for the Paige Evans Design Team! I've used the lovely Wonders collection on this page. I seem to be on a circular type design roll lately, because my previous layout featured a butterfly spiral, the one before that a large, layered flower, and this one today has a large rosette. So basically, all of them have a big circular design element hmmm. I should remember to do something different next time ha! Anyway, Paige had a virtual layout class recently where she created a wreath design from smaller rosettes. I really wanted to try to create rosettes, but then I decided to make just one large one. I followed her instructions - it doesn't matter what size you create; the steps are the same. The number of petals is always 8 as well, as it turns out (I've tried several sizes to see what fits best on a 12x12" page).

I chose 8 Wonders patterned papers in rainbow colors for my rosette and measured 5.5" on two sides, starting from the corner. I connected these two marks using a pencil and a ruler, to get an isosceles. I then cut off these triangles using my guillotine trimmer. I took each triangle and scored them right down the middle, just so I knew to which point I had to fold in the two sides. It's probably better if you watch the process video because I'm terrible at explaining things. I'm a visual type, I absolutely cannot follow written instructions, so I suggest you have a look at the video, if you want to see how to create the petals! Super simple - it's just hard for me to explain.

I then die cut a circle, maybe 3-4" in diameter, and glued the petals on it, so I could move the rosette easier, checking which background I want to use. I settled on this light green patterned paper from the B-side of Paper 24 - I liked that the circular design tied in so well with the rosette. I glued down the rosette.

I added foam tape to my photo and placed it in the middle of the rosette. For my title I chose a Chipboard Sticker. Next, I glued down the right side of each petal, because I wanted to tuck my embellishments into the openings. I selected a few Chipboard Stickers6x12 Cardstock Stickers, a Banner Sticker, pieces from the 8-Page Sticker BookFloral Die Cuts, and Ephemera Die Cuts in coordinating colors and glued them down using liquid adhesive. I adhered a tab Chipboard Sticker next to my rosette and wrote the date on it. Finally, I added my journaling.

Super easy and quick! I hope you like how it turned out!

Here's the video if you're interested: https://youtu.be/-zklgz6LK90

Thank you very much for stopping by today! Have an awesome day!


SUPPLIES: Patterned papers, stickers, embellishments: WONDERS

Blog: apocketfullofscrap.blogspot.com // Instagram: @zsoka_marko // Facebook: Zsoka Marko // YouTube: Zsoka Marko

SCT April Sampler Wonders Cards


Wednesday, April 28, 2021

 Have you subscribed to the monthly Scrapbook & Cards Today Sampler? The April 2021 kit has a lot of Wonders in it! I went LIVE in the SCT Sampler Facebook Group to do an unboxing and create some cards.

For this "Hello" card, I started with a white cardstock base, then trimmed borders from the colorful semi-circled Paper 6, and adhered them around the edges. Then I came in with some Ephemera Die Cuts and layered them in the middle with foam squares for dimension. I bent up the edges and petals of the die cuts to create texture. To finish, I added one of the Lollies on top. Done and done!

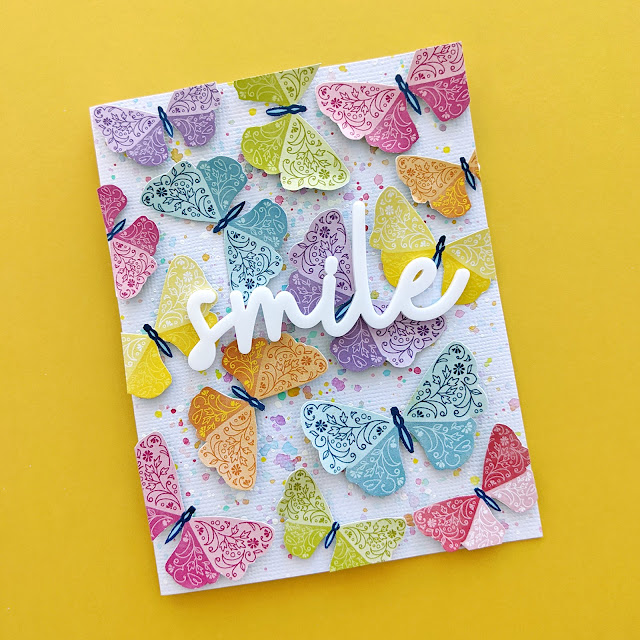
To begin this "smile" card, I splashed Pastel Dreams watercolors and watered down white acrylic paint across a textured white cardstock base. While that dried, I fussy cut butterflies from Paper 8. Once the paint dried, I adhered the butterflies in place using only a single foam square on the back middles to let the wings lift and bend to create more lifelike dimension. To finish, I attached the acrylic "smile" word, exclusive each month to the SCT Sampler Kits, using glue dots to the center of the card.

I started this 4.5" square "THANK YOU" card by splashing watered down Gold Paint across the front. While it was drying, I punched a bunch of tiny flowers and leaves from the multi-patterned Paper 20, layered them up, and glued them together. Once the background dried, I machine stitched with white thread loose circles all around the front. I adhered the flowers in a write design on top and then stitched a French knot with yellow thread through the center of each flower. To finish I added the colorful alpha stickers from the 8-Page Sticker Book to the center.

For this last card, I trimmed a 5.5" x 4 1/4" rectangle from the floral Paper 16, heavily distressed the edges, and then machined stitched it onto the front of a textured white cardstock base. I distressed the edges of a journaling card and tag from the Ephemera Die Cuts and layered them in the center with foam squares. I fussy cut the "OH SO HAPPY" rainbow from a cut-apart card found on Paper 24 and adhered it to the center also with foam squares. To finish, I added rainbow semi-circle Puffy Stickers under the journaling card. 
Easy peasy lemon squeezy! I hope you are inspired to subscribe to the monthly Scrapbook & Cards Today Sampler - you get a little sampling of current collections!

A Week in the Life Pocket Spread by Amy Jo Vanden Brink


Tuesday, April 27, 2021

 Hello everyone! Amy Jo Vanden Brink back on the blog again today with a project that just shouts springtime fun for me! I always enjoy documenting our springtime weeks, and probably more so than normal because it is when the garden is coming back to life. I did some work on setting up a little title page for my documenting this year using the Week cut file. I cut off the lines on the side as I wanted it to end up looking more like a page-turner or bookmark and had other plans for the journaling.

To back the cut file, I used the Wonders 2x2 Paper Pads (and with good planning, the width of the book mark was exactly the right size for me to simply place the 2x2 squares behind the days!). I printed my photo in black & white and then added my journaling. I really enjoy simple easy layouts, but it felt a little too simple to me, so I added the LOVE Ephemera Die Cut to get the color going all the way across the page. I used colorful Foam Thickers to get the title on the bright Paper 11 from the Go the Scenic Route collection. One thing I absolutely love about Paige's collections is that they are so easy to mix and match, the pieces from one collection go with another effortlessly!

I hope you enjoyed this peek at my album set-up today, I can't wait to fill it with colorful springtime memories!


SUPPLIES: Patterned papers, stickers, die cuts, embellishments: WONDERS and GO THE SCENIC ROUTEwhite cardstock; Die cut machine: Silhouette Cameo; Cut file: Week by Paige Evans

Location: Edmonton, Canada / Instagram: @thevanblife / YouTube: Amy Jo Vanden Brink / Facebook: Paper & Spool / Pinterest: amyjovb

Happy Babies Layout by Neftali Zambrano


Monday, April 26, 2021

  Hello crafty friends! Neftali Zambrano here with you today and I am sharing another 12x12 scrapbook layout using the Wonders collection!

For this layout I am using the Heart Divided cut file cut out on some 80 lb hot pink cardstock. I backed the cut file with a variety of the pink patterned papers from Wonders. I used Paper 4Paper 5Paper 7Paper 10Paper 13Paper 16Paper 18Paper 19Paper 21, and Paper 23 since they all had pink as their base color. I left one space for my photograph which I filled up using a sweet photo of my children. Once the cut file was all backed, I attached it to white cardstock using dimensional adhesive.

To embellish around the cut file I mainly used the Floral Die Cuts. I cut a lot of the flowers in half and tucked them all around the heart. I started with the big flowers first and finished off with the small ones using dimensional adhesive. This created a really lovely dimensional floral effect. I finished embellishing using the Chipboard StickersThickersBanner Stickers, and clear floral stickers from the 8-Page Sticker Book. I added a matching title using a Chipboard Sticker and the colorful Thickers. The final touch was some fuschia ink splatters. You can see below how much awesome dimension this layout ended up having. I love a dimensional layout!

 I had so much fun creating this layout. The Floral Die Cuts and the pink patterned papers made it so easy to work up. I ended up with a beautiful bright and colorful layout I can include in my kids scrapbook album. I hope that you have enjoyed this process, and that you are feeling inspired to get crafty with the gorgeous Wonders collection. See you next time, crafty friends!


SUPPLIES: Patterned papers, stickers, die cuts, embellishments: WONDERS; Die cut machine: Silhouette Cameo; Cut file: Heart Divided by Paige Evans; watercolorswhite cardstock

Location: California, USA / Blog: alltheneffyness / Instagram: @alltheneffyness / YouTube: Neffy Crafts + Scraps / Facebook: alltheneffyness / Pinterest: alltheneffynessscrap

Celebrate Layout by Paige Evans


Sunday, April 25, 2021

 Here is my other layout that appeared in the Spring 2021 issue of Scrapbook & Cards Today Magazine featuring my new Wonders collection and Celebrate cut file!

I started by die cutting my Celebrate cut file from textured white cardstock and backed it with a rainbow of patterned papers from Wonders. I used foam squares to attach the letters in place to create depth and dimension. Then I printed a photo of Fox jumping for joy on his 10th birthday celebrated at Disney World last October to 4x11". I have a wide format printer which prints up to 13" wide - it's a Canon Pro-100.
I adhered the photo on the left side of the background which is the dark blue starry B-side of Paper 20 and overlapped the cut file on the right. I did some tone-on-tone embellishing over the large letters using stickers from the 8-Page Sticker BookEphemera Die Cuts, and Puffy Phrase Stickers. Inside the "A" I added "10" Thickers and clear colorful "birthday" alphas. I slid on a Tassel Paper Clip, tucked a journaling spot underneath (on which I wrote journaling with a light blue pen), and added a piece of scalloped Washi Tape below.
On the white space of the photo at the top, I added another journaling spot topped with a "celebration" Banner Sticker and tucked a border sticker from the 6x12 Cardstock Stickers under. I tucked in a tabbed journaling card above the picture and stamped the date to finish.
I hope this layout inspires you to download the Spring 2021 issue of Scrapbook & Cards Today Magazine, grab my new Wonders collection, and check out my Celebrate cut file!
SUPPLIES: Patterned paper, stickers, tassel paperclip, die cuts, Thickers, washi tape, embellishments: WONDERSwatercolorswhite cardstock; Die cut machine: Silhouette Cameo; Cut file: Celebrate by Paige Evans

Flower Mini Album by Amber Mitchell


Saturday, April 24, 2021

 Hello crafty friends, Amber Mitchell here on the blog today sharing with you a fun, flower-shaped mini album I created using the new Wonders collection!

It's no surprise that shaped albums are one of my favorite things to create and I love how Paige's cut files make it so quick and easy to put one together! For this mini, I used the Flower cut file which is just perfect for this time of year.

To create the base of the album, I took two uncontoured images of the Flower cut file and welded them together vertically, with two small rectangular pieces connecting them, using my Cricut software. This created the pages of the album. I cut the pages from the following papers from WondersPaper 2Paper 5Paper 13Paper 14, and Paper 16. I then cut the original cut file from white cardstock and adhered it to the front of my album using liquid adhesive.

For extra texture, I machine stitched along the edges of all of my pages. I then slipped the pages through a 4-inch gold paper clip and stitched across hinges of the pages to keep the album in place.

To embellish this mini I used all of the fun, colorful, happy bits from Wonders. This collection is so pretty and has so many fun elements to work with! Throughout the album I layered up pieces from the 6x12 Cardstock StickersChipboard StickersFloral Die CutsEphemera Die Cuts, and Banner Stickers. On the cover, I added some of the Paper Flowers for a fun, stand-out touch.

To add sentiments throughout the album, I used the Thickers and Puffy Phrase Stickers as well as a few tabs from the 8-Page Sticker Book. I also fussy cut some gold-foil butterflies from the 6x8 Paper Pad and scattered those throughout the album to stick with the spring theme.

I created photo mats throughout the album using some of the square sheets from the 2x2 Paper Pads. I machine stitched around them for texture and then added one to every other page of the album.

This album came together so effortlessly thanks to the fun colors and patterns in Wonders. I can't wait to create with it again! Thanks for stopping by the blog today, I'll see you next time with another fun project! 


SUPPLIES: Patterned papers, stickers, die cuts, embellishments: WONDERS; Die cut machine: Cricut; Cut file: Flower by Paige Evans

Location: California, USA / Blog: Happy Crafty Studio / Instagram: @bambidearr / YouTube: bambidearr / Pinterest: bambidearr

Reasons to Smile Layout by Shimelle


Friday, April 23, 2021

 Hello crafty friends! Shimelle here today and I hope you're feeling happy and creative. I'm delighted to share this new scrapbook page with Paige's Wonders collection and her Open Book cut file - this combination turned out to be just perfect for some self-portraits my son snapped as part of a school project.

I started by cutting the Open Book cut file from white cardstock then backed it with three papers from Wonders. The yellow of the pages and the warm rainbow of the book cover are the A and B sides of Paper 23 and the tiny bit of blue with gold foil on the spine is actually from a butterfly wing found in the 6x8 Paper Pad. I backed the book with foam tape and adhered it to the background of green Paper 8 and the light blue Paper 15. I tucked the photos behind the book pages, along with a green tag cut from Paper 12. The larger photo is 4x6, and the smaller one is 2.5x3.5, but a 3x4 print would work here too. To the top right of the larger photo, I added a cut apart "Top 5" box from Paper 17, a green 'here now' die cut from the Ephemera Die Cuts, and a Banner Sticker.  Then it was time for a flutter of butterflies! I cut these from the gold foil paper in the 6x8 Paper Pad, and adhered each one on just one side, so a simple fold in the middle could give them some movement on the page.

The title is where this collection came together perfectly with the photos. His school assignment was to take a self-portrait and he had titled his 'Reasons to Smile' because he chose lots of little favourite things to make up his picture: building a den, reading, one of his fave outfits to wear, and so forth. How perfect is it that the Puffy Phrase Stickers actually has the words for 'so many reasons to smile today'? I was so happy that he chose reading as one of his reasons that the Open Book cut file was just right for what I wanted to remember watching him set this up! For finishing touches, I added a few label stickers from the 8-Page Sticker Book, gold heart Puffy Stickers, and gold mist.

Thanks so much for taking a look at my project today! What reasons to smile have you found today? Let us know in the comments or on your next scrapbook page!


SUPPLIES: Patterned papers, Thickers, stickers, die cuts, embellishments: WONDERSwhite cardstock; Die cutting machine: Silhouette Cameo; Cut file: Open Book by Paige Evans

Location: London / Blog: Shimelle / Instagram: @shimelle / Facebook: Shimelle / YouTube: Shimelle Laine / Pinterest: glittershim

Hello There Layout by Missy Whidden


Thursday, April 22, 2021

Hey friends! Missy Whidden here with a new layout featuring all the beautiful Washi Tape from Paige’s new Wonders collection. I used all the designs to create a fun and colorful background along with mixed media to match. I used thick smooth white cardstock for the base and I started by simply sticking strips of Washi Tape down starting from the top of the page. I originally went about half way down but then after adding the blue watercolor kept going all the way to the bottom. After applying the tapes, I coated the page with clear gesso before adding any watercolors. I softened up the tapes by smudging a bit of white gesso over some areas and then splattering white acrylic paint using a brush.

The Washi Tapes are all so beautiful I couldn’t choose a favorite. Once they were down, I machine stitched along each strip with a deep turquoise thread. I think this makes the tapes stand out a bit more and creates texture. I added a few 6x12 Cardstock Stickers in places which I popped up using adhesive foam.

I layered a few fussy cut tags from Paper 12 behind the photo. I distressed the edges and tied a twine bow on the end. I had already decided to use this big “Hello There” Chipboard Sticker before I even applied the Washi Tape, so I knew where it was going to go. I added several different sized flowers from the Floral Die Cuts around the photo as well as above and below it.

I used a blue Shimmerz spray to create the blue watercolor area. My thought was since I had so much color & pattern from all the Washi Tape, a solid blue area would help balance everything out. It was after adding the blue that I decided to continue to washi strips down the bottom of the layout. I popped up some of the flowers with adhesive foam to create more dimension and I added in a few colors of tangled thread in a few areas for even more texture and color.

I hope this gives you some fun ideas to try with the Wonders Washi Tape! It was so much fun to make. It was almost like creating my own patterned paper, which is always fun. Thank you so much for stopping in, and have a wonderful day!


SUPPLIES: Patterned papers, stickers, die cuts, washi tape, embellishments: WONDERSgessowhite cardstockwhite acrylic paintwatercolors
Blog: littlenuggetcreations.blogspot.com // Instagram: @missywhidden // Pinterest: @missywhidden
Facebook: missy.whidden // YouTube: Missy Whidden

Grateful Layout by Adam Westwood


Wednesday, April 21, 2021

 Hi! Welcome back to Paige Evans' blog! ScrappyAdam here again with something a little different from me! I started off with Paige's Rainbow Background cut file which I resized to as big as I could cut and then cut it from white cardstock. I couldn't decide what I wanted to do with it for a couple of days but then decided to try something different (for me) and got out a few Distress Oxides! I decided on six colours (I know, not a true rainbow - but I'm good with that!) with red, orange, yellow, green, blue, and purple, I then began blending the ink on to the cut file, having placed it on another sheet of white cardstock. I was then left with an awesome print on the white cardstock for another project and took the cut file as the base for my page!

Something else a little different for me was some mixed media! Basic but mixed media nonetheless! I took some watercolors and added splatters across Paper 12 from the Go the Scenic Route collection, roughly in the same diagonal pattern as I had coloured the cut file. The colours don't match the rainbow but I am good with that - it provided a contrast and another dimension to the page. I then adhered the cut file in place. I felt like something was missing so I decided to add a border but only to two edges - the left and the top. I used Paper 9 for this to give a pop of blue. I trimmed my photos which are 3x4" and matted these on white cardstock and then again with the B-side of Paper 6. I placed my photos in the centre but more towards the bottom of the page. I used pom pom trim from my stash to give a bit of added texture and something a little different and contrasting to the bright colours. This acted as a shelf for my photos to 'sit' on and helped focus my embellishing.

I struggle with titles - I always want an eye catching title or something quirky or a play on words but in the moment, can never think of anything suitable! I often do pages without titles because all my scrapping is random - nothing is chronological and I have mixed albums and I will often scrap multiple photos of the same event/activity/occasion and so I feel that a title on every page isn't always needed. Though I am finding myself titling pages a lot more these days! In the end, I decided on "Grateful" with a subtitle of 'Making Memories'. I used a puffy sticker from Truly Grateful and then a Puffy Phrase Sticker from Go the Scenic Route. I like to overlap a title on to my photo - I think it focuses the page to the photo.


It was then a case of embellishing. You will know by now that I am most definitely a 'more is more' kinda scrappy guy! But I didn't want to overload the page and cover all the rainbows. So I dug deep into my box of Paige Evans goodies and used various pieces from Go the Scenic Route including some Puffy Stickers and Ephemera Die Cuts. I also used a couple of the lovely birds from Truly Grateful and then some of the words from Paper 13 from Bloom Street, dotted around the page. The puffy stickers from Go the Scenic Route are fab as they have lots of dots - so I used a few of these too. I added some very basic journaling to the bottom left of the page and the date to the bottom right and that was this page done.

Thanks so much for stopping by, I'll be back soon - with a page using Paige's awesome new collection, Wonders! Have a happy scrappy week and take care!


SUPPLIES: Patterned papers, Thickers, stickers, embellishments: GO THE SCENIC ROUTEwhite cardstock; Die cutting machine: Silhouette Cameo; Cut file: Rainbow Background by Paige Evans

Location: Manchester, England / Instagram: @scrappyadam / Facebook: Adam Westwood / Pinterest: Scrappy Adam
Paige Taylor Evans © // Quinn Creatives DESIGN