I Love You Layout by Stefanie Ried


Wednesday, June 30, 2021

Hi friends, Stefanie Ried back with a new layout using the Wonders collection! After cutting the paper with the brush strokes in the last layout, this time I cut out the colorful stripes from the beautiful Paper 2. Isn't the color palette beautiful? I love it very much! To match, I wanted to incorporate the Epoxy Phrase Stickers into the strips.

First I cut out the stripes. Since my round circle punch is bigger than the width of the paper strips, I always stuck 2 colors together. These overlap minimally. I started at the top of my photo. To do this, I attached adhesive strips to the front and back. Now bend the 2 strips to different lengths and glue them to the photo. Then punch out the small hole with the small circle punch. I did this with all the paper strips. I left a small space between the words.

Since I didn't have all the colored letters in the right color, I thought long and hard about which title I could use. As you can see, "I Love You" fits quite well.

I hope you enjoyed my layout tutorial! See you next time!


SUPPLIES: Patterned papers, stickers, die cuts, embellishments: WONDERSwhite cardstock
Blog: steffiried.blogspot.com / Instagram: @steffiried / Pinterest: @steffiried / Facebook: stefanie.ried.96 YouTube: Steffi Ried

Happiness Spread by Krystal Idunate


Tuesday, June 29, 2021

Hello friends! Krystal Idunate here today, sharing a new spread I created using Paige’s Rainbow Simple cut file, Happiness cut file, and Wonders collection. I wanted to document a story of a special silly moment with my daughter and thought the combination of these cut files were the perfect sentiments for the story.

To get started with this spread, I resized the Rainbow Simple cut file to fit onto a 6x4” journaling card, and the Happiness cut file to fit onto a 3x4” journaling card. I cut the Rainbow from textured white cardstock and then used Paper 5142, and 11 to back the file. I then cut the Happiness title from some textured dark blue cardstock and backed the file with pattern swatches from the 2x2 Paper Pads to help soften the title up.

Once the cut file pieces were backed, I was ready to assemble my layout. I started with creating my embellishment cluster on my full page sized photo. I used a few tags cut from Paper 12 as layering elements. I stamped the Hello Lovely title along with a few tiny flowers from the Acrylic Stamps onto the yellow grid tag and LOVE the way it fills in the white space. I finished off my embellishment cluster by adding a few floral/stem elements from the Floral Die Cuts, as well as a few strands of natural twine. I adhered the cluster directly to the photo. On the left side, I started by adhering the Rainbow backed file onto a 6x4” piece of textured white cardstock. I brought the Acrylic Stamps back out and used a stacked heart stamp to create a yellow border around the outside of the rainbow - helping to break up a bit of the white space surrounding the rainbow. I also found two stickers from the 8-Page Sticker Book and Cardstock Stickers to layer up in the middle of the rainbow. Using the remaining piece of the yellow grid tag, I adhered the pattern on top of a 3x4” piece of textured white cardstock, and then put the Happiness title on top of that.

To finish off my spread, I cut down some white cardstock to one last 3x4” sized journaling card and then used the scallop line from the Acrylic Stamps to make lines for journaling. I hand wrote my story and then called this layout done. I have to say that I LOVE the look of this layout so much. Between the colors, the sentiments, and the story... it's just so fun. If you would like to see a process video for how this spread came together, you can check that out here!

I hope this spread inspires you to use Paige's cut files to create journaling cards of your own as well. Thank you so much for stopping by today and I hope you have a wonderful rest of your day!


SUPPLIES: Patterned papers, die cuts, stickers, stamps, embellishments: WONDERSwhite cardstock; Die cut machine: Silhouette Cameo; Cut files: Rainbow Simple and Happiness by Paige Evans

Location: Michigan, USA / Instagram: @krystal.idunate / YouTube: Krystal Idunate / Pinterest: Krystal Idunate / Patreon: Krystal Idunate

Scrap Heaven Mini Album by Heidi K. Lewis


Monday, June 28, 2021

Hey there scrappy friends, Heidi K. Lewis here on the blog today to tell you about an angel-shaped mini album made with one of Paige’s older collections (Whimsical) and the Angel cut file from the 25 Christmas cut files. Whenever I get an idea for a project, I typically get multiple ideas of different ways to execute the same project, and I like to make them all! Even though I have made an angel-shaped mini before (see this post), this album is made with a different collection and a modern style for a completely new look!

To make this album, I sized the Angel cut file to five inches and “contoured” it in Cricut Design Space to turn the image into a simple outline of the angel. I cut out 10 angels from plain white cardstock and applied a coat of clear gesso to one side of each angel. I applied modeling paste through Paige's stencils to each one of the angels. I made the cover pages by applying modeling paste through the Angel cut file and applying gold embossing powder while the paste was still wet. Once the texture paste was completely dry, I painted each angel with Lindy’s Gang Magical watercolors in pretty peach and pink tones (my favorite colors!)

While the watercolors were drying, I selected and printed all my photos for the album. The theme for this album is pictures of my craft room and supplies. One of the great things about this album is it only uses a single sheet of stickers! One of my secrets for choosing embellishments is pairing shapes that match my background. For example, for my first page I added a floral chipboard sticker because it matched the Flower Garden Background Stencil.

Another tip for embellishment placement is using objects to frame your photo, which I did on my second page.

The Sunburst Rays Stencil background paired nicely with a photo with light shining through my craft room window. Cloud stickers were a natural choice to go with the sunny background.

On the next page, I used my trick of pairing shapes once again by pairing star stickers with the Star Confetti Stencil.

The flower petals background is one of my all-time favorite backgrounds and was perfect for documenting my Bloom Street happy mail! Again, I paired flower stickers with the flower background.

The next page documents my large washi tape collection. The Whimsical collection has all sorts of crafty icons including this adorable washi tape dispenser—so perfect! I also love how the rose gold title matches the rosy color tones in the background.

Of course, a scrap album would not be complete without a few design team photos. Continuing with the theme of matching shapes, I paired heart stickers with the Heart Confetti Stencil background, and circular stickers with the Polka Dots Stencil background.

To finish off the album, I glued the backsides of my pages together. Then, I tied it all the pages of the album together with ribbon from my stash and the Flower Charms and Tassels from Bloom Street.

I used ransom-style thickers from my stash and Whimsical Mini Thickers to make the title for my album cover. I hope you enjoyed learning how this album came together. Until next time!

SUPPLIES: Patterned papers, stickers, charms, tassels, embellishments: BLOOM STREET and WHIMSICALwatercolorswhite cardstockmodeling pasteStencils by Paige Evans; Die cut machine: Cricut; Cut file: Angel by Paige Evans

Location: Idaho, USA / Instagram: @heidi.k.lewis / Facebook: Heidi K. Lewis / Pinterest: klipheid09

Besties Layout by Jennifer Rambert


Sunday, June 27, 2021

Hi paper lovers! Jennifer Rambert back today with a very colorful layout for the Paige Evans Design Team with the Wonders collection and her Besties cut file. I wanted a page with colors that wouldn't go unnoticed so I used yellow and fuchsia.

I first used my Silhouette Cameo to cut the Besties cut file and used patterned papers to trace, cut, and fill in the letters. Instead of backing the cut file, I glued it flat onto the background and then popped the letters up with 3D foam for more dimension. I used white cardstock for the background, which I coated with clear gesso before adding a lot of Dark Blue Shimmerz ink to bring out the yellow and fuchsia even more.

I sprayed the blue colors on the background then added water and let the colors flow and mix to get different shades. Once dry I splashed white acrylic paint diluted with a little water. Once it was well dried I was able to glue the cut file and the letters. I distressed the edges of the letters for more texture and because I love it! I layered crumpled tracing paper and different papers under my photo and I glued it with cardboard for more dimension above the cut file by inserting it a little under the letters. I added yellow and pink ink to each side of the photo because I found it was a bit lacking in color.

Then I decorated the whole thing with a lot of flowers (fussy cut, Floral Die CutsPaper Flowers). I also added rainbow and sentiment stickers. I cut the "Hello Lovely" fussy cut card and the butterfly that I added at my disposal as well as some golden hearts Puffy Stickers and a Cardstock Sticker banner. I finished with gold paint splatters to tie it all together!

I hope this inspires you for a future layout! I loved making this page - my daughter has been asking me for a long time to make it with intense colors and the Wonders collection is perfect for that! Thanks for stopping by and I wish you a wonderful day full of creativity!


SUPPLIES: Patterned papers, stickers, die cuts, embellishments: WONDERSwhite cardstockgessogold paintDistress Oxideswhite acrylic paint; Die cut machine: Silhouette Cameo; Cut file: Besties by Paige Evans

Location: France / Instagram: @secretsandcreations / Blog: Secrets & Creations / Facebook: Secrets & Creations / Pinterest: secretsandcreations

Snug as a Bug Layout by Valerie Bisson


Saturday, June 26, 2021

Hi there! Valerie Bisson here and I am so happy to be back creating for Paige’s cut file design team using her amazing cut files and the beautiful Wonders collection to make a super fun page with lots of texture and a cute photo. For today's project I started by preparing the Sketch and Stitch Clouds Background cut file on Paper 20 and then stitching it with all 6 strands of DMC threads in a backstitch.

Once the stitching was complete I chose Paper 2 for the lower half of the layout. With this paper I cut the rainbow in strips about half way so I could roll each piece separately. Since I was only using it on the lower part of the layout I decided to cut off a few inches of it and tuck in these extra pieces for another layer of rolled sections which you can see in the close up photo. Also so that the rolled pieces would stay rolled tight I added a small amount of glue inside the paper roll - this way the page didn’t get to bulky making it easier to keep in a photo album.

Next I matted my photo with a pink paper from the 6x8 Paper Pad and then tucked it near the centre of the page with dimensional adhesive. I added two birds from the 8-Page Sticker Book on either side of the photo and "dream" from the Ephemera Die Cuts at the top of the photo. After this I added white acrylic paint splatters along the rolled paper strips and several of the cute mini Puffy Stickers in matching colors.


Then for the title, cut files work great for this and I found the perfect one, Snug as a Bug in a Rug cut from white cardstock. I backed it with Paper 2 from the 12x12 Paper Pad and another paper to add an outline layer. Then I adhered it to the page with dimensional adhesive, placing it on the background to match up the stripes. Lastly, I added a bunch of nuvo crystal drops in white.

I hope my layout has inspired you to grab some cut files, thread, and start creating! Thanks so much for stopping by, have an amazing day!


SUPPLIES: Patterned papers, stickers, die cuts, embellishments: WONDERSwhite cardstockwhite acrylic paint; Die cut machine: Cricut Explore Air 2; Cut files: Sketch and Stitch Clouds Background and Snug as a Bug in a Rug by Paige Evans

Location: Manitoba, Canada / Instagram: @valeriearts2 / Pinterest: valeriearts2 / Facebook: Valerie Bisson

PaigePals: A Monthly Mini Album Kit & Virtual Class


Friday, June 25, 2021

I am so excited to announce the launch of PaigePals: a monthly mini album virtual class & kit club where you'll learn the latest and greatest techniques for creating cute and colorful handmade mini albums from scratch for documenting your precious memories! No two albums will be alike, the kits will always be exceptional, and you'll expand your creativity by taking it to the next level!

Product in every monthly kit has a retail value of over $60 and I'm using past collections from Maggie Holmes, Vicki Boutin, Dear Lizzy, 1Canoe2, and Jen Hadfield. Kits will contain at least 12 papers (please note that 12x12” papers will be trimmed down to 6x12” so you'll get half of every paper and make shipping internationally possible) and at least 8 packs of embellishments for creating the mini album from start-to-finish.

All kits whether you purchase 1 or all 4 will ship by August 1st and you will receive an email with tracking info. I plan to release mini album classes & kits in 4 month batches to keep shipping costs down and ensure it all runs smoothly!
These are the dates and times that the live virtual classes will take place. The link to the live YouTube video will be emailed about 24 hours before the class and the video will be saved for re-watching. Be sure to check your spam and promo folders for emails from paigetaylorevans@gmail.com as more often than not my bulk emails are hidden.

Images of the kit, the mini album we will be making, additional supplies, photo sizes, and more, will be shared in the private Facebook group on the 2nd of every month so you can gather everything in time for the live instruction. Dates and times are subject to change due to unforeseen circumstances, and I will be sure to communicate if there are any changes via email and the Facebook group.

Mini Album Class 1 - Saturday August 28th 11am-1pm Eastern Time
Mini Album Class 2 - Saturday September 25th 11am-1pm Eastern Time
Mini Album Class 3 - Saturday October 23rd 11am-1pm Eastern Time
Mini Album Class 4 - Saturday November 20th 11am-1pm Eastern Time
- 2 hour live monthly class teaching how to create the mini album.
- Access to a private Facebook group where updates will be posted along with sneaks, photos, supply lists, cut files, and more! Share your projects, ask questions, get inspiration, and be surrounded by mini album lovers!
- Receive kits from lots of collections so everything goes together to make the projects and elevate your creativity.
- Monthly guest designer showing alternate ideas with the kit.
- Every mini album will be unique and special with different supplies so you will learn all kinds of useful techniques that can be applied outside of mini album making!
USA
1 kit with virtual class - $80
2 kits and virtual classes - $140 (save $20)
3 kits and virtual classes - $200 (save $40)
4 kits and virtual classes - $260 (save $60)
*all prices include shipping

INTERNATIONAL
1 kit with virtual class - $95
2 kits and virtual classes - $170 (save $20)
3 kits and virtual classes - $240 (save $40)
4 kits and virtual classes - $320 (save $60)
*all prices include shipping.

VIRTUAL CLASSES ONLY
1 virtual class without the kit - $20
2 virtual classes without the kits - $37 (save $3)
3 virtual classes without the kits - $55 (save $5)
4 virtual classes without the kits - $70 (save $10)

The PayPal request and an email with the link to join the private Facebook group where communication will take place will be sent within 48 hours of sending your order to me. Please be sure to pay the request within 48 hours, after then the request will automatically be canceled.

All kit/s whether you purchase 1 or all 4 will ship by August 1st and you will receive an email with tracking info. Some packages reach their final destination in a few days and some take a few months because of covid restrictions. If your country is on THIS LIST chances are it could take 6-10 weeks for a package to reach you. If you haven’t received your box after 10 weeks from when you receive the shipping notification email, please reach out to me for help. Thanks for working with me through these unprecedented times in the shipping industry!

The first 50 orders will receive a 3" round PaigePals sticker!
To join, send me an email (paigetaylorevans@gmail.com) with the following information:
1) Your name
2) Shipping address
3) PayPal email address or Venmo name
4) What you would like to order

Thank you so very much for your support in my newest scrapbooking endeavor! Please let me know if you have any questions! I can't wait to create with you virtually and see how you document your memories in mini albums!


Thank you very much for being here! Please enjoy this Island Scene cut file!

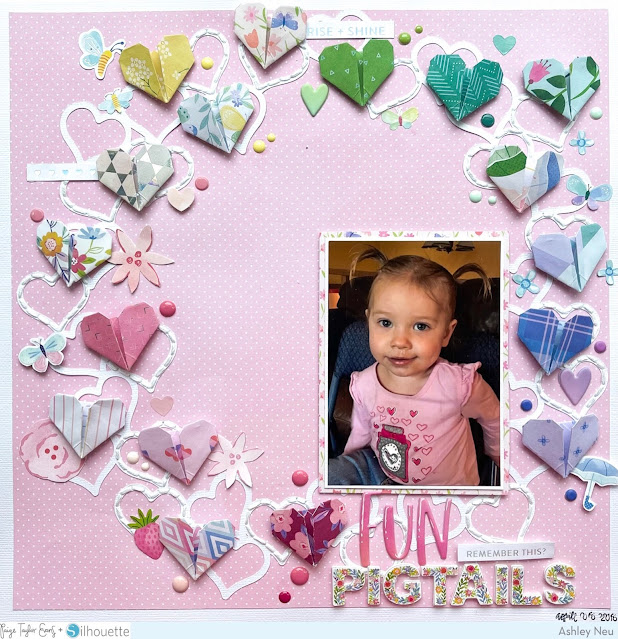
Pigtails Layout by Ashley Neu


Hi scrappy friends! Ashley Neu back with a fun and whimsical layout! For this layout, I used the Bloom Street collection and Paige's Heart Wreath cut file. The photo I have scrapped is one of my youngest daughter when she was sporting some cute, little pigtails. She absolutely loved when I did her hair so I have many photos of her with her hair all done up.

The first thing I did after cutting the Heart Wreath cut file from white cardstock was attaching the cut file onto this adorable pink with white polka dot patterned paper from the 12x12 Paper Pad. I did some stitching with white embroidery floss by randomly selecting hearts to stitch, giving it a fun and whimsical feel. Stitching directly onto the cut file that’s attached to a background paper gives it the sturdiness you need to not rip a intricate or delicate cut file.

Next, I created these fun geometric origami hearts! They are so simple to make. If you ever made paper airplanes or really anything using paper folding, you can definitely make these! In my YouTube tutorial for this layout, I show you at normal speed how to make these. After making 17 hearts using mostly the 12x12 Paper Pad but also some papers from the 6x8 Paper Pad, I arranged them in a rainbow order over the heart wreath cut file and attached them using foam adhesive.

Finally, I created the title using a combination of the Puffy Vinyl Stickers and the Floral Foam Thickers. I also added embellishments to the layout using the 4-Page Sticker Book, Cardstock Stickers, fussy cut flowers from Paper 12, and some enamel dots from my stash to create a tone-on-tone effect. That is one of my most favorite techniques to use! It makes the embellishing part of creating a layout super smooth and quick!

Thank you for checking out this layout and for stopping by Paige’s blog! Have an amazing day! 


SUPPLIES: Patterned papers, stickers, Thickers, die cuts, embellishments: BLOOM STREETwhite cardstock;; Die cut machine: Silhouette Cameo; Cut file: Heart Wreath by Paige Evans

Location: Minnesota, USA /  Instagram: @ashleyneudesign / YouTube: Ashley Neu / Pinterest: Ashley Neu Design / Facebook: Ashley Neu Design

Home Layout by Adam Westwood


Thursday, June 24, 2021

Hello! ScrappyAdam back with you and I’m excited to share another project using Paige's cut files and awesome collections! I have used mostly Wonders, the latest collection, but you’ll also find a couple of older collection pieces.

I started with Paper 11 and added a large strip down the middle of Paper 23 with two strips of Paper 17 to each side. On Paper 23 I decided to use some heart shapes in ink on top on top of this although I then covered most of it up! I added a border around the whole page on top of the layers to cover the foam tape using Paper 6. I took a whole sheet of the Floral Transparency and then used foam tape around the entire page and down the page behind the orange strip. I then used the sequin mixes from Turn the Page and Truly Grateful to create to giant shaker pockets on each side of the layout which gives the layout a lot of dimension and created a unique shaker page!

I took Paige's Home cut file and backed two letters with a floral paper from the Wonders 6x8 Paper Pad and the heart and E with a foiled paper from Horizon. This was then popped at the bottom of the layout. It was then a case of adding my photos, embellishments, and finishing touches! I wanted to use the cut file as part of a long title and to give a bit more interest, I used the alphas from Wonders together with alphas from three other collections by Paige.

I popped by two photos (one is 3x4” and one is a little bigger) to the top left of the layout. I had a section of the Heart Wreath cut file left from a previous layout and so I tucked this behind my photos. I like to cut up cut files and tuck them in, not backed, to add some extra interest, texture, and dimension! I popped double mats using paper from the Wonders 6x8 Paper Pad to my photos.

Finally, I finished with two tags from Paper 12 tucked behind my photo with some ribbon, the whole pack of wood embellishments in the Mixed Embellishments from Truly Grateful dotted about the page, Puffy Stickers from Wonders, and some fussy cut envelopes from Paper 22 and foiled mandalas from the 6x8 Paper Pad. If you look closely enough, there are some stickers from older collections too. That’s what I love about Paige’s collections – they all work together so well and can be mixed and matched and I love to dive into my huge box of Paige Evans goodies and pull out all sorts of lovely scrappy goodies! You’ll also find a Horizon paperclip or two!

I look forward to coming back with another layout and I am SO EXCITED for the new Bungalow Lane collection! Have you seen it? It’s bloomin’ lovely! I’ll see you soon but in the meantime, check out the blog for tons of inspiration from Paige and the rest of the design team! Take care and stay safe wherever in the world you are!


SUPPLIES:
 Patterned papers, stickers, die cuts, embellishments: WONDERS; Die cutting machine: Silhouette Cameo; Cut files: Home and Heart Wreath by Paige Evans

Location: Manchester, England / Instagram: @scrappyadam / Facebook: Adam Westwood / Pinterest: Scrappy Adam
Paige Taylor Evans © // Quinn Creatives DESIGN