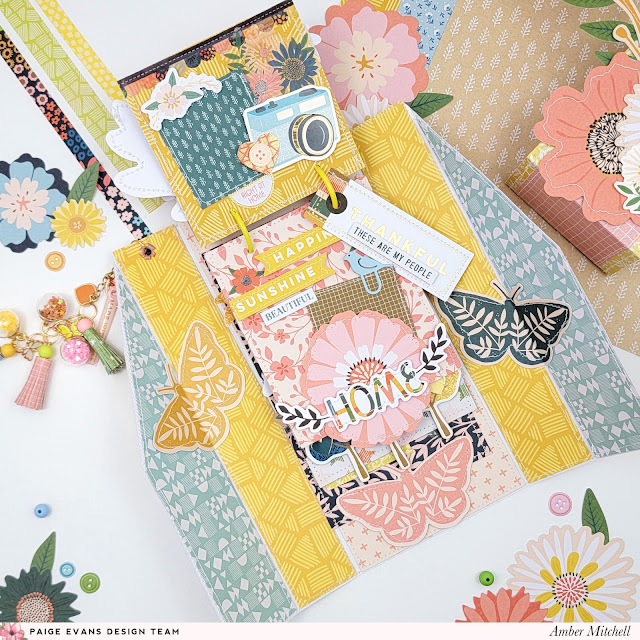
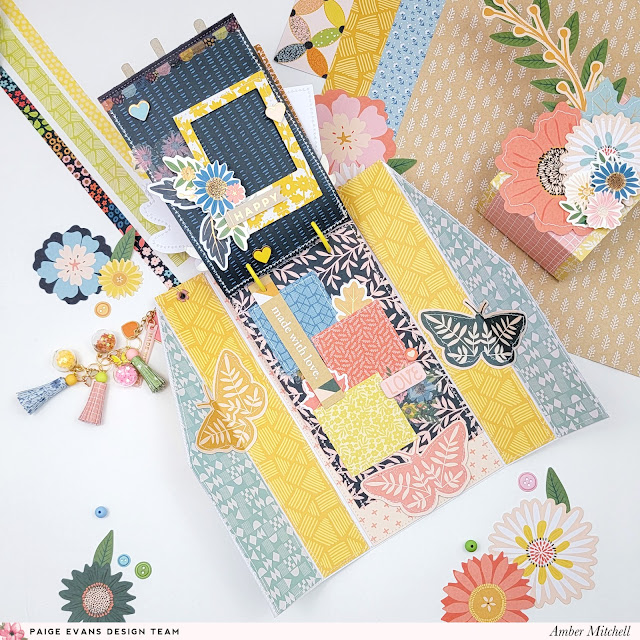
Hello crafty friends! Amber Mitchell here on Paige’s blog today to share with you this fun peek-a-boo mini album I created using the Bungalow Lane collection.
I have had so much fun working with the Bungalow Lane collection! I’ve made several albums now and still feel as inspired to create with it as I did the very first time! The colors and patterns just speak to me!
The base of this mini album has a peek-a-boo center that gives a glimpse of the inside pages. To create the base, I took a sheet of paper from the 12x12 Paper Pad and trimmed it down to 8.5 x 11 inches. I scored this sheet on the 11-inch side at 2, 3.5, 7.5, and 9 inches. I creased and folded on the score lines to create the template of my base.
To create the peek-a-boo center, I trimmed the outer panels on either end at an angle. Since I used a sheet of paper from the 12x12 Paper Pad, I needed to mat the back of it (or inside of the album) with patterned paper. I used pink, yellow, and blue patterns from the pad and adhered them down using a strong adhesive.
To create the pages, I took five sheets of paper from Bungalow Lane and trimmed them down to the following sizes: 2.75 x 2.5, 2.75 x 3.5, 2.75 x 4.5, 2.75 x 5.5, and 2.75 x 6.5 inches. I made my five pages from the following patterned papers from Bungalow Lane: Paper 10, Paper 11, Paper 14, Paper 16, and Paper 21. To bind my pages to the album I chose binder rings. I used some yellow 1-inch rings from my stash to match the collection. I added them to the top of my album base and attached the pages from largest to smallest. And that’s the base of the album ready to go!
To embellish this mini album, I used a mix of embellishments from Bungalow Lane to create a lot of texture and dimension.
For the title, I used stickers from the Foam Phrase Stickers and the Chipboard Stickers. I added these to the top page of the album and layered them around Floral Die Cuts and Layered Stickers. To create extra pages and journaling spots, I used pieces from the Ephemera Die Cuts and added them in-between the pages.
For some finishing touches, I used smaller elements from the 8-Page Sticker Book, Embossed Puffy Stickers, and Cardstock Stickers. This is a great way to fill up space or add extra detailing to pages. Throughout the album I added a few photo mats that I created using sheets from the 2x2 Paper Pads. I stacked these on the last page and added one to a tuck-spot on another page that I created using a flower from the Floral Die Cuts.
When it comes to a closure for this album, I opted to create a band that wraps around it. A Velcro strap or even a magnetic closure would work great as well. I decided to use a band so that I could further decorate the cover with flowers and leaves. To create this band, I took a sheet of paper that measured 3 x 12 inches. I scored this on the 12-inch side at 3, 4.5, 8.5, and 10 inches. I folded this strap around the album and adhered it together using adhesive tape. The final touch was a fun dangle made up of a paper tassels and charms, including one of the Heart Charms.
I’m absolutely in love with how this album turned out and I’m inspired to try it in different sizes and shapes! Thank you so much for stopping by my post today. I’ll see you next time with another fun project!
SUPPLIES: Patterned papers, stickers, die cuts, paper clips, charm, washi tape, embellishments: BUNGALOW LANE
Location: California, USA / Blog: Happy Crafty Studio / Instagram: @bambidearr / YouTube: bambidearr / Pinterest: bambidearr


Another beautiful album Amber - thanks for sharing.
ReplyDeleteI love your little albums! This is precious!
ReplyDeleteSo beautiful and inspiring Amber! You have THE best ideas! Thanks for sharing all the measurements too 💗K
ReplyDeleteThank you, Amber, for this sweet album. You are truly inspiring. Of course, the beautiful designs from Paige just give it the perfect added touch.
ReplyDeleteBeautiful and love Bungalow Lane!! My head is spinning!! I have at least three different people and occasions in mind to make one of these albums for!!❤️
ReplyDelete