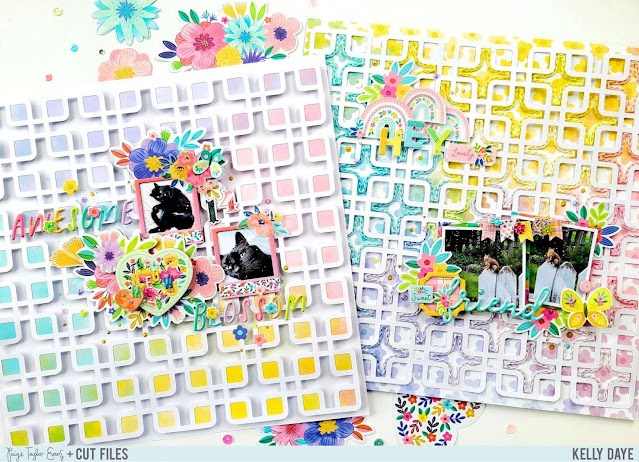
Hello crafty friends, Kelly Daye here with two layouts this week, read on to see why! I’ve used Paige’s Rounded Squares Background cut file for both. My plan was to paper-back the cut file with Paper 18 from Blooming Wild then lay it over stitched Paper 12. Have you noticed these two papers are identical in color, but Paper 12 has flowers on it? Anyways, after two days of chain stitching with multiple colors of DMC floss I found that the paper-backed cut file overwhelmed all the pretty stitching! Gah! On to plan B, ha! I cut out another Rounded Square Background from white cardstock, left it open (no paper-backing), and glued it over my stitching. Then, I popped up the paper-backed cut file onto another sheet of white cardstock with foam tape. Voila, two pretty backgrounds to design with!
‘Hey Lovely Sweet Friend’ features photos of a visitor that joined us at a local pub as we sipped wine on their patio. I made the tiny squirrel sized banner from flags in the Sticker Book and added three little Flower Charms. My 2x2 photos are backed with the Floral Transparency. This adds more interest and color but doesn’t cover up the background. I made a small collage on the left of the photos with a Chipboard Tile, Chipboard Frame Stickers, Puffy Phrase Stickers, Mini Flower Puffy Stickers, and Floral Die Cuts. On the right, more floral embellishments, a butterfly from the Cardstock Stickers and a cute pink button from the Chipboard Stickers! To balance my vignette on the lower right, I made another vignette on the top left. You might have learned about the magic of three, that’s how I designed this cluster, spelling ‘HEY’ with Thickers.
Watch this Cameo Tutorial to see how I used Paige’s Rounded Squares Background cut file to create the stitching on Paper 12. Meanwhile, check out how Paige stitched Paper 12 for her own gorgeous design!!
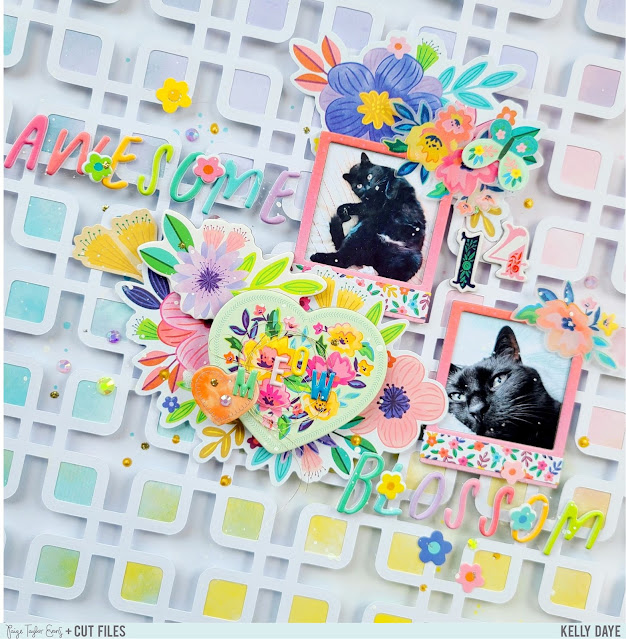
‘Awesome Blossom’ features my sweet and lovable kitty Blossom. How perfect that her name is part of the Puffy Phrase Stickers! This layout was made with the Rounded Squares Background cut file paper-backed with Paper 18. I’ve embellished Chipboard Frame Stickers with Washi Tape.
A cluster of pretty things including Floral Die Cuts, Chipboard Stickers, Mini Flower Puffy Stickers, transparent flowers from the Sticker Book, and Cardstock Stickers all surround my chunky cuddle-bug.
There are no mistakes in scrapbooking, LOL! I hope you’re inspired to use one cut file in two ways too! Thanks so much for coming by!
SUPPLIES: Patterned papers, stickers, Thickers, die cuts, embellishments: BLOOMING WILD; Cut file: Rounded Squares Background by Paige Evans


Oh dear! I can image how your heart dropped when you thought your stitching was going to be overwhelmed. However with a little magic you managed to create not one, but two delightful pages, each of them so, so pretty. Thanks for generously sharing your methods so that we can attempt something similar. I tried to leave this comment on your blog Kelly, but for some reason, it wouldn't "stick" Love your work, Helen W
ReplyDeleteHi Helen! Thanks ever so much for your generous message! It's always a pleasure to share how things came together. I feel totally blessed to be able to design for Paige, using her gorgeous products! Cheers dear 💛
Delete