Sparkle & Glow Layout by Kat Flores


Thursday, February 29, 2024

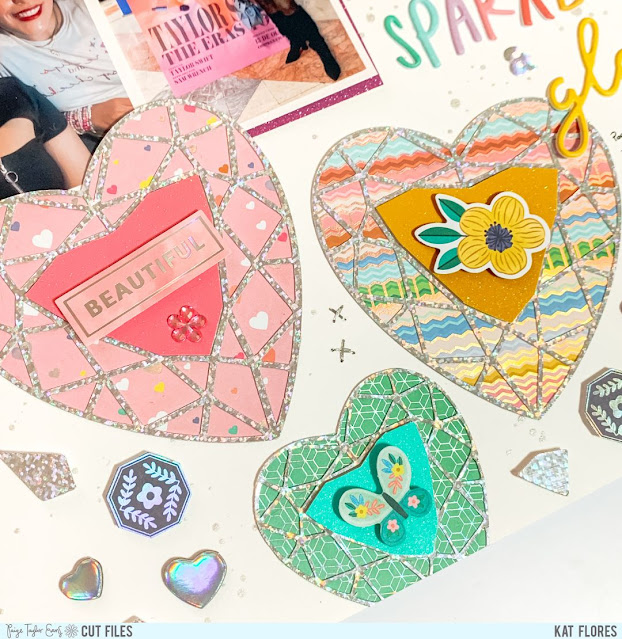
Hello scrappy friends! Kat Flores here, I’m so happy to be back on Paige's blog sharing a layout inspired by Taylor Swift’s music. Last year I saw her movie with my best friend, we had a really nice experience since we couldn't go together to the concert, so my inspiration was about friendship and her Bejeweled song. I chose the Jewel Heart cut file and Blooming Wild collection.
My idea was to make a shiny & sparkly page, so I started making my background on white cardstock and silver paint splatters over it. Next I cut Jewel Hearts in different sizes from a holographic paper, backed them with papers from the 6x8 Paper Pad, and I used glitter cardstock for the inner pieces. I attached the hearts to my background with foam tape. To embellish, I fussy cut hexagons from a paper in the 6x8 Paper Pad and glued them with foam dots around the page. To give an extra touch to those focal points, I used hearts from the Chipboard Stickers that were perfect with that holographic shine and also placed down with foam dots some scraps from the cutting file, trying to make them look like little jewels. I made my title using words from the Puffy Phrase Stickers and the Sticker Book. I embellished every jewel heart making a tone-on-tone effect, using some Ephemera Die Cuts, Cardstock Stickers, and flowers from Puffy Phrase Stickers. The final details were some cross stitches around my page using silver thread.
I loved how this turned out! Now every heart reminds me of Taylor Swift’s eras. I hope you get inspired to use your Blooming Wild stash in your projects and check out Paige's cut files! Have a wonderful day and happy scrapping!
SUPPLIES: Patterned papers, stickers, die cuts, embellishments: BLOOMING WILD; Cut file: Jewel Heart by Paige Evans

Spring Has Sprung Layout by Jackie Ashton


Wednesday, February 28, 2024

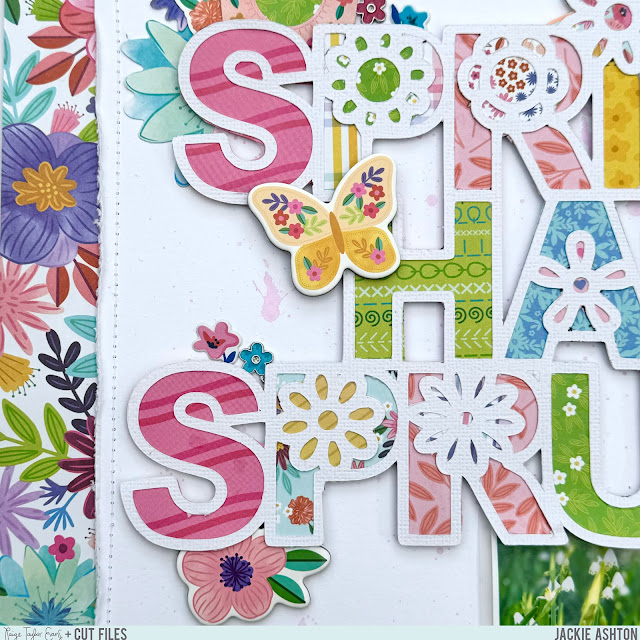
Hi everyone! Jackie Ashton here with my newest layout using Paige's Spring Has Sprung title from the 19 Spring Cut Files along with her Blooming Wild collection.
I cut the Spring Has Sprung title from white cardstock and backed each letter using various scraps of patterned papers from the 12x12 Paper Pad and 6x8 Paper Pad. Once each letter was backfilled I added it to a 10" square of white cardstock (with pink splatters applied beforehand) using foam squares for dimension then added it onto a background of the floral Paper 24. I distressed the edged then machined stitched it in place. After positioning and sticking my title down, I added vellum and patterned paper to my photographs and tucked them under the lower edge of my title. I left the edges of the cut file free from 3D foam so I was able to tuck floral embellishments around it including floral Chipboard StickersCardstock StickersMini Flower Puffy Stickers, and Floral Die Cuts. Within my embellishment clusters I added Flower Charms, making sure I tucked them behind so you can’t see the attachment.
I love how this turned layout out and I hope you can get some inspiration to use Blooming Wild and the Spring Has Sprung title from the 19 Spring Cut Files! Thanks so much for stopping by and have a great day!
SUPPLIES: Patterned papers, stickers, die cuts, embellishments: BLOOMING WILD; white cardstock; Cut file: Spring Has Sprung title from the 19 Spring Cut Files by Paige Evans

Flower Child Virtual Classes!


Tuesday, February 27, 2024

Join me for virtual classes featuring the Flower Child collection by Jen Hadfield! Together we'll learn how to make a Paintbrush Mini Album and four 12x12 Flower Child Layouts from start-to-finish. Continue reading for all the details!
In the first class I teach you how to create a paintbrush-shaped mini album with six lovely and layered pages, flowers galore, and realistic fringe that looks like paintbrush bristles! After purchasing, Ecwid will email you the PDF that contains a list of additional craft supplies to have on hand, photo sizes, any homework to complete before class, templates, cut files, instructions, and a link to YouTube video tutorial. The class is pre-recorded so you can go at your own pace and watch anytime/anywhere!
Register for access only to the paintbrush mini album virtual class HERE and purchase supplies through my affiliate link HERE.
***********************************
In the layouts class I teach you how to create four 12x12 scrapbook layouts! Techniques include a grid background made of circles, a distressed sunburst page, a handmade flower made of patterned paper petals, and a backed flower background cut file. After purchasing, Ecwid will email you the PDF that contains a list of additional craft supplies to have on hand, photo sizes, any homework to complete before class, templates, cut files, instructions, and a link to YouTube video tutorial. The class is pre-recorded so you can go at your own pace and watch anytime/anywhere!
Register for access only to the layouts virtual class HERE and purchase supplies through my affiliate link HERE.
Let me know if you have any questions! See you in the Paintbrush Mini Album Class and four 12x12 Flower Child Layouts Class!

Happy Fun Times Layout by Paige Evans


Monday, February 26, 2024

Here is the finished layout that we made in today's very first Make with Me Monday!
Here is the video for re-watching and you can find the playlist HERE.
SUPPLIES (affiliate linked):
Blooming Wild collection: https://shrsl.com/3wukm

SCRAPBOOKING BASICS:
12" paper trimmer: https://shrsl.com/334mc
fussy cutting scissors: https://shrsl.com/43jzk
journaling pens: https://shrsl.com/4i2ix
pencil and eraser: https://shrsl.com/4i2ic

OPTIONAL:
sewing machine: https://bit.ly/3UUyvLw
white all-purpose thread: https://shrsl.com/4i2j4
hand sewing needle: https://shrsl.com/4i2iq
white embroidery thread: https://shrsl.com/4i2i7

The layout is based on this sketch:
And the sketch is based on this layout:
Sketches are a great starting point and then you can change the collection, shapes, number of photos, and more, for completely new and unique results! See you again next Monday!

Spring Banner Layout by Heidi Lewis


Hayyy friends, Heidi Lewis here and it's currently snowing as I am writing this blog post, but I am daydreaming of warmer days ahead. Meanwhile, I am using the Banner from the 19 Spring Cut Files and Paige's Splendid collection to reminisce on days of spring past.
I began this layout by cutting the Banner from white cardstock and backing it with a variety of patterns from Paper 19. Then I cut 0.4 inch squares from scrap papers from Bungalow Lane and Paper 21 from Splendid. Next, I arranged the paper pieces into a horse on the left side of the page. Once the squares were glued into place, I zig-zag stitched the lines between the squares with rainbow thread. I arranged the Banner above the horse and added extra banners from the Cardstock Stickers, Ephemera Die Cuts, and Epoxy Stickers. Some Chipboard and regular Buttons give the banners extra pizzazz. Lastly, I added a 3x4 photo to the bottom of the page and finished off the embellishing with more Stickers and ephemera to fill in some of the negative spaces.
Alright, I think I "baled it!" Now, quit horsing around and go make this layout! Be sure to check out Paige's 19 Spring Cut Files!
SUPPLIES: Patterned papers, die cuts, stickers: SPLENDID; Cut file: Banner from the 19 Spring Cut Files by Paige Evans

Make with Me Monday!


Sunday, February 25, 2024

I have been wanting to do "Make with Me Monday" for years and now it's finally happening! Join me LIVE every Monday at 8am Pacific / 11am Eastern Time on my YouTube channel and learn how to make a layout! My plan for 2024 is to base the layout on my sketch of the week and the sketch I use will be posted in the Sketches Album in my Happy Scrappy Place Facebook Group!
*********
Each live broadcast will last around 45 minutes to an hour, give or take, is free to watch, anyone in the world can join in the fun, and the video will be saved in THIS PLAYLIST so if you can't join the live you can watch it later and/or watch it again! I will post the YouTube link and supplies to have on hand to create the layout along with me in my FB group the Saturday before (but for this first one I'll post the link/supplies tonight)!
*********
PS - I haven't gone live in a loooong time so the first few sessions I might need a little grace to figure it all out again :)
I AM SO EXCITED TO SCRAP WITH YOU LIVE EVERY WEEK!

Spring Tree Layout by Audrey Mutschall


Saturday, February 24, 2024

Hello friends!! Audrey Mutschall here with a new layout featuring Paige’s Tree from the 19 Spring Cut Files and her beautiful Blooming Wild collection.
I cut the design from white cardstock and backed it with various patterned papers from the 12x12 Paper Pad. With the tree complete, I adhered it to watercolor Paper 18 using foam adhesive to pop it up from the background. Next came the fun part - embellishing the tree! I used Floral Die Cuts, a birdhouse Chipboard Sticker, birdhouse Cardstock Stickers, and Mini Flower Puffy Stickers. I also fussy cut butterflies from Paper 16 and placed them on top of the butterflies on the cut file. I made a title from the Puffy Phrase Stickers and the Alpha Thickers then placed it on the left side of the cut file. My photo is matted with pink hearts Paper 2 and embellished with phrase stickers from the 8-Page Sticker Book. I attached a piece of cardstock to a Chipboard Sticker tag and placed this between the layers of matting around my photo so that it can slide out to reveal journaling. Lastly, I placed a border of Washi Tape along the bottom of the page and added another Chipboard Sticker at the trunk of the tree.
I hope this inspires you to check out Paige’s 19 Spring Cut Files and her beautiful Blooming Wild collection for all of your spring projects!
SUPPLIES: Patterned papers, stickers, die cuts, embellishments: BLOOMING WILD; white cardstock; watercolors; Cut file: Tree from the 19 Spring Cut Files by Paige Evans

PaigePals6 Kits & Virtual Classes!


Friday, February 23, 2024

**************************************************************************************************
I am very excited to continue teaching virtual classes with accompanying kits so you can create the projects along with me in PaigePals6 which consists of 4 kits and 8 virtual classes to make 4 mini albums and 16 layouts! Read on for all the info for how you can participate in the classes, see sneak peeks of the projects, class descriptions, and ordering info below!
Please note that the format is slightly different from previous PaigePals classes: instead of going live I will have pre-recorded videos that you can access anytime/anywhere after they are published. This is so I can show more in-depth techniques that can't be done in the usual 2 hour window and we are creating more projects - instead of making 2 layouts per kit we will make 4 so you learn twice as many techniques and get more use out of the kits!
**************************************************************************************************
FEBRUARY MINI ALBUM & LAYOUTS KIT
Videos go up on February 24th 2024 at 3am Pacific/6am Eastern
Learn how to create a paintbrush shaped mini album and four 12x12 layouts using the Flower Child collection by Jen Hadfield! Techniques for the layouts include a grid background made of circles, a distressed sunburst page, a handmade flower made of patterned paper petals, and a backed flower background cut file. After purchasing, Ecwid will email you the PDFs that contain a list of additional craft supplies to have on hand, photo sizes, any homework to complete before class, templates, cut files, instructions, and a link to the PaigePals6 YouTube playlist where classes will be added on February 24th at 6am Eastern Time.
**************************************************************************************************
MARCH MINI ALBUM & LAYOUTS KIT
Videos go up on March 23rd 2024 at 3am Pacific/6am Eastern
Learn how to create a castle shaped mini album and four 12x12 layouts using the Main Character Energy collection by Shimelle! Techniques for the layouts include rings of fussy cut butterflies, a background made of triangles, a grid of hand stitched paper circles, and a backed rainbow cut file. After purchasing, Ecwid will email you the PDFs that contain a list of additional craft supplies to have on hand, photo sizes, any homework to complete before class, templates, cut files, instructions, and a link to the PaigePals6 YouTube playlist where classes will be added on March 23rd at 6am Eastern Time.
**************************************************************************************************
APRIL MINI ALBUM & LAYOUTS KIT
Videos go up on April 20th 2024 at 3am Pacific/6am Eastern
Learn how to create a standing frame mini album and four 12x12 layouts using the Life of the Party collection by American Crafts! Techniques for the layouts include a grid background of stitched squares & photos, rows of hand cut patterned paper hearts, cascading hand stitched paper balloons, and a backed large title cut file. After purchasing, Ecwid will email you the PDFs that contain a list of additional craft supplies to have on hand, photo sizes, any homework to complete before class, templates, cut files, instructions, and a link to the PaigePals6 YouTube playlist where classes will be added on April 20th at 6am Eastern Time.
**************************************************************************************************
MAY MINI ALBUM & LAYOUTS KIT
Videos go up on May 18th 2024 at 3am Pacific/6am Eastern
Learn how to create 3 tiny chipboard albums in a paper basket and four 12x12 layouts using the Discover + Create collection by Vicki Boutin! Techniques for the layouts include a grid background of paper rectangles & photos, a hand stitched circles background, a hand stitched swirls frame, and a backed title cut file with a bit of mixed media. After purchasing, Ecwid will email you the PDFs that contain a list of additional craft supplies to have on hand, photo sizes, any homework to complete before class, templates, cut files, instructions, and a link to the PaigePals6 YouTube playlist where classes will be added on May 18th at 6am Eastern Time.
**************************************************************************************************
PRICES
USA: 4 kits with the 8 virtual classes: $388 + $12 shipping - purchase HERE
* If you purchase additional supplies from my shop I will refund any shipping over $12

INTERNATIONAL: 4 kits with the 8 virtual classes: $388 + actual shipping costs.
*Please send me email paigetaylorevans@gmail.com with your mailing address to get an exact shipping quote.

VIRTUAL CLASSES ONLY: All 8 virtual classes: $170 (save $30!) can be purchased HERE

INDIVIDUAL CLASSES: Access to individual virtual classes will be made available the month they are released in MY SHOP
**************************************************************************************************
Kits will ship within 72 hours of payment received and you will get an email from stamps com with your tracking #. If you haven’t received your box after 4 weeks from when you receive the shipping notification, please email me. Please let me know if you have any questions and I can't wait to create with you virtually and see how you document your memories in layouts & mini albums!
Thank you so much for your continued support of my passion for scrappin'!

Glow Spread by Ashley Neu


Thursday, February 22, 2024

Hello scrappy friends! It’s Ashley Neu back for the Paige Evans Cut File Design Team to share my next project. I am very excited today to share this layout because it is the very first time I have created a 6x8 layout. Not only that, but it’s also a double page spread! Blooming Wild was perfect for the photos I had selected as were the Half Flower Circle and Butterfly cut files.
One of my favorite patterned papers from the collection is Paper 13. Tone-on-tone is always a hit for me. This paper also has the most beautiful pattern which just makes it the perfect background paper. I cut 2 pieces at 6x8”. After backing the Half Flower Circle with papers from the 6x8 Paper Pad, I adhered it to the left edge of the paper. My two 2x2.5” photos were then layered on top. My title came from the Puffy Phrase Stickers which was layered onto a fussy cut floral. I also added a floral to the top of the photos and some enamel dots from my stash around the floral cut file.
The right page holds the Butterfly cut file and a photo of my daughter in front of a butterfly mural. The 6x8 Paper Pad came in handy to back the butterfly. That rainbow floral paper was perfect to mimic the colorful butterfly in my photo. The tiny fussy cut butterflies also came from a paper in the 6x8 Paper Pad. I included a sentiment sticker above my photo from the Sticker Book and more enamel dots.
I hope you liked this style of layout because 6x8 layouts may be an obsession for me for a while! Thank you for stopping by Paige’s blog and have a great day!
SUPPLIES: Patterned papers, stickers, Thickers, die cuts, embellishments: BLOOMING WILD; white cardstock; Cut files: Half Flower Circle and Butterfly by Paige Evans

Leaf Wreath Layout by Amber Mitchell


Wednesday, February 21, 2024

Hi crafty friends! Amber Mitchell here on Paige's blog today to share with you a layout that I created using her Blooming Wild collection and Leaf Wreath cut file.
It's slowly starting to warm up here in California, with some sunny days mixing in amongst the rainy ones. To match that weather I decided to create a vibrant, spring-themed layout that features a bunch of florals and happy sentiments. I felt inspired recently by the beautiful wreath layouts Paige has created and decided to create one myself. I cut Paige's Leaf Wreath cut file from white cardstock then I chose my background paper. I opted for a bright yellow paper from the Blooming Wild Project Pad because I love how it made the photo and the flowers POP! For texture I added machine stitching in circles on the middle of the background. Then I splattered watered down acrylic paints around the stitched circles. I used the colors white, yellow, blue, and pink. I then glued the wreath down over the center circle. I love how the stitched circles and paint splatters peek through the leaves of the cut file. The photo I used for this layout is of my nephew from several years ago. It was so fun to work with this photo and since he's quite a bit older now the nostalgia was hitting hard! I chose this photo because the greens of the grass in the background complemented the shades of green in this collection perfectly! I tucked my photo behind the leaves of the cut file on the right-hand side of the layout. To embellish, I used A LOT of florals from the Floral Die Cuts. I created five different clusters of flowers, making sure to use a mix of colors, and included plenty of leaf die cuts as well. Once the clusters were adhered down (using a mix of glue dots and foam tape), I added some small statement pieces to each of them. On two of them I added butterflies from the Cardstock Stickers. I propped these up on foam tape and bent the wings upwards to create dimension and texture. On the bottom cluster I added a miniature rainbow from the Chipboard Stickers. I also added a bright yellow chipboard flower to the top cluster. I made the cluster around the photo the largest. I added multiple larger flowers and leaves. I also tucked a birdhouse sticker behind the leaves and then added a bird sticker on top of the leaves. To create the title for this page, which is "Hello, you are sunshine", I used two different sentiment stickers (one from the sticker sheet that is included in the Project Pad and one from the Cardstock Stickers). To finish off this layout, I added a few Chipboard Stickers around the layout. Three buttons to draw the eyes to all sides of the page and a tab on the side of the photo to add a small sentiment sticker finish up this page.
As someone who mainly creates mini albums, I still feel a bit out of my comfort zone when it comes to creating scrapbook layouts, but using Paige's cut files makes it a breeze and so much fun! Thanks so much for stopping by my post today!
SUPPLIES: Patterned paper, embellishments, die cuts, stickers, embellishments: BLOOMING WILD; Cut file: Leaf Wreath by Paige Evans
Location: California, USA / Blog: Happy Crafty Studio / Instagram: @bambidearr / YouTube: bambidearr / Pinterest: bambidearr

Happy Valentine's Day Layout by Yui Oku


Tuesday, February 20, 2024

Hi everyone! Yui Oku here today with a new layout using Paige's Hearts Heart from the 12 Love Cut Files along with her Sugarplum Wishes collection which is Christmas-themed but also has a lot of pink and red papers and embellishments perfect for love-themed pages!
I cut the Hearts Heart from the 12 Love Cut Files three times: white cardstockPaper 6, and Paper 7. I recommend leaving the last red paper on the mat. First, I put the white heart on Paper 11 for the background. Then I added in the small hearts with foam squares. For the red hearts, I chose only those that did not contain green holly. I wanted to use more of the leftover hearts so I scattered them around the page. Then I added clear glitter snowflakes from the Sticker Book. After adding two photos on the bottom right I attached a red ribbon to the pink tag from the Ephemera Die Cuts. Valentine's Day is all about sweets so I added candies from the Cardstock Stickers and Foam Stickers and a red "HAPPY" tag. Next to the heart I used the small red foil Mini Thickers to make the "HAPPY VALENTINE'S DAY" title and used the Thickers to make the "DAD & ME" title.
I loved making a Valentine's Day page with the Christmas-themed Sugarplum Wishes collection and Paige's Hearts Heart from the 12 Love Cut Files!
SUPPLIES: Patterned papers, stickers, die cuts, embellishments: SUGARPLUM WISHES; white cardstock; Cut file: Hearts Heart from the 12 Love Cut Files by Paige Evans

Love Floral Layout by Valerie Bisson


Monday, February 19, 2024

Hi friends! Valerie Bisson here and I’m so happy to be back sharing a layout I made using Paige's Love Floral from the 14 Valentine Cut Files paired with her Blooming Wild collection.
I started with white cardstock for the background and black cardstock for the Love Floral from the 14 Valentine Cut Files then I backed it with various papers from Blooming Wild all done using my Cricut. For the L, V, and E letters I used a paper from the Splendid Digital Collection which was exactly what I was looking for to be able to have the photo and word Love all in black & white. Before adhering the Love Floral Cut File I added some stenciling in black distress ink to two corners of the background using Paige’s Flowers stencil which you might have in your stash, or you could use the Flower Background Cut File for stenciling. Since the cut file was already so pretty I really didn’t want to cover it up with embellishments even though I auditioned many different pieces, so instead I decided on some easy stitching in the centers of the flowers with a back stitch. As far as embellishment I only added a label from the Sticker Book to document the date and the word You with the Mini Thickers from Sugarplum Wishes. Lastly a little sprinkle of enamel dots.
Thanks so much for joining me here on the blog and I hope you’re inspired to give the 14 Valentine Cut Files a try on one of your next projects!
SUPPLIES: Patterned papers, stickers, die cuts, embellishments: BLOOMING WILDSplendid Digital Collectionwhite cardstockblack cardstock; Cut file: Love Floral from the 14 Valentine Cut Files by Paige Evans

So Much Love Layout by Phil Donahue


Friday, February 16, 2024

Hello scrappy friends! Phil Donahue back on Paige's blog with a lovely & colorful layout featuring the Love Love Love from the 12 Love Cut Files! These cut files are perfect for Valentine's Day and everyday layouts. I wanted to feature a photo of my niece and her dad holding her soon after she was born. This layout was a joint effort between me and my Instagram followers in which I asked them to vote on a photo, cut file, and Paige Evans collection that I should showcase for my next design team layout. The survey resulted in me using the aforementioned photo and cut file along with Paige's vibrant Splendid collection! 
To begin, I cut the Love Love Love from the 12 Love Cut Files from white cardstock and backed it with vellum. I knew because the photo was black & white and the cut file was so simple I wanted to make a very colorful background inspired by the rainbow stripe Paper 3. I found scraps from my Splendid stash in colors pulled from that paper, cut them in 1x10-11" strips, distressed the sides, and adhered them to a white cardstock background in messy rows. I splattered coordinating Distress Oxides around the page and adhered the backed cut file over top with foam squares for depth and liquid glue for longevity. I die cut the photo in a circle, backed it with another piece of vellum, and a scaled down version of Paper 3 from the 6x8 Paper Pad then adhered it to the middle "O" in the cut file. The cut file served as the primary title for the page but I wanted to add a little extra something and found a gold foil "So Much" in the Epoxy Stickers and placed it above the photo to create the full title. Lastly, embellishments were scattered tone-on-tone like pieces from the Chipboard Stickers along with Floral Die Cuts and Ephemera Die Cuts placed on the far right side of the page. Final touches were a trio of gold hearts surrounding the photo.
I hope you found some inspiration in this layout and choose to try out Paige's 12 Love Cut Files Bundle for all your LOVEly photos! Thanks for reading and happy scrapping!
SUPPLIES: Patterned papers, stickers, die cuts, ellishments: SPLENDID; white cardstock; Cut file: Love Love Love from the 12 Love Cut Files by Paige Evans

Heart Doily Layout by Noelle Culp


Thursday, February 15, 2024

Hi crafty friends! Noelle Culp here today with a new layout using Paige's Heart Doily from the 14 Valentine Cut Files and her Blooming Wild and Splendid collections!
I love making Valentine layouts! Isn't it so fun to use pink? For this layout I started by cutting the Heart Doily from the 14 Valentine Cut Files from white cardstock and backed it with Paper 19 and Paper 23 from Blooming Wild and Paper 2 and Paper 23 from Splendid. I adhered my photo on Paper 2 from Blooming Wild and made flowers out of a mixture of plain and patterned pink papers using Paige's Layered Flower cut file. For my background I splashed a bit of dark blue paint and added strips of Paper 16 that I cut with a (very old) pair of decorative edge scissors. To finish I added a Journaling Spot behind the photo, a sentiment from the Cardstock Stickers, and a Puffy Phrase Sticker.
I love how this page turned out and I hope it inspires you to try making a layout with Paige's Heart Doily from the 14 Valentine Cut Files along with her Blooming Wild and Splendid collections!
SUPPLIES: Patterned papers, die cuts, stickers, embellishments: BLOOMING WILD and SPLENDID; white cardstock; Cut file: Heart Doily from the 14 Valentine Cut Files by Paige Evans

Love Heart Layout by Lisa Fonseca


Wednesday, February 14, 2024

Hello friends, Happy Valentine's Day! It's Lisa Fonseca back with a new layout using Paige's Love Heart for Stitching Cut File and her Blooming Wild collection!
To begin I cut the Love Heart for Stitching from white cardstock then stitched it with a normal backstitch using different shades of pink and red. To make the ombre effect seem more real I mixed the colors in the areas where I switched colors. After stitching I hand cut the heart out and adhered it with foam squares onto more white cardstock. Then I added a lot of fussy cut flowers from Blooming Wild patterned papers. After adding a photo of me and my friends I created the title with a mix of Thickers and word stickers from the Sticker Book. I sprinkled silver holographic heart and a bird Chipboard Stickers around the page and finished with a smattering of gold paint.
I hope this page inspires you to check out Paige's cut files and her Blooming Wild collection! See you again next time!
SUPPLIES: Patterned papers, stickers, Thickers, die cuts, embellishments: BLOOMING WILD; white cardstock; Cut file: Love Heart for Stitching by Paige Evans
Paige Taylor Evans © // Quinn Creatives DESIGN