Hello Gorgeous Layout by Phil Donahue


Thursday, January 30, 2025

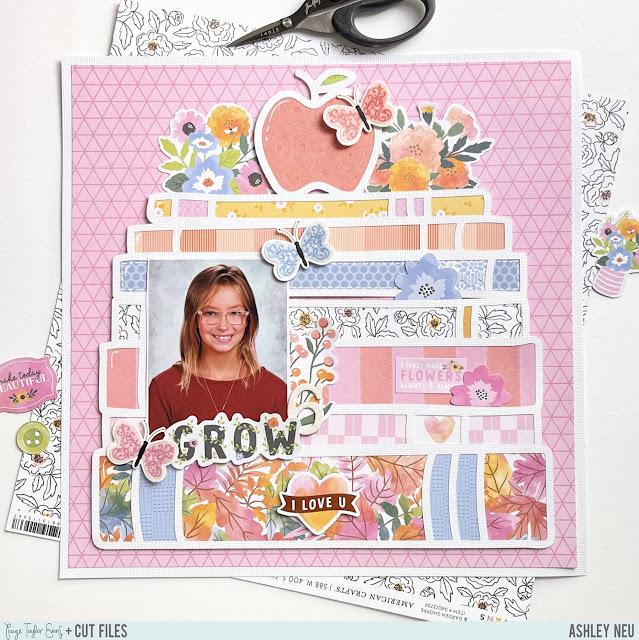
Hello scrappy friends! Phil Donahue here back on Paige's blog with a pretty pink floral layout featuring her Adventurous collection and Half-Flower cut file! This layout documents two beautiful black & white photos of my niece simply looking out of a window. I love documenting simple, beautiful moments like this one in my scrapbook layouts. They really do grow up so fast!
To begin, I cut the design out of white cardstock and backed with various pink papers from my scraps and the 12x12 Paper Pad. After realizing the page would look too flat for my liking, I decided to add a second layer of petals above, curling the edges to add more dimension and interest to the overall layout. I added the photos and cut file to the gold foil frame paper from the 12x12 Project Pad and added florals and leaves from the Floral Die Cuts around the page. I made my title using a Chipboard word and Puffy Sticker then added a strip of pink paper ribbon from the Sequins and Trims pack to complete the page! I hope you found some inspiration from this layout and choose to try Paige's Adventurous collection along with her Half-Flower cut file! Thanks for stopping by and happy scrapping!
SUPPLIES: Patterned papers, stickers, die cuts, embellishments: ADVENTUROUSwhite cardstock; Cut file: Half-Flower by Paige Evans

Fox the Gamer Layout by Paige Evans


Wednesday, January 29, 2025

Here is a layout I made for the Pinkfresh Studio May 2023 CREATE & CONNECT virtual event using the Lovely Blooms collection which I love how it can work for both Fox & Jane pages!
To create this layout, use the green plaid B-side of the Here & Now Paper for the background. Optional: splatter watered down white acrylic paint and green watercolors across the background then set it aside to dry. Find the center of the background by measuring with a ruler at 6” in and 6” down and make a mark with a pencil.
Use a 2½” hexagon punch to make (13) patterned paper hexagons from the collection papers and Journaling Bits. Optional: machine stitch with white thread around all the hexagons for a fun texture. Also punch (4) 2¾ x 2¼” photos into hexagons. When the background is dry (or speed up the drying time with a hair dryer), place a paper hexagon in the middle over the pencil mark then add the rest of the paper and photo hexagons around, leaving about a ¼” gap between each as shown. Don’t glue them down yet. Once you like the placement of everything, take a picture to refer back to in case things get moved around, flip all papers and photos over, add foam squares on the back, then attach them in place. 
Embellish the hexagons mostly tone-on-tone with Cardstock Stickers, pieces from the Ephemera PackChipboard StickersPuffy StickersJournaling BitsPuffy Alpha StickersFabric Ephemera, and handwritten journaling. Cut a 3” square of the grid Choose Happy Paper, cut it in half diagonally, then cut those triangles in half diagonally once more to create (4) triangles. Place a triangle in each corner of the page as a photo corner then an optional finishing step is to machine stitch around the border using white thread.

Adventurous Pages by Monique Lowe


Hello scrappy friends! Monique Lowe here today sharing pages from my Summer 2024 album using Paige's Adventurous collection along with her Alphabet for Stitching and Cityscape cut files. It is a work in progress, with lots of lovely adventures to still document but I’m delighted to have made a start! I began with a title page for the London stop of our summer travels with the title simply being "LONDON". I cut these letters using Paige’s Alphabet for Stitching from three patterned papers - Paper 11 and both sides of Paper 12. With the red, white a blue of the Union Jack in mind, I opted for similar colors but swapped the red for a deep raspberry pink instead. Using coordinating thread, I stitched around each letter and printed my photo to fill a 6x8 page. I placed the letters overlapping diagonally across my photo, added a boat Mini Puffy Sticker, and finished my page off with a pink pom pom trim.
The next two pages document a brief and unexpected visit to Canary Wharf. It was a Sunday so it was eerily quiet for such a busy business center but there was something quite magnificent and majestic about those enormous glass buildings dwarfing us as we walked by. The Cityscape cut file is of five connected buildings, however, I cut them each from different papers from Adventurous and worked with them individually. I raised each colorful building with foam adhesive and backed them with gray cardstock. I used Paper 1 for my background along with a strip of Paper 11 as a road beneath the row of buildings. I tucked a photo of one of the buildings between and backed a family selfie with Paper 14. I embellished around it using cut apart pieces from Paper 1, Floral Die Cuts, and tabs and tags from the Card Making Kit and Ephemera Die Cuts. I finished off the two pages with an airplane trail Rub On and my title made using Thickers and Mini Thickers. Last, but not least, I popped my three complete pages into the gorgeous 6x8 Album from Adventurous. 
I am so delighted to have finally started this project and look forward to adding in many more stories! Thank you for stopping by and I hope you feel inspired to document some of your own adventures using Adventurous!
SUPPLIES: Scrapbook album, patterned papers, stickers, die cuts, embellishments: ADVENTUROUSwhite cardstockgesso; Cut files: Alphabet for Stitching and Cityscape by Paige Evans

Love Layout by Kelly Daye


Tuesday, January 28, 2025

Hello scrappy friends! It’s Kelly Daye here, scrapping my best friend Nadine and family. I’ve paired Paige’s Love cut file with her classic Truly Grateful collection, and a whole lot of stitching!
I copied the title 4 times and welded them all together, cut it from white cardstock, and backed it with Paper 9. The background is Paper 24 and I back-stitched the entire sheet with complementary DMC threads. I manually made the holes for stitching and used all six strands of floss. It took me about 3 days, off and on. The focus of this layout runs diagonally with all the embellishments falling in that line. Flowers, birds, and butterflies always have my heart and I still love this collection so much!
SUPPLIES: Patterned papers, stickers, die cuts, enamel dots, embellishments: Truly Gratefulwhite cardstock; Cut file: Love by Paige Evans

Fun Fun Fun Layout by Jackie Ashton


Monday, January 27, 2025

Hello everyone, Jackie Ashton here with my next project using Paige's wonderful Adventurous collection and her Fun Fun Fun cut file.
I started my page by cutting the title from white cardstock, backed each letter with three patterned papers from 6x8 Paper Pad, then added foam tape behind the cut file so that it gave it some dimension to my layout. For my base paper I used two of the 12x12 patterned papers, Paper 1 and Paper 21, overlapping them at an angle and then machine stitching them in place, trimming the overlap so that the base still measured 12x12. Before adding my photograph to my layout, I added patterned paper from 6x8 Paper Pad behind, added foam tape to the left side so that it was on the same level as the cut file. To embellish my layout, I used tags from Paper 5 which I added above my photograph and pieces from the Sticker Book around the page. I finished my layout with some Enamel Stickers and Mini Puffy Stickers.
SUPPLIES: Patterned papers, stickers, die cuts, enamel dots: ADVENTUROUSwhite cardstock; Cut file: Fun Fun Fun by Paige Evans

Sweet Layout by Paige Evans


Sunday, January 26, 2025

Here is a layout I made for the Pinkfresh Studio CREATE & CONNECT virtual event back in May 2023 using the Lovely Blooms collection!
To create this page, trim off the barcode strip from the Colorful Triangles Paper to use as the background. If you’d like to add hand stitching, grab a paper piercer, foam mat, and ruler, and pierce a hole every half centimeter around the outer edge of each triangle. Make a chain stitch with matching colored thread through the holes. Each section took me about 20 minutes to stitch and I have a tutorial for the chain stitch HERE.
Adhere a 4x3” photo to the center then tuck die cuts and stickers underneath and overlap them on top of the photo as shown, sticking mostly to tone-on-tone embellishing. Continue adding embellishments tone-on-tone over the different blocks of color across the background to help tell the story and enhance the theme of the photo.
Tuck a journaling spot die cut under the photo and write journaling on top with a pink pen to finish.

New Collection from Paige Evans + American Crafts: HAPPY HAVEN!


Saturday, January 25, 2025

My 19th and last collection with American Crafts is called HAPPY HAVEN!
There are 24 products in this springy everyday line and when I receive my order (the estimated time of arrival is March) then I will put full collection kits for sale in MY SHOP so stay tuned! Take a look through this collection and let me know what inspires you most!
***************************************************************
Floral Transparency
12 Double-Sided Patterned Papers
Cardstock Stickers
Cardmaking Kit
Floral Die Cuts & Journaling Die Cuts
Foam Stickers
Mini Puffy Stickers & Washi Tape
6x8 Paper Pad
Acrylic Stamps & Tassel Charms
12x12 Project Pad
Thanks so much for stopping by and taking a look at my Happy Haven collection! And a big thank you to American Crafts! I started working there on January 2nd 2008 and my last day was January 2nd 2025 - 17 years to the day. I will forever cherish the opportunities and collections that we created together!

Paige Taylor Evans + Pinkfresh Studio!


Friday, January 24, 2025


Pinkfresh Studio is thrilled to announce that Paige Taylor Evans is officially joining the Pinkfresh Studio family! Paige is known for her vibrant, bold, and innovative designs and we are excited to bring her fresh, dynamic energy to the brand, making this a perfect match!
Paige’s artistic vision, combined with her deep passion for storytelling, will infuse Pinkfresh Studio with new energy. Her unique approach to design—blending bold patterns, vibrant colors, and heartfelt themes—aligns perfectly with Pinkfresh Studio's commitment to creating high-quality products that spark joy and creativity.
Together, Pinkfresh Studio & Paige Taylor Evans will launch an exclusive collection of designs that celebrate creativity, color, and the art of storytelling. We are excited to deliver stunning new products that inspire crafters of all skill levels to elevate their projects and express their personal style in fresh, exciting ways.
Stay tuned for more updates as Pinkfresh Studio prepares to unveil upcoming releases featuring Paige's signature touch. The future is bright, and there’s so much to look forward to!

LOVE Mini Album by Inessa Persekian


Thursday, January 23, 2025

Hey friends, Inessa Persekian back on the blog! I used Paige's Adventurous collection along with her Love Mini Album cut file to create this project. This cut file really grabbed my attention as a fun and cute way to document anything that you love! In this case, I'm focusing on my love of travel and am looking forward to filling up the album with my favorite photos.
The overall design was to use a mix of patterns and create sequin shakers in each letter, using sequins to coordinate with the paper color scheme. Each letter was sized to 4.22 inches in height, with the width adjusted proportionally. I cut each letter twice - once for the front and once for the back - to create shaker pockets filled with sequins. To make the backing pieces, I used the contour feature in the Cricut software; the equivalent in Silhouette may differ.
Letter L: Front & Back: Paper 17. Embellishments: "Let’s See the World Together" sticker, two floral ephemera, a puffy lemon sticker, and enamel dots. I added a 2x3 photo, a butterfly cut from Paper 19, the "Explorer" sticker, and a heart sticker to the backside.

Letter O (Heart Shape): Front: Paper 11 / Back: Paper 16. Embellishments: A 2x2 photo (backed on patterned paper), various stickers, and a puffy camera sticker. Backside: I added a 3x4 photo, flower stickers, and the "Wonderful" tag.

Letter V: Front: Paper 3 / Back: Paper 21. Embellishments: A 3x4 photo matted on Paper 17, a fussy-cut tag from Paper 21, stickers, a puffy arrow, and twine. Backside: A 3x3 and a 2x3 photo, stickers, and a fussy-cut tag with twine.
Letter E: Front & Back: Paper 20 for both sides. Embellishments: A 3x3 photo, a 2x3 photo, stickers, puffy stickers, and floral accents.
I bound the album with binder rings in various colors from my stash and added a metal charm - a hotel key tag from the collection. To finish it off, I tied coordinating ribbons to the rings. This mini album is ready for fun travel photos and has so much character with its shaker details and layered embellishments! I’m thrilled with how this turned out and hope you feel inspired to try something similar for your next project!
SUPPLIES: Patterned papers, stickers, die cuts, charm, embellishments: ADVENTUROUSwhite cardstock; Cut file: Love Mini Album by Paige Evans

Winter Wonder Layout by Heidi Lewis


Wednesday, January 22, 2025

Hello friends! It's Heidi Lewis here on the blog to brighten your day with a colorful winter layout made with a mashup of several Paige Evans collections and her Hat and Christmas Nordic Background cut files!
This layout was inspired by a page from Paige's December Daily 4x4 Sequin Album Class. Rather than stitching a background, I adapted the technique to back the Hat cut file to give it a knitted effect. I cut out a single backing piece for the hat and then stitched the entire thing over and over in Rainbow Threads. I gave the hat some extra pizazz with some Wonders Mini Puffy Stickers and Go the Scenic Route Enamel Dots. For my background, I blended olive green ink through the Christmas Nordic Background cut file. I balanced the sweater design on top of the page with Washi Tape and a border Cardstock Sticker from Wonders along the bottom of the page. I placed my hat in the center of the page and then created a cascade of snowflakes from Sugarplum Wishes layered with fussy cut mandalas around the hat. I tucked two round photos on either side of the hat. I left a blank space in the right-hand corner to create a title made from a combination of Wonders Thickers and Puffy Phrase Stickers. Hope you feel inspired to dig through your stash to make a colorful winter wonder layout!!
SUPPLIES: Patterned papers, die cuts, stickers, embellishments: WONDERS and SUGARPLUM WISHESwhite cardstock; Cut files: Hat and Christmas Nordic Background by Paige Evans

Hockey Layout by Audrey Mutschall


Tuesday, January 21, 2025

Hello friends! Audrey Mutschall here with a new layout using Paige’s Christmas Trees Striped design and her Sugarplum Wishes collection. It’s still cold and snowy here in Canada, so I’m using this time to scrapbook a few remaining Christmas photos while I’m still in the mood to create winter pages!
I chose a sheet of green patterned paper from the Bloom Street collection for the cut file (I’m trying to use up some of my stash), but any green cardstock would look great. I placed the cut file on a sheet of white cardstock and decorated the right side of the layout with a strip of Washi Tape, a border Cardstock Sticker, and a strip of Paper 7. Next I matted my photo with the opposite side of Paper 7 and a snowflake patterned paper from one of the Boxed Cards. Lastly, I decorated with fussy cut flowers from Paper 2, Enamel Dots, Mini Alpha Thickers, an Acrylic Sweater Sticker, and shiny star stickers from the 8-Page Sticker Book. I hope this inspires you to keep scrapbooking those Christmas memories with Paige’s Cut Files and Sugarplum Wishes!
SUPPLIES: Patterned papers, die cuts, stickers, washi tape: SUGARPLUM WISHESwhite cardstock; Cut file: Christmas Trees Striped by Paige Evans

Stack of Books Layout by Ashley Neu


Monday, January 20, 2025

Hi friends! It’s Ashley Neu here for the Paige Evans Cut File Design Team to share my next layout with you. It’s been a while since I’ve used Paige’s Garden Shoppe collection but wow, she brought together a beautiful fall collection with her unique designs and rainbow colors! I just love it so much. I cut out the Stack of Books cut file and got to work making a school-themed layout.
After cutting the Stack of Books from white cardstock, I backed it with papers found in the 12x12 Paper Pad and adhered it onto Paper 24 from the collection. The bottom book was the inspiration for the colors that I used for the rest of the books. I adhered my photo on top and added the “GROW” title that can be found in the Ephemera Die Cuts. The flowers from the Floral Die Cuts were perfect to embellish this beautiful stack of books so I tucked them in by my photo, between the books, and on the top behind the apple. Lastly, I added some finishing touches with more embellishments from the Ephemera Die Cuts as well as pieces from the Sticker Book and the gorgeous butterflies from the Dimensional Stickers. I hope you love this layout as much as I am enjoying it! Thank you for stopping by Paige’s blog and have a great day!
SUPPLIES: Patterned papers, stickers, die cuts, embellishments: GARDEN SHOPPEwhite cardstock; Cut files: Stack of Books by Paige Evans

Sandy Layout by Paige Evans


Sunday, January 19, 2025

Here is a layout I made for the Pinkfresh Studio CREATE & CONNECT virtual event back in September 2022 using the Chrysanthemum embellishments which a few things are still available at SBC and A Cherry On Top: Ephemera Die CutsChipboard Flair, Chipboard Frames & Cardstock Stickers.
Use my Grid for Stitching cut file to have an electronic cutting machine cut the holes through a 12x12” piece of white cardstock. Alternatively, use a ruler to make a 3x3 grid and pierce a hole every ⅛”. Hand stitch with a chain link stitch through the holes using white embroidery floss.

Add a 3” square photo to the center with foam squares for dimension. Fill in the grid with bits and pieces from the Chrysanthemum collection - layer little clusters in each grid for ultimate cuteness. Start with larger embellishments such as Chipboard Frames and Ephemera then add smaller things such as Cardstock Stickers and Chipboard Flair. Finish with the tiniest bits like Enamel Dots and Puffy Alphabet Stickers.

Finish by journaling on a piece of Ephemera using a coordinating colored pen. PS - it's so funny how much Sandy has changed since she was a kitten! Her face is now very dark brown and of course she's a chonkster :)
SUPPLIES: Chrysanthemum collection by Pinkfresh StudioEphemera Die CutsChipboard FlairChipboard Frames & Cardstock Stickers; Cut file: Grid for Stitching by Paige Evans; white cardstock; Electronic cutting machine: Cricut

Suitcase Mini Albums Live Virtual Class!


Friday, January 17, 2025

Join me on Saturday February 1st at 8am Pacific / 11am Eastern Time to learn how to fill these two Miniature Suitcase Mini Albums with the Coast to Coast collection by American Crafts!
I have sold out of kits however with the purchase of access to the virtual class you get the list of supplies that I use so you can find the same things or adapt and use your stash. These miniature suitcases would look adorable filled with ANY collection!
The live virtual class will take place on YouTube on Saturday February 1st 2025 at 8am Pacific/11am Eastern Time and will last approximately 2.5 hours during which we will create the projects to go inside the miniature suitcases. The larger suitcases can be found in sets of 12 from my Amazon shop HERE and the smaller suitcases can be found in sets of 6 from my Amazon shop HERE.
Inside the large suitcase is a binder ring style mini album made of 18 paper tags and (16) 3x4" photos. Hand stitching is optional, it's for looks only, but I do love the texture and pop of color it adds! 
Inside the small suitcase is an envelope mini album made up of 5 patterned paper envelopes filled with gift cards - the perfect present to give to loved ones headed out on an adventure!
The purchase of the virtual class also includes instructions for four 12x12 layouts using the same Coast to Coast collection!
After purchasing the Miniature Suitcase Mini Albums Class, Ecwid will email you the PDF that contains a list of craft supplies to have on hand, photo sizes, templates, cut files, instructions, and the YouTube link where the live class will take place on Saturday February 1st 2025 at 8am Pacific/11am Eastern Time. The video will be saved for re-watching whenever you have time.
Let me know if you have any questions, thank you so much, and have a happy scrappy day!
Paige Taylor Evans © // Quinn Creatives DESIGN