Choose Happy Layout by Paige Evans


Wednesday, February 19, 2025

One of the layouts that I taught how to create with the Lovely Blooms collection at the Pinkfresh Studio May 2023 Create & Connect virtual event included a pre-cut floral frame cut file. While the cut file isn't available anymore, I still want to show how you can use floral die cuts paired with floral cut files to create a happy layout!
Trim off the barcode strip from the pink striped B-side of the Be Pleasant paper to use as the background. Apply liquid glue carefully across parts of the back of the pre-cut floral frame cut file then attach it to the center of the page. Overlap (2) 3x4” photos on the upper right side, tucked under the flowers. Instead of backing an intricate cut file such as this beautiful floral frame with itty bitty patterned papers, another fun technique is to layer die cuts on top!
Grab flowers and leaves from the Floral Ephemera (I used 8 different die cuts from the pack) as well as one flower piece from the Fabric Stickers, gently shape and bend them to create texture, then add glue on the back center only so the edges can lift up off the page and create shadows. On the top right corner, cluster a “so cute” label and “love this” pennant from the Cardstock Stickers, small round green flower from the Chipboard Stickers, floral heart from the Fabric Stickers topped with a floral cluster from the Puffy Stickers, and three blue Enamel Dots.
Create the title on the left side in the gap between the flowers using two large Puffy Phrase Stickers. Below the title add a sentiment puffy sticker and a journaling spot from the Cardstock Stickers. Write journaling with a blue pen on the journaling spot then finish with three blue enamel dots below.
Thanks for stopping by! Let me know if you have any questions and have a happy scrappy day!

Love You Layout by Sophie Delorme


Hello friends! Sophie Delorme here with a new layout to share! I used a cut file from Paige called Love You Stitching Letters and her Adventurous collection.
I cut the title from white cardstock and stitched each letter alternating between pink and orange thread. I tore a strip of the striped Paper 7 and placed it on the upper part of the layout. I created a mixed media background using different tones of blue with Lindy's Gang magical powders from my stash. I printed my photo in black & white, added tissue paper and a few layers of patterned papers, and placed it just a little bit on the upper left of the page. I placed my big title in the center of my mixed media, with a part of it over my photo. I embellished the page with two floral clusters. I also fussy cut a few butterflies from Paper 19 and embellished with a few pieces from the Sticker Book. I hope that you like this layout perfect for the month of love!
SUPPLIES: Patterned papers, die cuts, stickers, embellishments: ADVENTUROUS; white cardstock; Cut file: Love You Stitching Letters by Paige Evans

Happy Heart Layout by Phil Donahue


Tuesday, February 18, 2025

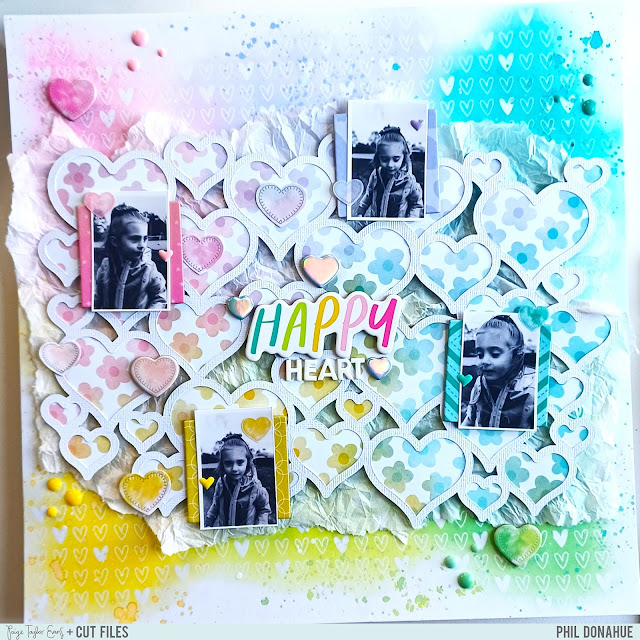
Hello scrappy friends! Phil Donahue here back on Paige's blog with a dreamy, pastel layout featuring her Hearts Background cut file along with the beautiful Blooming Wild collection. The rainbow background and colorful cut file allow the four black & white photos of my niece to pop off the page!
To begin, I cut the Hearts Background from white cardstock and backed it with the colorful Paper 12. I added foam adhesive to the back and added it to a layer of crumpled and torn tissue paper. I gathered coordinating Distress Oxides and brushed them on a 12x12 heart-patterned resist paper from my stash. I went around the page with the inks to reflect the colors in the floral paper. Next, I splattered watered down ink and white acrylic paint around the page to create even more interest. After some dry time, I adhered the cut file to the background. I matted the small photos on Chipboard Tiles then created my title with a word from the Chipboard Stickers along with white puffy stickers from my stash. Final touches were tone-on-tone hearts and embellishments from the Sticker Book, Cardstock Stickers, and 12x12 Project Pad. I hope you found some inspiration in this layout and choose to try Paige's Hearts Background cut file along with her Blooming Wild collection! Have a lovely day and happy scrapping!
SUPPLIES: Patterned papers, stickers, die cuts, embellishments: BLOOMING WILDDistress Oxideswhite cardstock; Cut file: Hearts Background by Paige Evans

Love You Layout by Monique Lowe


Monday, February 17, 2025

Hi scrappy friends! Monique Lowe here today with a new layout using Paige’s 12 Love Cut Files along with her Adventurous collection. I just had to document these sweet photos with a love-filled layout because these two girls (one furry and one human!) have my heart!
To start, I cut the Hearts Heart cut file twice - once from white cardstock and once from Paper 16. I then used a second sheet of Paper 16, opting for the B-side for my background. Taking the white cardstock cut file, I placed it in the center of my background and drew lightly around the outer edge with pencil. I used this line as a guide to poke evenly spaced holes around the entire heart and stitched along the line with white embroidery thread. For the purpose of this layout, the white cardstock cut file is merely a template (but I have saved it to use on another project so it’s definitely not wasted!). With this in mind, I taped it in place in the center of the stitching using a few pieces of washi tape. Then it was time for my favorite part! I began to fill in the little heart spaces like a jigsaw puzzle, using the matching hearts I had cut from the A-side of Paper 16. Some I raised up with foam squares and some I stuck directly onto the background, creating fun dimension. Once complete, I gently removed the white cut file, leaving only the little heart inserts on my page. I then backed my three photos with layers of tissue paper and coordinating patterned papers. I stuck closely with the colors from Paper 16, choosing to draw out the pinks and baby blue. I created two clusters diagonally across the page, embellishing with chipboard flowers and Floral Die Cuts. To add a bit of contrast, I used the navy Paper 11 for the Love You title as well as a few extra flowers using a metal die from my stash. Finally, with a few gold splatters and three clusters of Enamel Stickers, my layout was complete! Thank you for stopping by to read how my layout came together. I have a process video over on my YouTube channel - please come join me as I get creative with Adventurous and the 12 Love Cut Files. I hope you feel inspired to document some of your love stories too!
SUPPLIES: Scrapbook album, patterned papers, stickers, die cuts, embellishments: ADVENTUROUS; white cardstock; Cut files: Hearts Heart from the 12 Love Cut Files by Paige Evans

This is the Life! Layout by Paige Evans


Sunday, February 16, 2025

Hello scrappy friends! Today I'm sharing a layout that I made with the Coast to Coast collection by American Crafts and you can find the full instructions and Mountains for Stitching Cut File in my Coast to Coast Layouts Class PDF HERE!
With the paper scraps leftover from my Miniature Suitcase Mini Albums Class I pieced together six snow-capped mountains which set the scene for three photos of Fox at young men's camp last summer. Hand stitching details always add the perfect finishing touch and tons of texture. A die cut sun, airplane, seagull, and truck towing a camper are the little things that bring the page to life.
These paper pieced mountains would look fabulous with basically any collection - simply cut triangles of different sizes, layer them across the background, tuck photos into the mix, then sprinkle on embellishments! Done and done, cute and cuter!!
Thanks so much for stopping by! Let me know if you have any questions and I'd love for you to check out my Coast to Coast Layouts Class PDF with the instructions for four 12x12 layouts!

Love Family Time Layout by Kelly Daye


Thursday, February 13, 2025

Hello friends, Kelly Daye here celebrating the love of my family! This is me and my brothers last summer. I told them, “I’ll be a rose between the thorns”, and we all laughed. I’ve used Paige’s Flower Heart cut file and a combination of her classic Bloom Street and Horizon collections. Paige also has bundles in her shop dedicated to love themed cut files: 12 Love Cut Files & 14 Valentine Cut Files.
To begin, I made a circle frame in Silhouette Design Studio and cropped the center of the Flower Heart cut file; this way I didn’t have to paper back the entire cut file, only the part not covered by my photo. Then I chain stitched sequins around my photo. It’s popped up in the center with foam tape. The title was made with Paige’s Wonders Thickers and they’re still available! For a pretty background, I tore the bottom off of Bloom Street Paper 16 and added Horizon Paper 23. Don’t they coordinate perfectly? I love this about Paige’s collections, they can be mixed together with such a pretty effect. The floral embellishments are Horizon and the butterflies were fussy cut from Horizon Paper 7. Again, if you don’t have them in your stash, visit AC Digitals for all your favourite Paige Evans collections.
SUPPLIES: Patterned papers, stickers, die cuts, enamel dots, embellishments: Bloom Street and Horizon; white cardstock; Cut file: Flower Heart by Paige Evans

Squares Grid Layout by Paige Evans


Wednesday, February 12, 2025

When I received the Lovely Blooms collection for teaching at the Pinkfresh Studio May 2023 Create & Connect virtual event, I couldn't stop creating layouts!! I ended up making 8 layouts, 1 card, and a tag mini album. Here is the 4th of the 8 layouts featuring a grid background and five 2" square photos of Fox & Jane on the first day of school a few years ago:
The 12x12 Paper Pack packaging has miniature versions of all the papers included in the collection - this is an amazing paper to use for scrapbooking so don’t throw it away, use it! The images are just under 2" square and I cut them all apart and used 20 of 24 of them on my page. Then, trim off the barcode strip from the blue striped The Best Day paper to use as the background. Find the center by measuring with a ruler at 6” in and 6” down and make a mark with a pencil.
Place the 20 paper squares along with (5) 2” square photos in a 5 x 5 grid across the background using the pencil mark as a guide to place the center square first. Arrange the other papers and photos with about a ¼” gap between. Don’t glue anything down yet. Move the squares and photos around until you like the way it looks. I tried to space similar colored papers out and mix up the placement of the pictures but it could also be fun to put them in an ombre order or even at an angle! Once you like the placement, take a picture to refer back to in case things get moved around, flip all papers and photos over, add foam squares on the back, then attach them in place. Embellish the squares with little stickers, die cuts, enamel dots, and more! 

My Boy Layout by Jackie Ashton


Hello friends! Jackie Ashton here with my next design team layout using Paige's Adventurous collection and her Heart Garden from the 12 Love Cut Files.
I cut the Heart Garden from white cardstock and backed the hearts with papers from the 6x8 Paper Pad. I wanted to add a patterned border to my layout, so I trimmed the white cardstock down to 11.5”, distressed the edges, and added it to Paper 7. I then machined stitched around the edges of the white cardstock to add extra texture. Before adding the cut file to the page, I added Distress Ink to the background to form a shadow behind each heart. Using the same papers from the 6x8 Paper Pad, I added them behind my photograph, staggering the layers and adding foam tape behind to give it dimension on my layout. To embellish my layout I used phrases and flowers from the Sticker Book and mini hearts from the Mini Puffy Stickers. For the title I used the Mini Thickers. Thanks for stopping by!
SUPPLIES: Patterned papers, stickers, die cuts, Thickers: ADVENTUROUS; white cardstock; Cut file: Heart Garden from the 12 Love Cut Files by Paige Evans

Love You Layout by Inessa Persekian


Tuesday, February 11, 2025

Hey friends! It’s Inessa Persekian back on the blog with a new 12x12 layout featuring the Love You Stitching Letters and her Adventurous collection. I had so much fun creating this page and incorporating lots of texture, stitching, and layered details!
To start, I hand stitched each letter using a chain stitch with three beautiful shades of DMC thread: 600, 605, and 778. Once the letters were stitched, I splattered some gold Glimmer Mist onto the background to add a subtle shimmer. To do this, I poured a bit onto a piece of transparency, picked it up with a paintbrush, and flicked it onto the page. This technique framed the stitched letters beautifully! After the mist dried, I adhered my stitched letters, centering them about 1.5 inches from the top of the white cardstock. For the "O"s, I backed them with two photos of me and hubby then popped them up with foam adhesive to make them stand out. I also used a circular chipboard frame over the top "O" for extra dimension. Below the letters, I added 3 ribbons from the Ribbon & Sequins Mix and they really accentuate the letters. I machine stitched a white border around the page using my sewing machine. I fussy cut butterflies from Paper 19 and adhered them so they looked like they were fluttering across the page. I added a chipboard floral cluster, tucked in a bit of white thread, and placed enamel dots in the centers of the flowers. For the year "2024", I used small Foam Thickers to mark this memory. To complete the layout, I sprinkled some sequins from the Ribbon & Sequin Mix for a little extra sparkle. I absolutely love how much texture and dimension this layout has - it turned out gorgeous! I hope it inspires you to try some stitching on your next project. Happy crafting, and I’ll see you next time!
SUPPLIES: Patterned papers, stickers, die cuts, charm, embellishments: ADVENTUROUS; white cardstock; Cut file: Love You Stitching Letters by Paige Evans

Love 2 Travel Layout by Heidi Lewis


Monday, February 10, 2025

Hello friends! It's Heidi Lewis here today and I made a love-themed layout with the Adventurous collection and Love Heart for Stitching cut file to document one of my all time favorite dates - ziplining in Hawaii with my hubby!
I started this layout by cutting the Love Heart for Stitching cut file from white cardstock and stitching it with a chain link stitch using all six strands of DMC white embroidery floss. Then I filled the entire heart with Washi Tape stamps. I used an entire roll of washi tape, but it was worth it! To help my photos pop against the busy background, I placed them behind the Polaroid Frame Border cut file. Then I built three embellishment clusters around the outside of the heart using a combination of Cardstock Stickers, Mini Puffy Stickers, and the 8-Page Sticker Book. One of my favorite details on the page is a dangling Charm held in place by a Washi Tape bow. This layout can be easily adapted to any travel-themed photos so I hope you feel inspired to recreate it!
SUPPLIES: Patterned papers, die cuts, stickers, washi tape, charm, embellishments: ADVENTUROUS; white cardstock; Cut files: Love Heart for Stitching and Polaroid Frame Border by Paige Evans

Hey You (Fringed Paper Strips) Layout by Paige Evans


Sunday, February 9, 2025

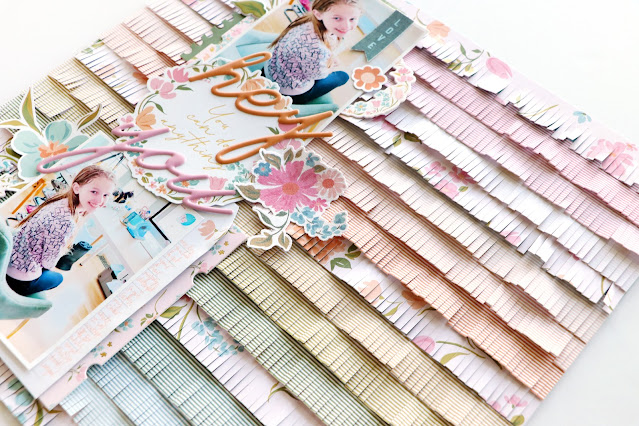
Here is a layout I made for the Pinkfresh Studio May 2023 Create & Connect virtual event using the Lovely Blooms collection featuring fringed paper strips for an uber textured effect!
I started with a sheet of smooth white cardstock for my background but it can be any color in your stash because it will get completely covered up. Next, trim off the barcode strip from the striped Spread Love paper and cut the stripes into individual strips. Also trim (5) 1 x 12” strips from the floral Start Somewhere paper. Use fringe scissors to snip along the edge of every strip, leaving ¼” uncut at the top. Add liquid glue across the back of the top of the bottom fringed paper strip and add it to the bottom of the background. Add liquid glue across the back of the top of the next fringed paper strip and overlap it slightly above the previous strip. Continue adding glue and layering the fringed paper strips all the way up the background. I placed 1 floral, 3 striped, 1 floral, 3 striped, 1 floral, 3 striped, 1 floral, 3 striped, and finished with 1 last floral fringed paper strip. Ruffle up the fringe to create texture and interest on the background. 
Attach (2) 3 x 4” photos on the left side with adhesive only in the middle so you can tuck embellishments underneath the edges. Adhere a large floral wreath sentiment from the Ephemera Pack to the middle between the photos and top with two Puffy Phrase Stickers. Tuck a green journaling card from the Journaling Bits under the left edge of the top photo. Cut a floral frame Chipboard Sticker in half and tuck one half under the left edge of the top photo and the other piece under the right edge of the bottom photo. Tuck a tag from the Journaling Bits under the right edge of the bottom photo and write journaling on top with a peach pen. Cut a floral wreath Chipboard Sticker in half then tuck one piece under the right edge of the top photo and the other piece under the left edge of the bottom photo. Embellish with floral Ephemera, floral and leaf Puffy Stickers, and floral Fabric Ephemera in clusters as shown.
After creating the dimensional background I didn't want to cover a whole ton of it up so by clustering my photos, title, and embellishments over on the left side the fringe is the star of the show on the right side!
Thanks for stopping by and have a happy scrappy day!

Stitched Adventure Layout by Paige Evans


Saturday, February 8, 2025

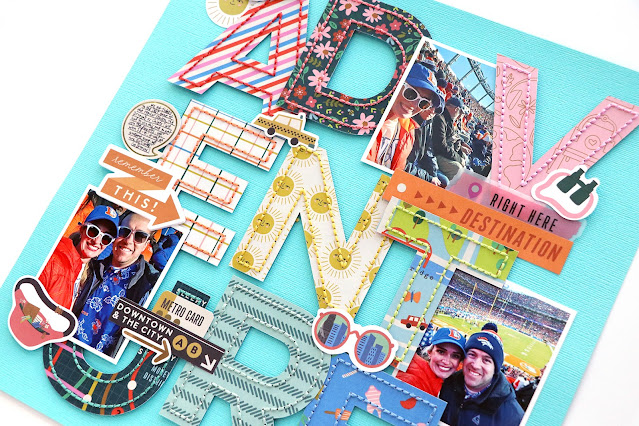
Hello scrappy friends! Happy Saturday! Popping in to share a layout that I made with the Coast to Coast collection by American Crafts and you can find the full instructions and Adventure Letters for Stitching Cut File in my Coast to Coast Layouts Class PDF HERE!
It's no secret that I love hand stitching. And patterned paper. And big titles. And the Broncos!! I combined lots of these techniques together on one 12x12 layout and after stitching the Adventure Letters with a basic backstitch this page came together quickly. It took about 20 minutes to stitch each letter so 9 letters x 20 minutes = about 3 hours of invested stitching time. Totally worth it!
The photos I scrapped are of me & Chris at a Broncos game and I had fun including lots of little meaningful icons such as a sun and sunglasses because it was very sunny, a cowboy hat because, well, Broncos!, binoculars because we were in the nosebleeds, a metro card and subway die cut because we took public transportation to the event, a pretzel and snacks because we got treats at the game, a fanny pack because I couldn’t bring a big purse, etc! It’s a page full of fun surprises! PS - go Broncos and we won this game against the Chiefs 38-0! Touchdown after touchdown after touchdown!
Thanks so much for stopping by! Let me know if you have any questions! Be sure to check out my Coast to Coast Layouts Class PDF for not one, not two, not three, but four awesome 12x12 layout instructions! 

Alaska Cruise & Crop with Paige Taylor Evans


Friday, February 7, 2025

Join me on an amazing Alaskan Cruise & Crop July 24th-31st 2026 - so not this summer, but NEXT summer :) We'll set sail from Seattle, Washington on the Voyager of the Seas then on the two days at sea enjoy 3 classes learning how to make a variety of projects such as layouts and a mini album using the freshest product! All of the details, itinerary, registration & more can be found HERE.
Every person gets at least 3 feet of crafting space and the cropping room is open 24/7 so you can scrap all day and night!
Non-scrappers are welcome on the cruise too! I'm bringing my whole family!
I'll have giveaways, goodies, and a pop up shop!
Limited spots available!
Let me know if you have any questions & hope to SEA you there!

Mandala Layout by Audrey Mutschall


Thursday, February 6, 2025

Hello friends! Audrey Mutschall here with a new layout featuring Paige’s Heart Mandala from her bundle of 14 Valentine Cut Files and her Go the Scenic Route collection! This is an older collection, but it’s still available to purchase digitally or you may have it in your stash, like me!
I used white cardstock for the cut file and then backed it with the pink watercolor Paper 13, mint watercolor Paper 2, and navy mandala Paper 11. I kept it really simple so the beautiful design of the cut file wouldn’t be overpowered by lots of different colors and patterns. My background paper is also a watercolor paper, this time from the Bloom Street collection. My photo is embellished with a few Ephemera Die Cuts, fussy cut flowers, and a butterfly. I hope this inspires you to check out Paige’s 14 Valentine Cut Files for all your projects celebrating those you love!
SUPPLIES: Patterned papers, die cuts, stickers: GO THE SCENIC ROUTE and BLOOM STREET; white cardstock; Cut file: Heart Mandala from the 14 Valentine Cut Files by Paige Evans

Love Love Love Layout by Ashley Neu


Wednesday, February 5, 2025

Hi friends! It’s Ashley Neu here for the Paige Evans Cut File Design Team to share a fun love-themed layout with you all! I have used Paige’s Garden Shoppe collection to document these adorable photos of my daughter after playing with some Snapchat filters. She’s not allowed to have Snapchat so when she’s given permission to play with the Snapchat filters on mom’s phone, a fun mini photo session is held! This layout features the Love Love Love title found in Paige’s 12 Love Cut Files bundle.
I love the look of a photo strip with square photos so I created one for this layout. I cut the title out from Paper 5 and adhered it onto Paper 2. Next, I adhered that photo strip over the letter ‘Os’ which I felt was the perfect spot for them! I kept the title and embellishments pretty simple. I used a foam sticker from the Thickers Phrase Stickers as the title and layered it over the photos. I grabbed a yellow journaling piece from the Journaling Die Cuts and added some florals around the photo found in the Dimensional Stickers and Cardstock Stickers. I also added a tiny phrase sticker from the Sticker Book. To finish off the layout I used a white gel pen and drew faux stitching around the perimeter of the background. I hope you have found some inspiration from this layout! Thank you so much for stopping by Paige’s blog today and have a wonderful day!
SUPPLIES: Patterned papers, stickers, die cuts, embellishments: GARDEN SHOPPE; white cardstock; Cut file: Love Love Love from the 12 Love Cut Files by Paige Evans

Celebrate Layout by Valerie Bisson


Tuesday, February 4, 2025

Hi crafty friends! Valerie Bisson here today and I’m so happy to to share my next scrapbook layout with you featuring Paige's Celebrate cut file and her Adventurous collection with a bit of Blooming Wild.
I started by choosing a dark blue cardstock for my background and splattered white acrylic paint across the page. Then I cut the title from white cardstock and backed it with various patterned papers from the 12x12 Paper Pad and the 12x12 Project Pad. I added an offset layer behind the cut file in gold foil paper then adhered it all with foam squares. Since I was making a birthday page, balloons seemed like the right addition to my layout. I used 3 chipboard hearts from Paige’s Blooming Wild collection and added hand stitching around the hearts and stitched strings to create my balloons. Next I added pieces from the Cardstock Stickers, stickers from the 12x12 Project Pad, Mini Foam Thickers in 3 spots around the page, and word stickers from the 8-Page Sticker Book. The finishing touch for this page were the gold stars from the Sequins & Trims scattered throughout the layout. I hope you’re inspired to start creating with Paige’s cut files and collection!
SUPPLIES: Patterned papers, stickers, die cuts, embellishments: ADVENTUROUS & BLOOMING WILDwhite cardstockwhite acrylic paint; Cut file: Celebrate by Paige Evans

Happy Place Layout by Sophie Delorme


Monday, February 3, 2025

Hello crafty friends! It's Sophie Delorme on Paige's blog today with a new layout created with the gorgeous Adventurous collection and her Frame cut file.
I cut the Frame from white cardstock and backed it with several patterned papers that I selected from the 6x8 Paper Pad and a solid color from the 12x12 Project Pad. I stitched on the frame and added foam dots behind it to make it stand out on my white background. I fussy cut many beautiful flowers out of Paper 10 and embellished all around the frame with them. I selected my title from the Puffy Phrase Stickers, added a tag, a few other stickers, and some enamel dots around the frame. I also placed Paper 12 on the bottom of the layout, where I tore the edge of my white cardstock background. I hope this will give you some new ideas to try! Thank you for stopping by and happy crafting!
SUPPLIES: Patterned papers, die cuts, stickers, embellishments: ADVENTUROUSwhite cardstock; Cut file: Frame by Paige Evans

Back to School Layout by Paige Evans


Saturday, February 1, 2025

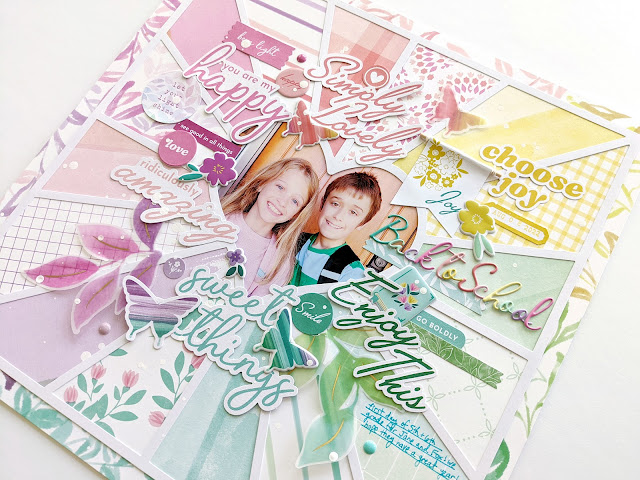
Here is a layout I made for the Pinkfresh Studio September 2022 CREATE & CONNECT virtual event using the Delightful Collection and my Heartburst cut file to document a back-to-school photo of Fox & Jane!
Gut a 10” square from the center of the rainbow leafy Chase Beauty Paper. Back a Heartburst cut file with patterned papers in colors following the background paper and fill the center heart with a photo.
Embellish tone-on-tone centering around the heart using bits and pieces from the Title Ephemera, Ephemera, Hanging Banners, Chipboard Flair, Vellum Embellishments, and Cardstock Stickers. Add the largest pieces first, followed by smaller pieces, and finish with the tiniest things like Enamel Dots and the Puffy Stickers. Leave a gap for the title on the right side.
Add a title overlapping the right edge of the photo using the Puffy Alphabet Stickers then journal with a blue pen in the bottom right wedge. Splatter white acrylic paint over the entire layout to tie it all together (be sure to cover the photo with scrap paper before splattering). To finish, glue the entire backed cut file centered onto the gutted rainbow leafy Chase Beauty Paper.

January 2025 Highlights


Here's what we were up to in January 2025! Finally a more calm month with no traveling or huge holidays :)
Chris and I went to the 1000th regular season Broncos game! Cool eh?
Got all our Broncos merch on to support our team!
We drove to an RTD parking garage then took the train a couple stops to the Mile High Stadium or whatever it's called now, I swear it has changed names 5 times since I've known Chris.
Let's goooooooo!
Hi Bo Nix!
Even though it was cold, with the sun shining we were nice and toasty.
Hi Patrick Mahomes! The Chiefs benched their best players since they had already got 1 seed and home field advantage, no point injuring them.
The Broncos won 38-0, Andy Reid's first shutout. We made it to the Playoffs for the first time in like 8 years!
Before we left we walked down to the lower levels. Wow those are much better seats than the nosebleeds lololol. And we saw another touchdown!!
I know people have a lot of opinions about this game, but all I know is it was FUN to go to!
Of course the Chiefs are going to the Super Bowl to get their three-peat, vs the Eagles. I can't wait to watch!
A couple selfies, one right after I signed my new contract with Pinkfresh Studio and another right before I went live with Pinkfresh Studio to make the big announcement!
I love pink as you can tell from my sweatshirt and watch - this new flavor of Red Bull is right up my alley! It's delicious but lots of sugar gives me zits so I had a pack of 4 cans over the course of a week and not anymore since.
It has snowed so much and been soooooooooo cold.
I bribed the kids to go on a walk but they lasted literally 30 seconds so I did not pay up.
Chris and I went on a date to Shanahan's Steakhouse in Denver where he has all his rings and trophies on display which was really neat to see in real life!
The food was aight, mostly just a fun atmosphere and spending time with my hubby.
I'm so domestic, making the kids a grilled cheese and burnt (at her request) nachos! If you know me, you know this is an achievement, I don't cook. Unless absolutely necessary haha.
Jane got a new church 'fit! She's so darling!
The kids either didn't have school for break or it was canceled because of snow/freezing temps, so I took them to MOD Pizza for lunch.
More cutie patootie Jane.
I think I'm going to try functional medicine and had my first consultation. I'm very hopeful to be rid of headaches once and for all.
Exercising is going well!
Spent some time straightening these frames in our bedroom.
The bathroom got finished!!!
I absolutely love how it turned out.
I know it's not for everyone, but it is for me :)
We have no plans to move anytime soon so I am having SO MUCH FUN putting our own personal stamp on all the rooms.
Yes it's a purple toilet closet!
Patterns, textures, colors, all my favorite things. Oh and of course flowers!!
Now what should we renovate?? The kids are begging for their bathroom to be redone.
*****************************************
Onto the kitty cats! Aren't they the sweetest snuggling me on either side?
1) They haven't been on this same gray blanket together in a long time so I had to document. 2) Every morning they follow me into the basement while I exercise and 3) eventually Amy goes on top of a Kallax so I have to lift Sandy up their too. 4) Birdwatching.
She looks like a Best in Show dog lol.
Oh Sandy. She is omnipresent and loves each of us equally.
I can't even Amy, hehehe.
She's still my snugglemuffin.
*****************************************
Onto the scrappiness! This is what a clean slate/fresh start looks like. I boxed up all my AC collections and put them in a safe place.
I shared a mini album, scrapbook, and 3 12x12 layouts in January! Click the links to see them in more detail:
I announced my last collection with American Crafts called Happy Haven!! When I receive my order I will put full collection sets in
MY SHOP and announce on socials so stay tuned.
HUGE NEWS!!! I am joining Pinkfresh Studio! Our first two collections will release in May and I'm soooooo stinkin' excited and happy!
Registration is now open to the Crop & Create Delivered Papercrafting Event by Scrapbook & Cards Today with all these talented teachers! Plan your weekend with us and find out what classes you’ll take by visiting HERE to get all of the details of this fun-filled virtual scrapbooking event! In my class we'll use Happy Haven to create a single 12x12 layout and a double-page spread! We can't wait to create, get inspired & find joy in our hobby - together!!
I spent the first part of January prepping for my Suitcase Mini Album Kit & Live Virtual Class! Here's a snapshot of me collating the coordinating threads and ribbons with my su'purr'visor Amy.
We put all the kits together on a Saturday morning.
The following Tuesday I released the kits to my PaigePals and they sold out the first day - thank you!!! You can still join the virtual class TODAY which includes a PDF with all the supplies you need to have. The video is saved for rewatching whenever you have the time.
All the kits boxed up and ready to go to their new owners!
Trying to figure out Ecamm again, technology is not my favorite sometimes...
I've tried so many different set ups. I think I'm giving up doing lives, they just stress me out sooooo badly. Pre-recorded for the win.
Sneaks of my February kit & class which I plan to release to my PaigePals on February 18th!
I'll end with one more sneak of an upcoming album for a kit & class!! EEEEK!!! Gi DeMello is AMAZING! She brings all my visions to life!
Have a happy scrappy February!
Paige Taylor Evans © // Quinn Creatives DESIGN